SScheduler User Manual (For Ward Managers)
User Guide for Ward Managers (Head Nurses)
Where should I start?
First time using the app?
- Sign up & log in → create an account
- Onboarding (one-time) → set up ranks, shift codes, staffing patterns, etc.
- Review the schedule → check the auto-generated schedule
- Use the AI copilot → add rules, adjust shifts
- Finalize & share → distribute the schedule to nurses
Have you already created schedules before and need next month's?
- Check the staff roster → add new staff, remove departures, update information
- Check ward shift information → review changes to staffing patterns and other onboarding settings
- Prepare the monthly schedule → select the month, review off-shift information, upload the wanted file
- Review the schedule → Use the AI copilot → Finalize and share (Details: sections 3 → 4 → 5)
1. Sign Up and Login
Sign Up
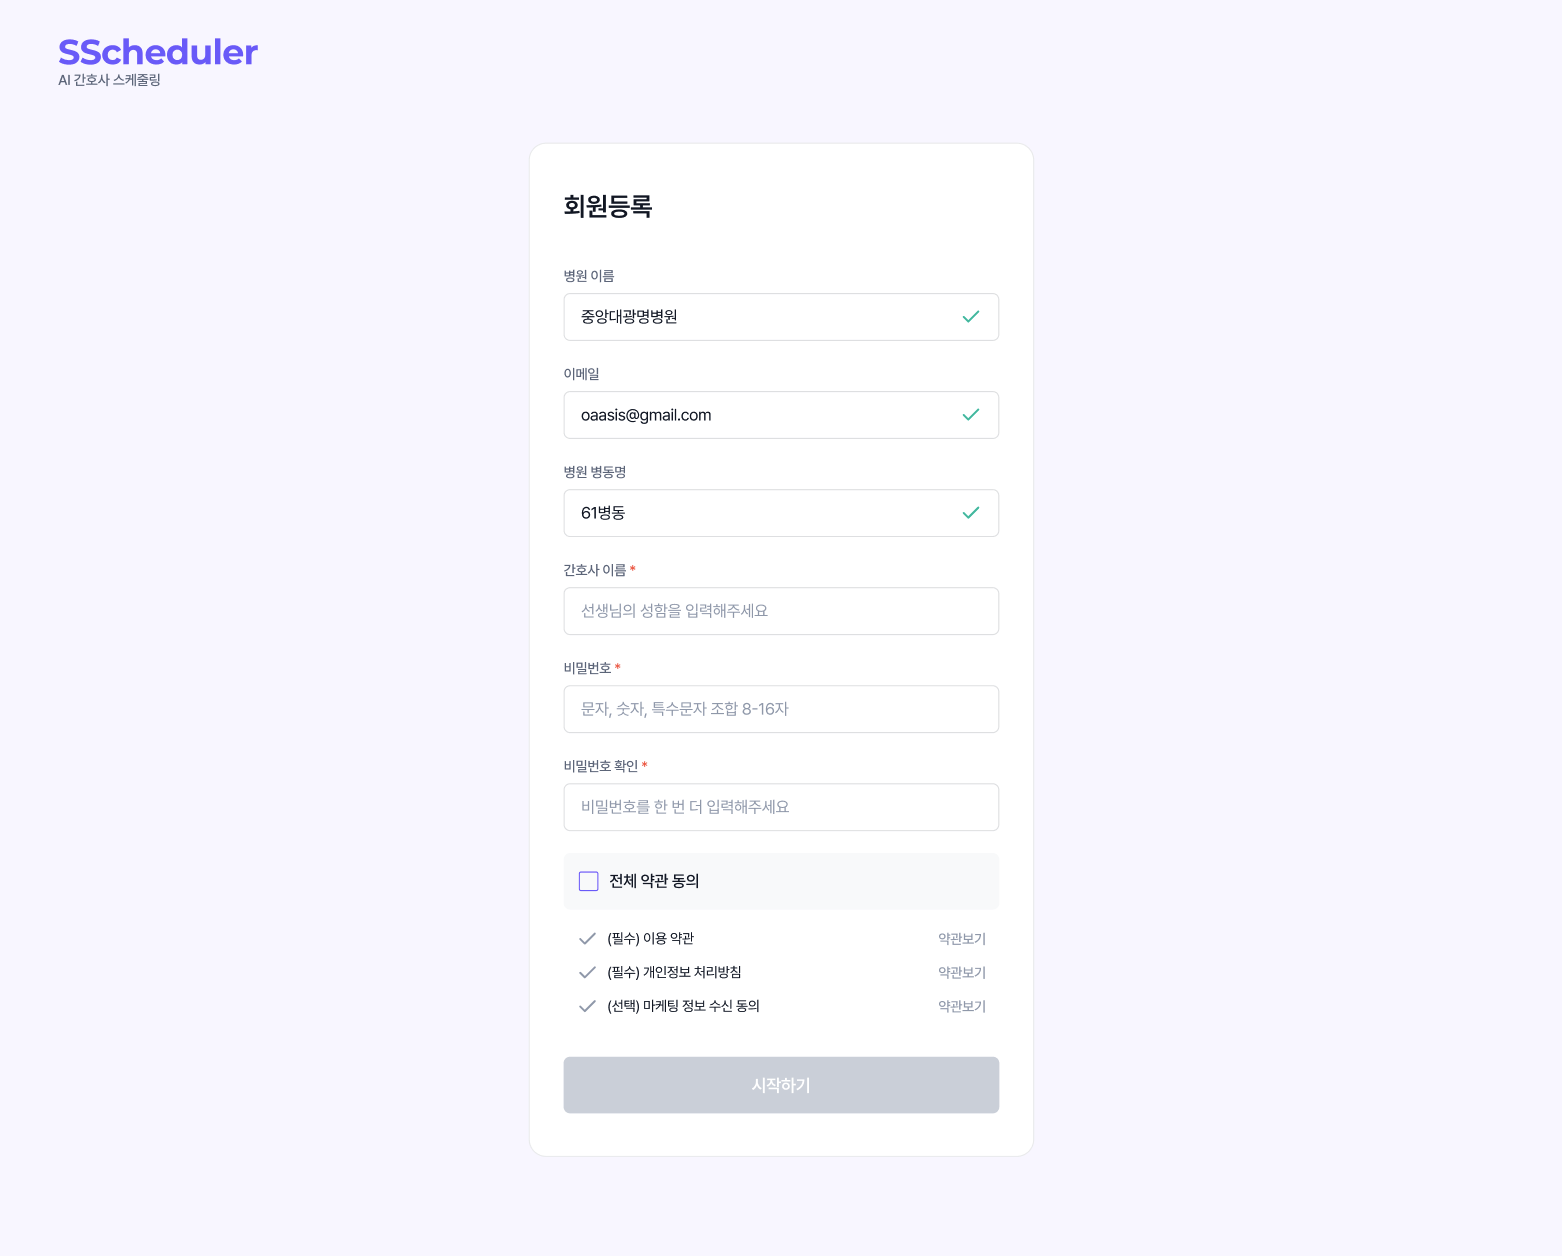
Click the invitation link sent by your hospital administrator to open the Sign Up screen.
- Hospital Name / Ward Name are filled in automatically via the invitation link.
- Enter your Name / Password manually.
Your password must contain uppercase letters + lowercase letters + special characters.
Login
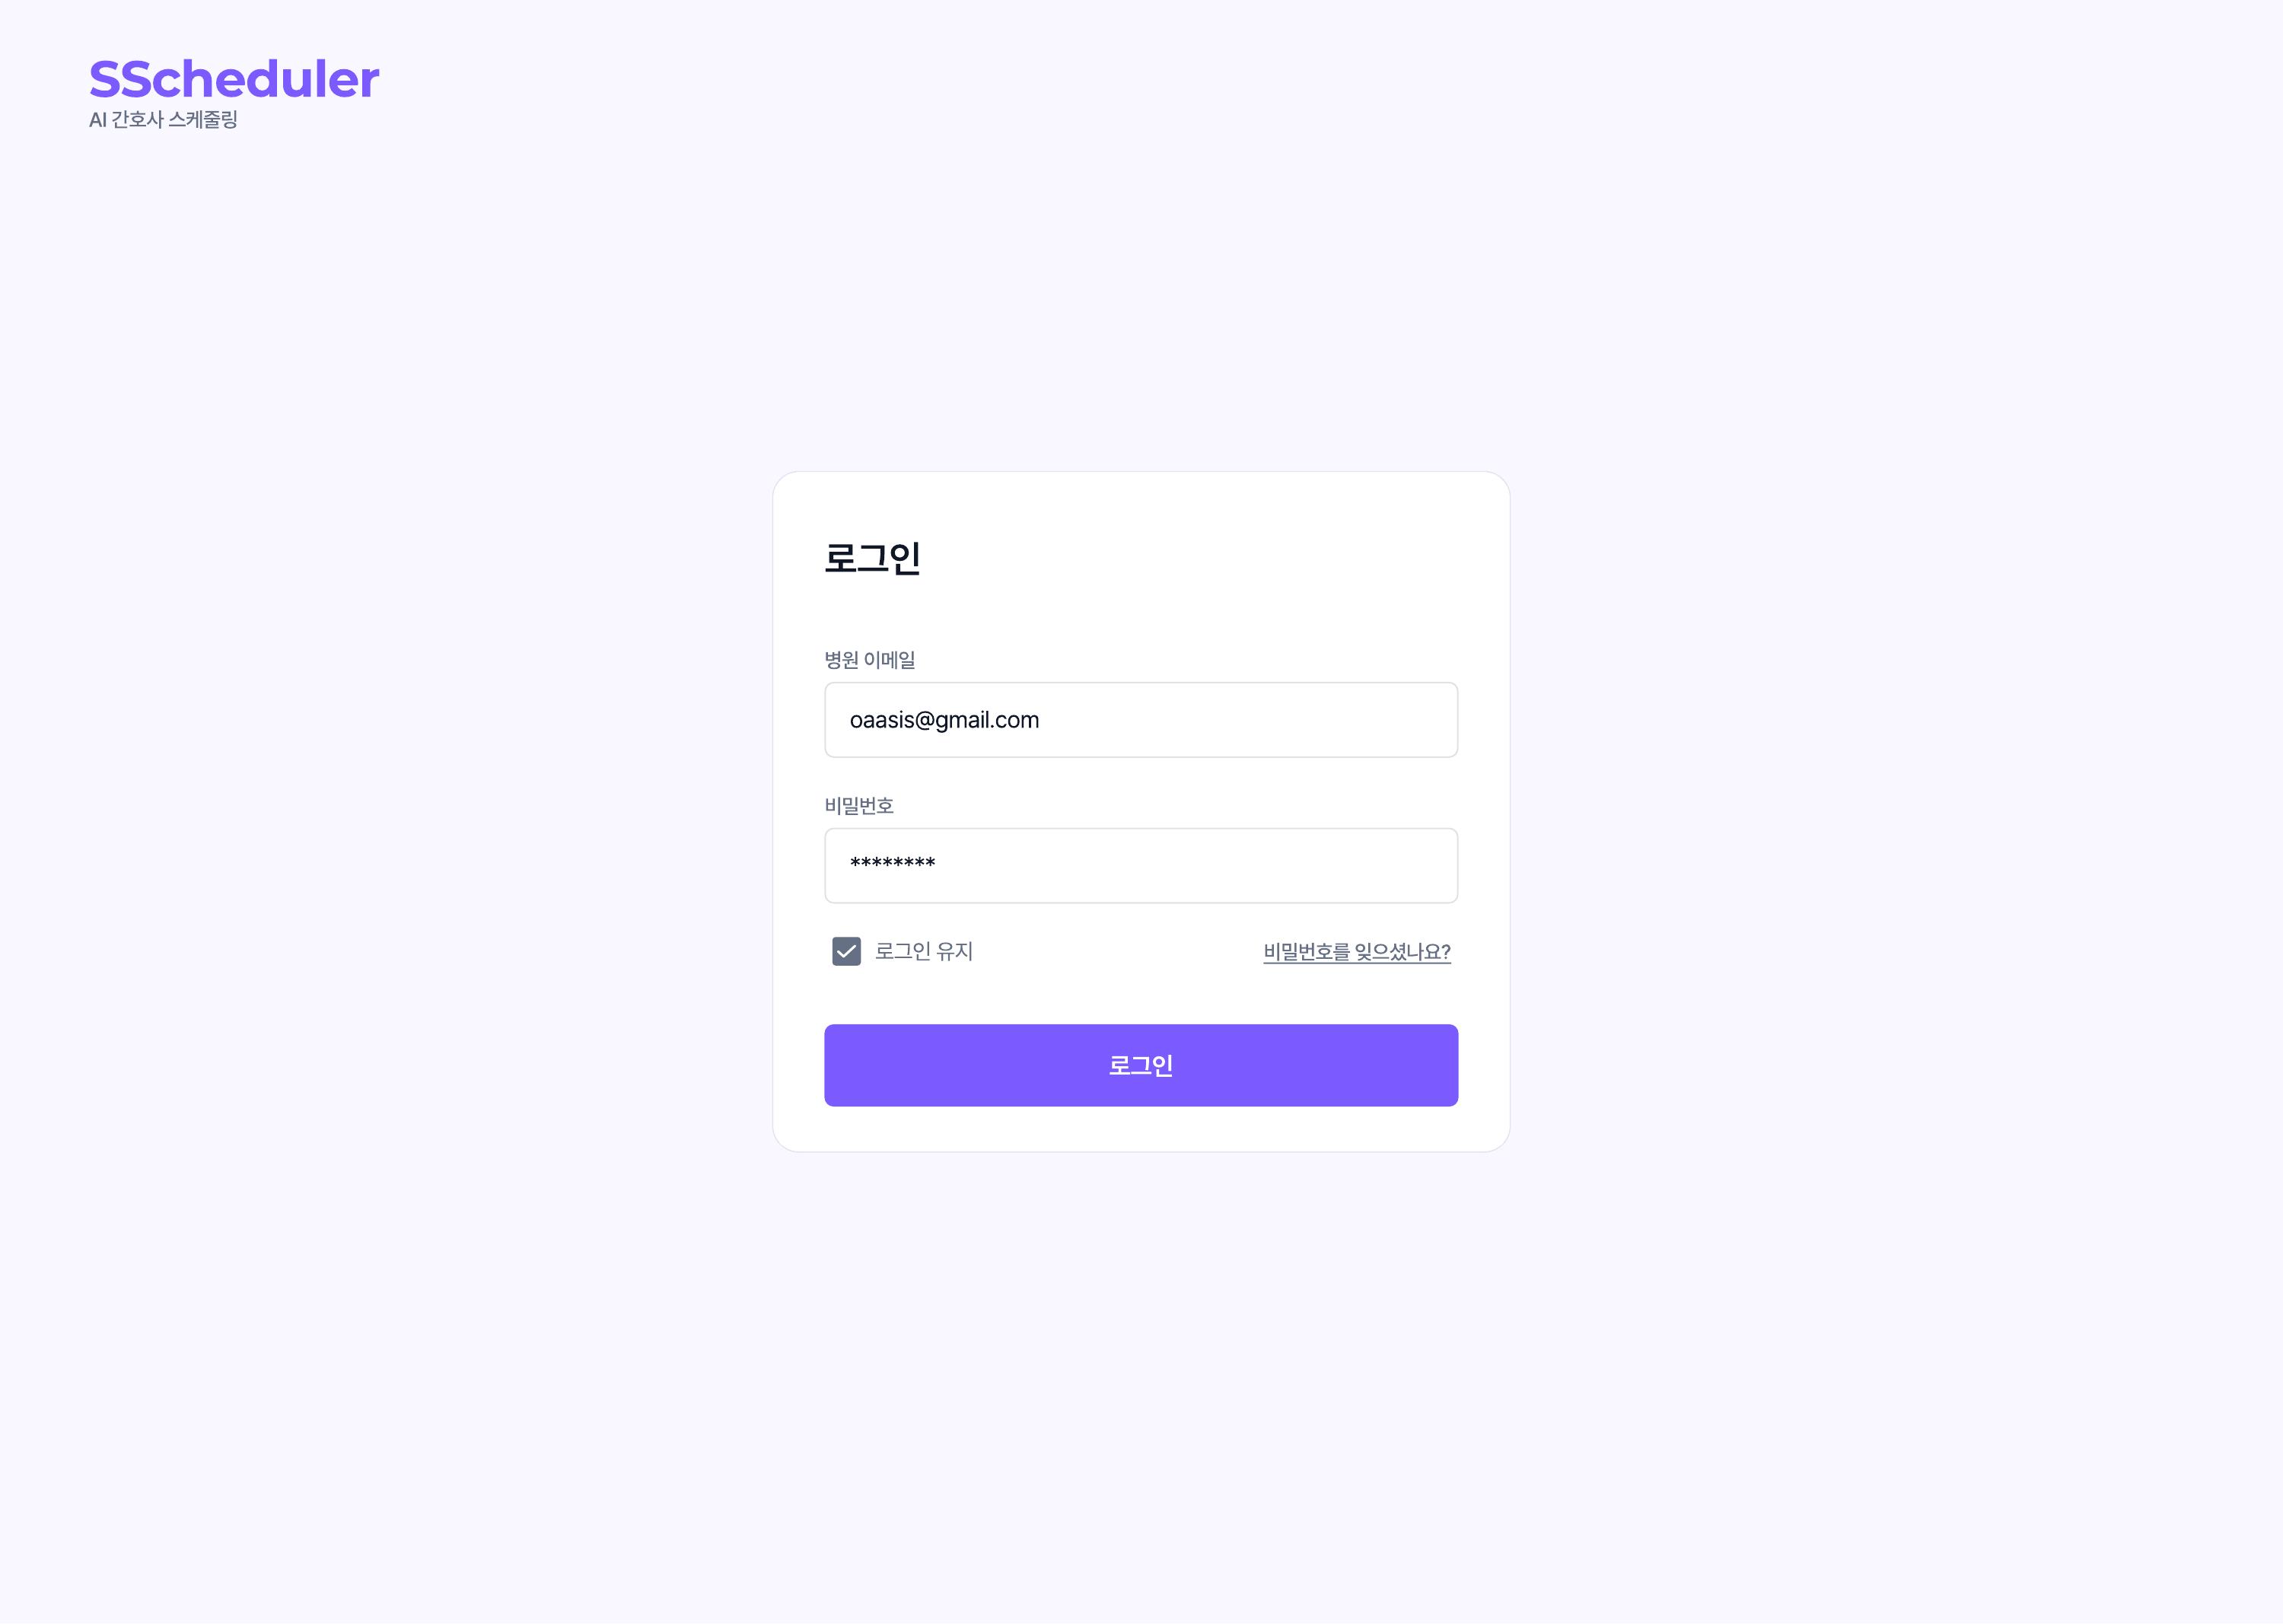
- After registering, log in at https://sscheduler.oaasis.cc/.
2. Onboarding (One-time Setup)
On your first access, complete the 3-step setup: Staff Information → Shift Settings → Data Upload
2-1. [Required] Staff Information Settings
Register the criteria used to classify nurses in your ward. Configure the 4 tabs in order.
① Rank (Seniority)
- Among the default items, uncheck any ranks not used in your ward.
- If a new rank is needed, add it with + Add Item.
② Work Capability (Skill Level and Assignment Conditions)
Work capability determines which staff a staffing pattern applies to. General wards often group nurses by skill level, such as senior, mid-level, and new nurses. In departments with more complex conditions, also consider the shift codes and days each person can work.
- Uncheck default items that are not used in your ward.
- Add new items with + Add Item.
- Separate staff into different work capabilities if their assignment conditions differ, even when their skill level is the same.
Group staff into one work capability only when the same staffing pattern can apply to all of them.
Separate groups when:
- Available shift codes differ.
- Some staff must be included in or excluded from a particular shift.
- e.g., If only some junior on-call staff cannot work weekends, use separate groups for `Junior On-Call` and `Junior On-Call — No Weekends`.
- Weekday or weekend availability differs.
③ Off-Shift Codes
- Expand each category dropdown and uncheck off-shift codes not used in your ward.
- For codes not in the list, add them with + Add Item.
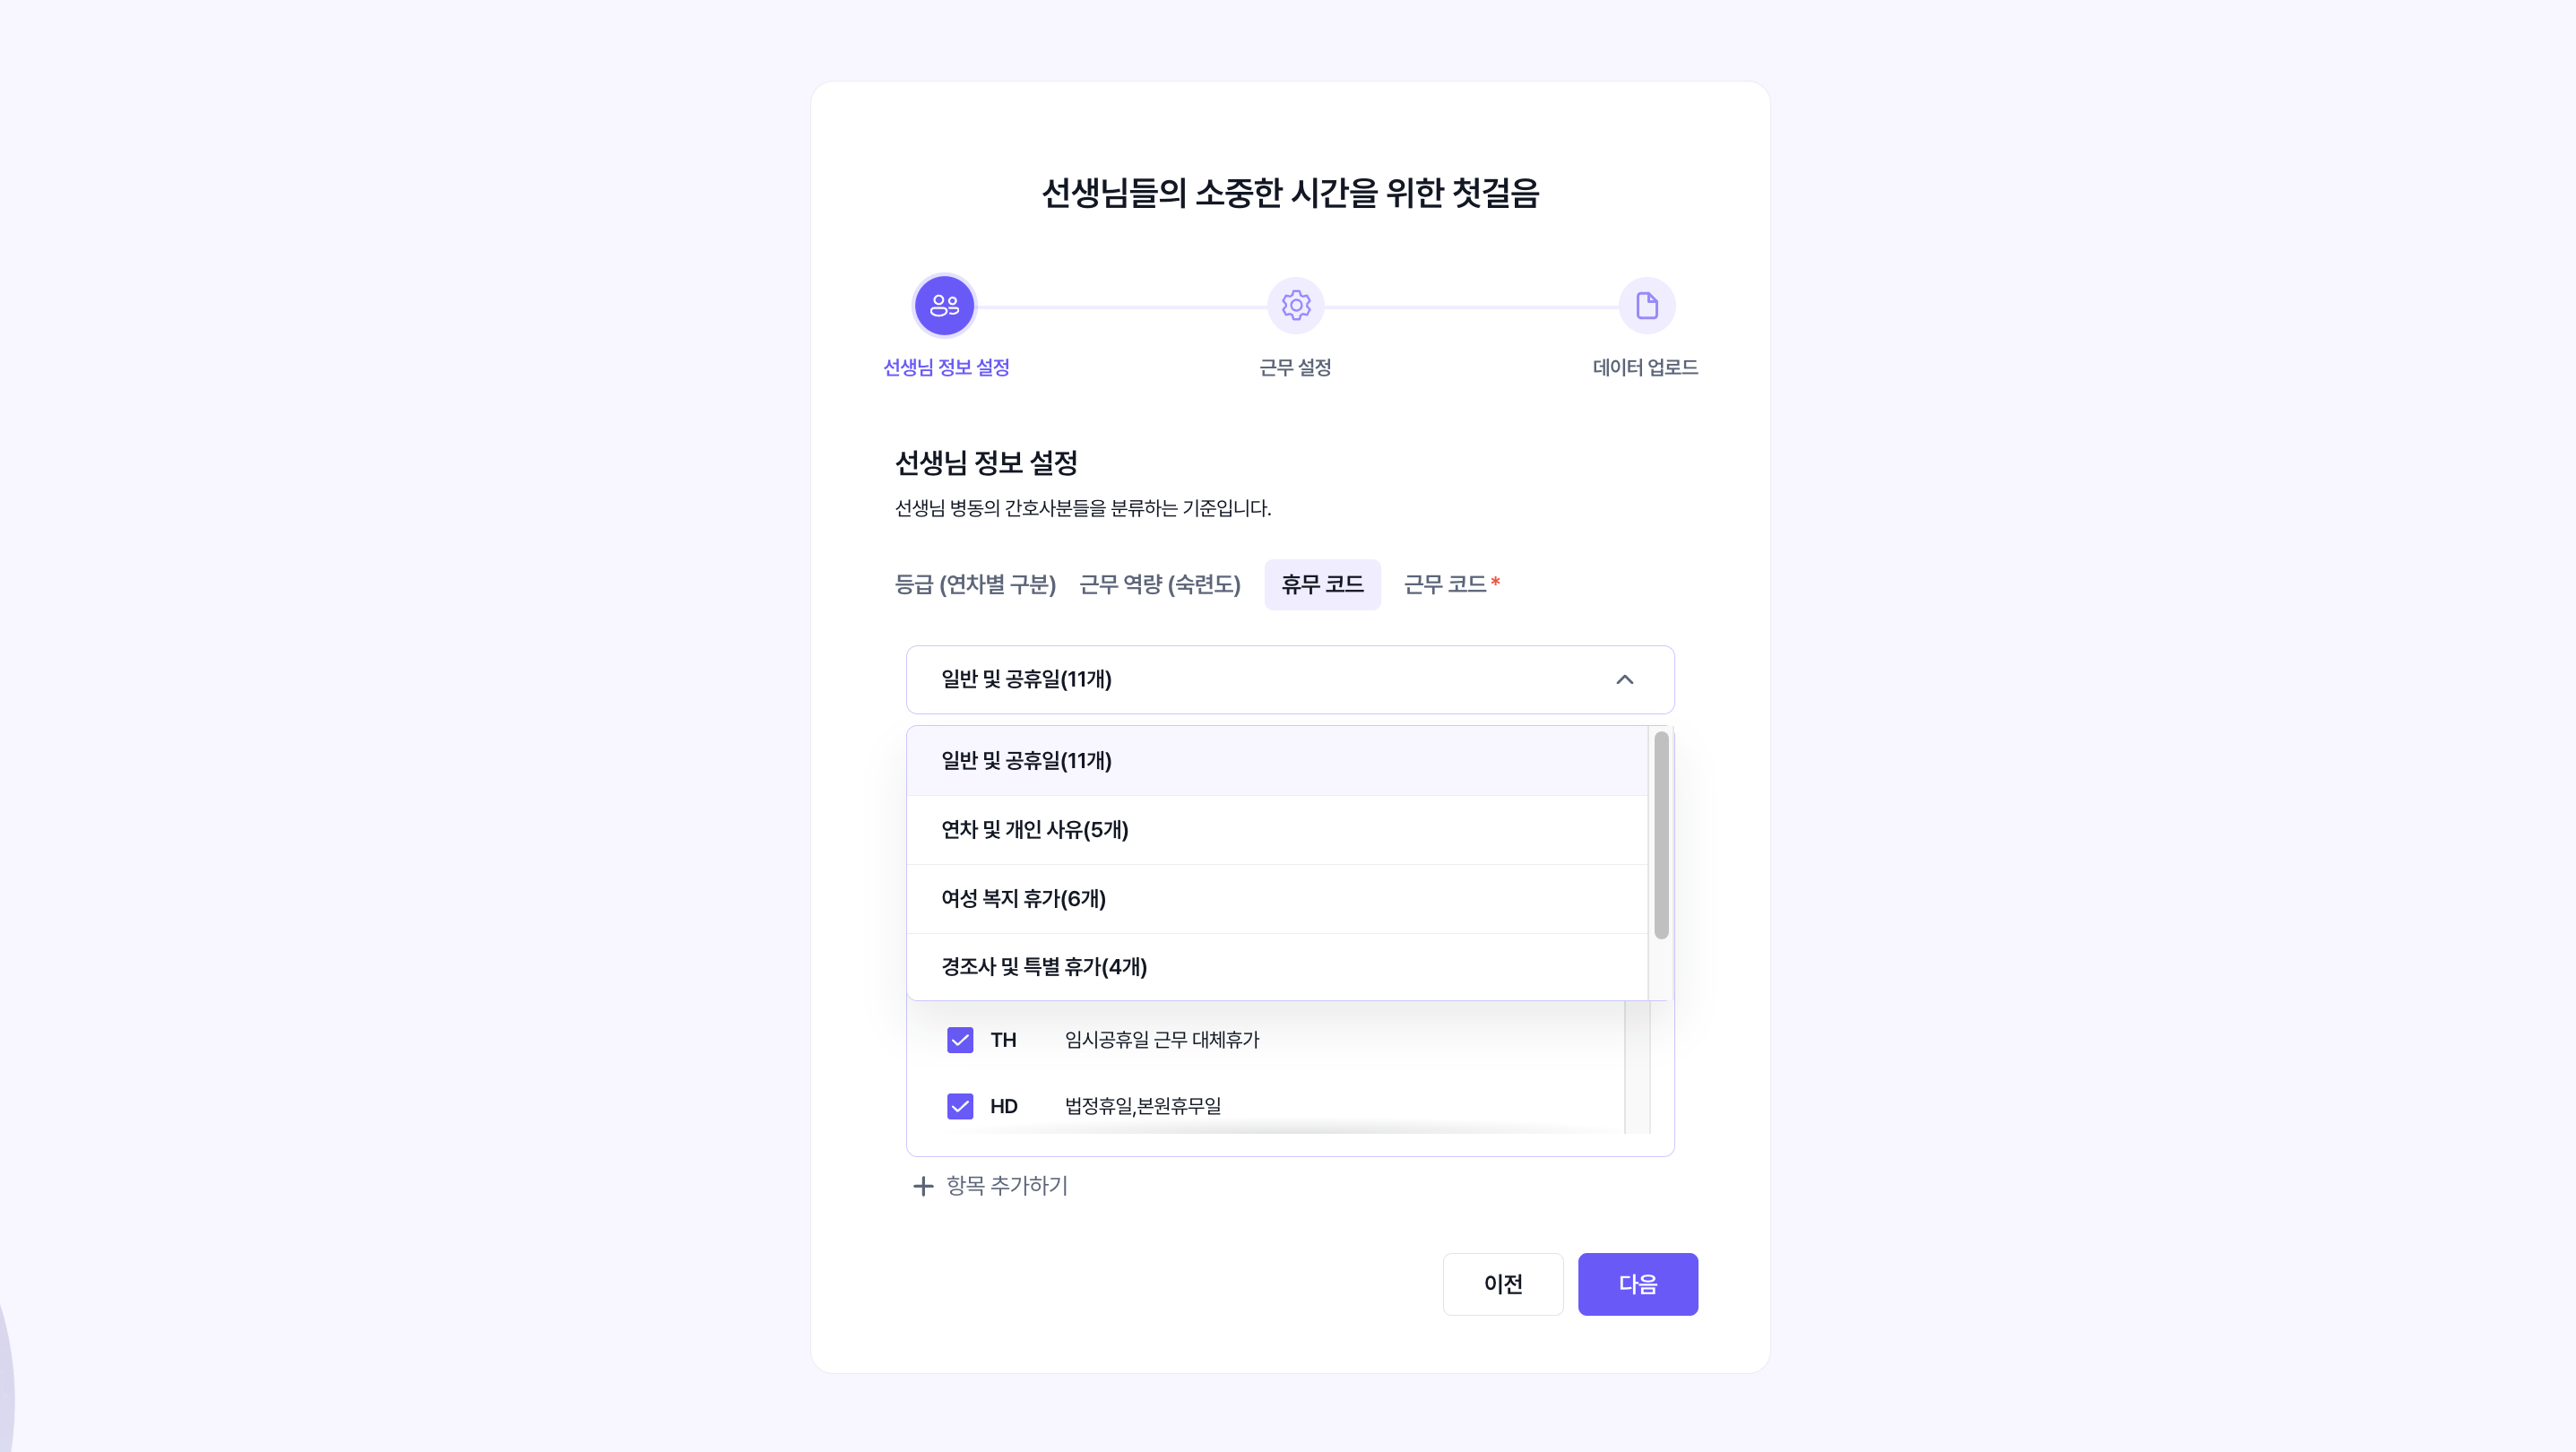
④ Shift Codes
- Expand each category dropdown and uncheck shift codes not used in your ward.
- For codes not in the list, add a new shift code with + Add Item. You must enter the working hours together with the code name.
2-2. [Required] Shift Settings
Register the working methods and patterns required for schedule generation.
① Shift Type
Each staff member belongs to one shift type and can be assigned only the shift codes registered in it. Include all shift codes the person may actually be assigned, not just the most frequently used codes.
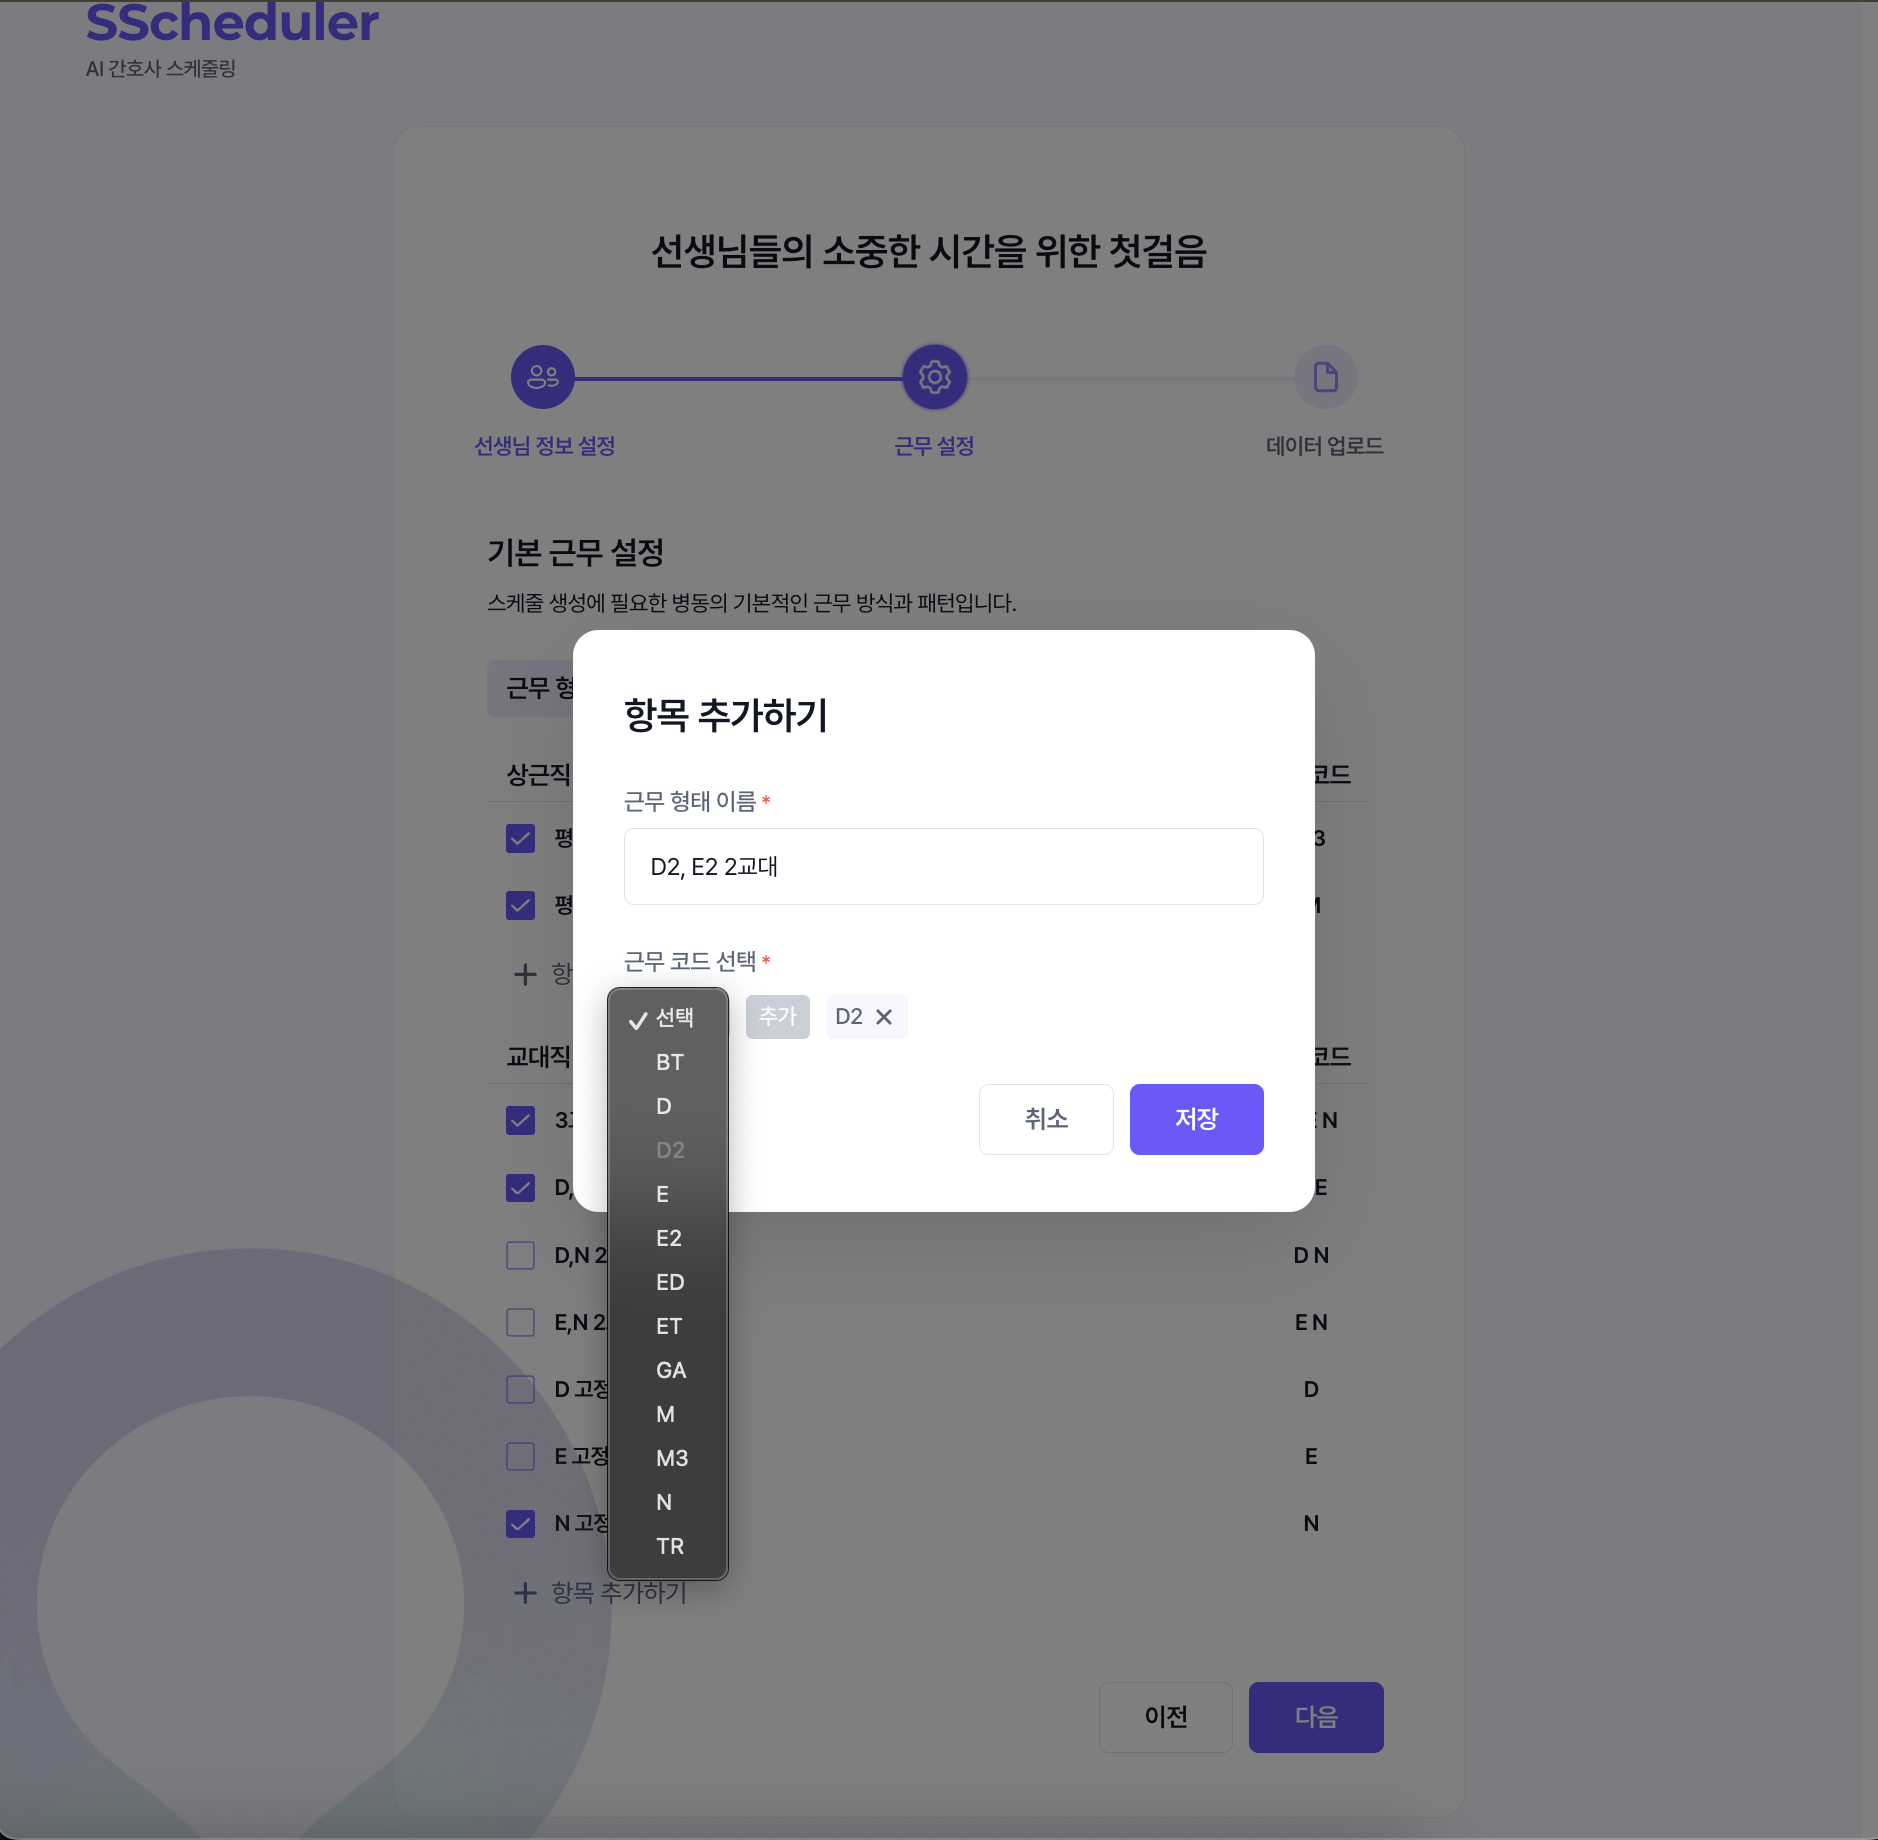
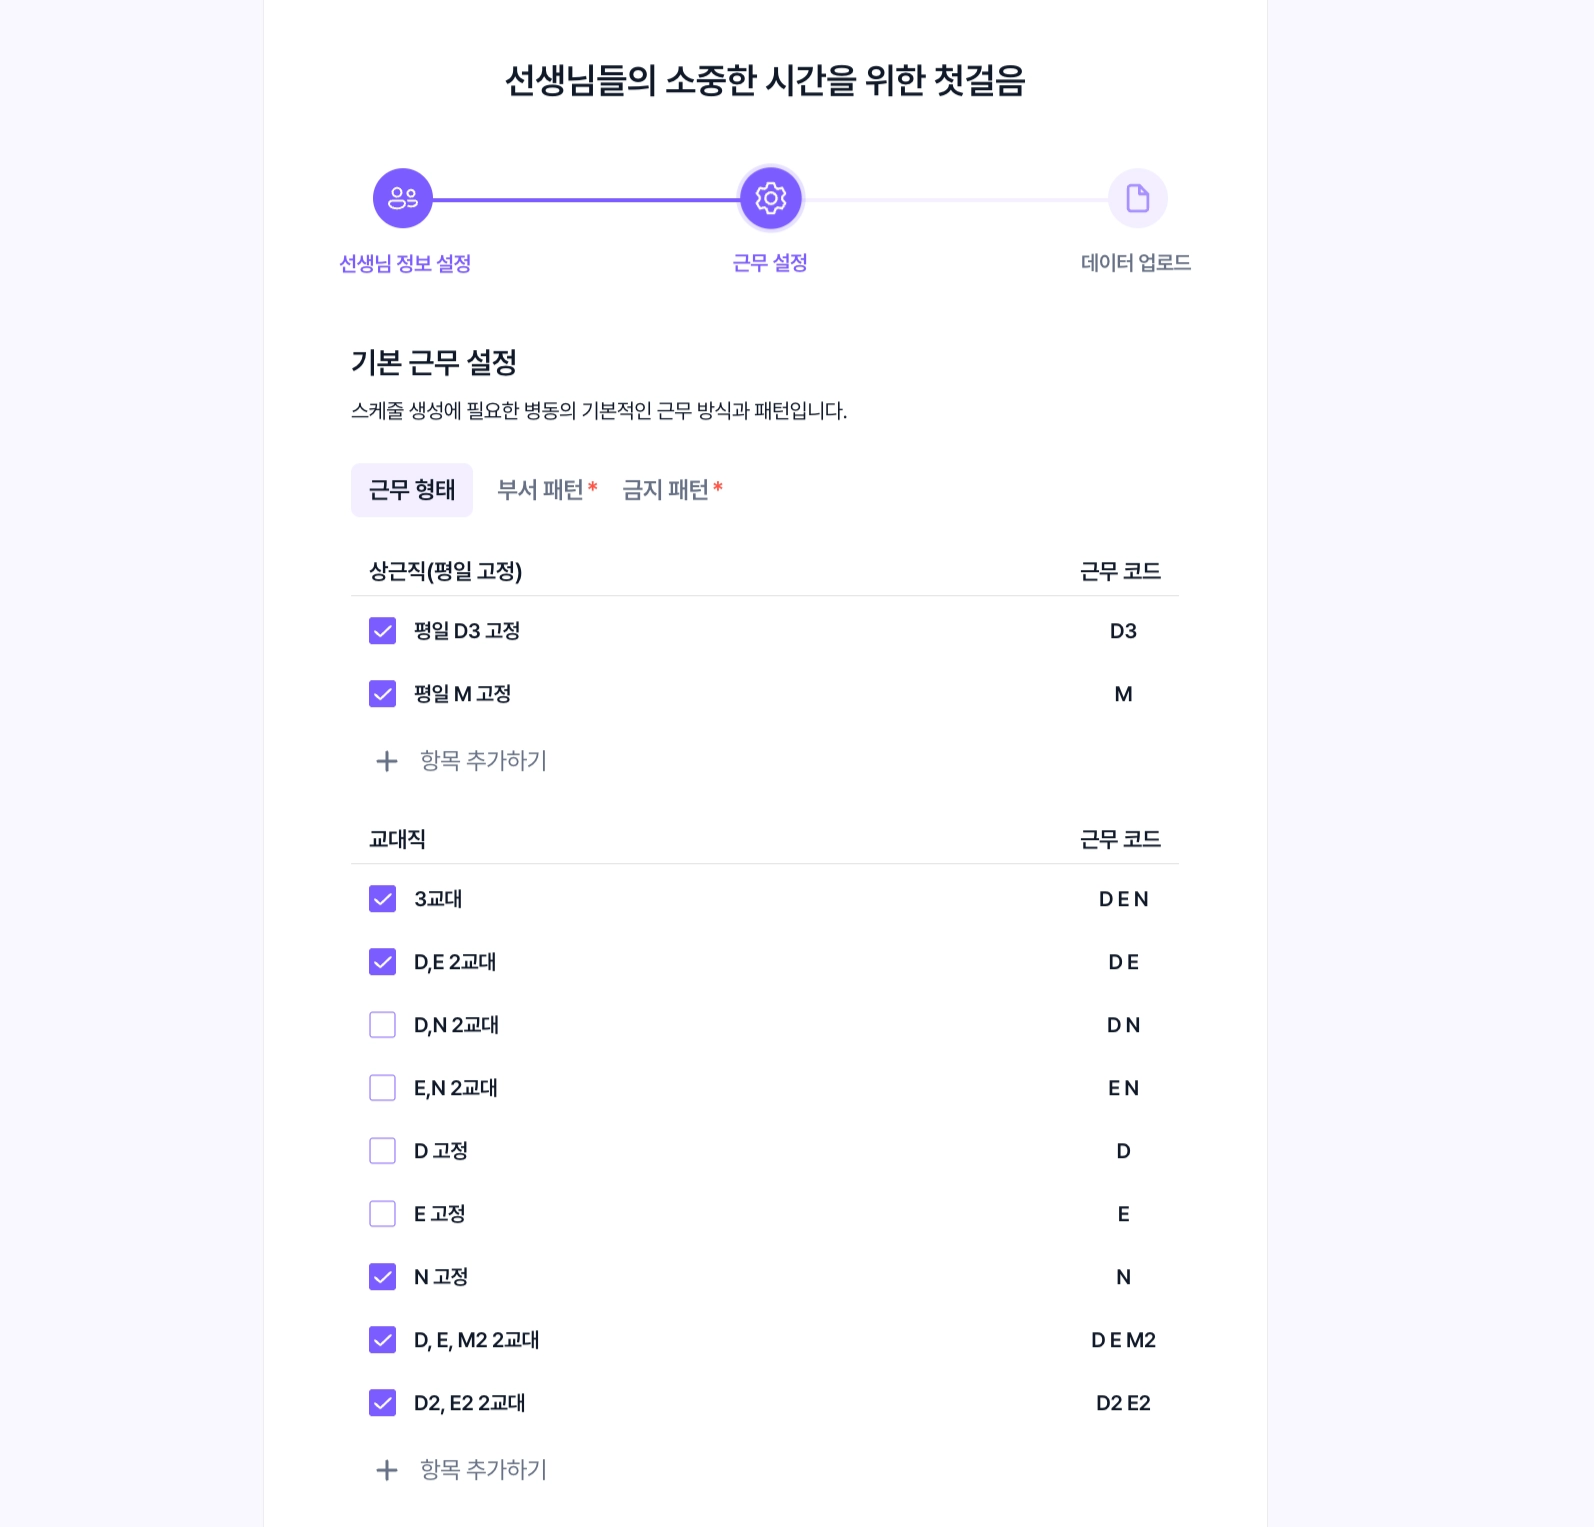
- Click + Add Item to register a shift type.
- Enter a name (e.g., "3-Shift") → Select all available shift codes (e.g., D, E, N).
Any shift code you want to include in a staffing pattern must first be registered in that shift type's shift codes.

e.g., To include a D/E 2-shift type in a staffing pattern as M2, add the M2 code to the D/E 2-shift type first.
Shift codes selected for fixed-day and rotating shift types are currently handled as follows.
- Fixed-day: All selected shift codes are considered available on weekdays.
e.g., Fixed-day, weekday D3 fixed (D3): D3 shifts available on weekdays
- Rotating: All selected shift codes are considered available on every day of the week.
e.g., Rotating, 2-shift (D / E / M2): D, E, M2 shifts available on every day of the week
If available codes differ between weekdays and weekends, register all codes used across both in the shift type, then define weekday and weekend conditions in staffing patterns. For details, see FAQ6 - 근무 역량·요일별 근무코드 설정하기 (Korean).
e.g., If a 2-shift type uses D and E on weekdays but M2 on weekends, register D, E, and M2, then set the day-specific conditions in staffing patterns.
② Staffing Pattern
Staffing patterns define how many staff from selected work capabilities to assign to each day and shift code.
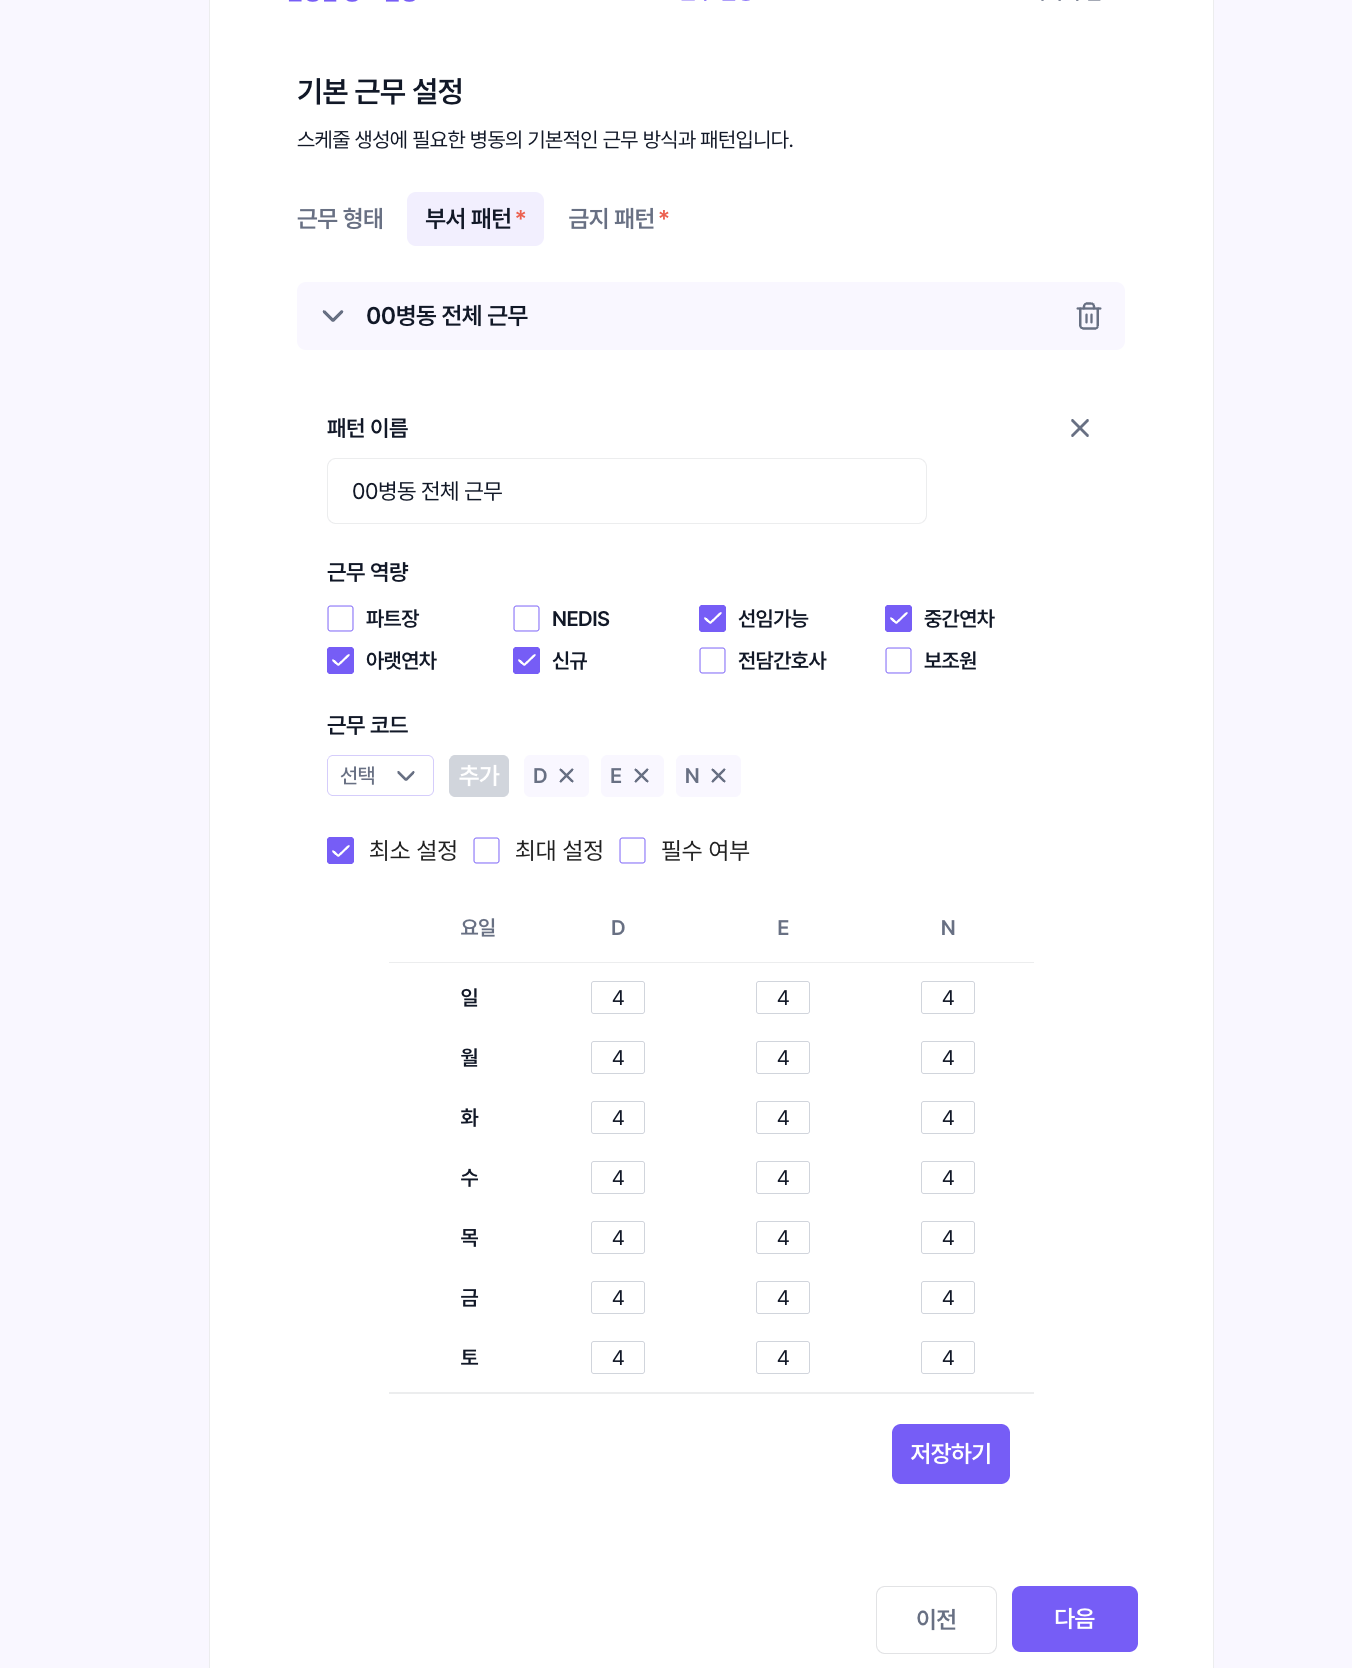
| Setting | Meaning | Example |
|---|---|---|
| Minimum | Minimum staffing target | At least 1 senior nurse on D |
| Maximum | Maximum number allowed | At most 1 new nurse on the same shift |
| Required | Enforces the condition when checked | Staffing limits that must not be violated |
| Same minimum and maximum | Exact number to assign | Exactly 1 nurse on N |
| Minimum 0 and maximum 0 | Bans the assignment when Required is checked | No D4 assignments on weekends |
- Click + Add Staffing Pattern, then enter a pattern name and select the applicable competencies.
Select all work capabilities to include in this pattern's staffing range for each day and shift code.
The same work capability can appear in multiple patterns. If you select several capabilities in one pattern, the headcount is the combined total across all selected capabilities, not a separate count for each.
e.g., For Monday D, setting 4 in the Nurse pattern and a minimum of 1 in the Senior pattern applies both conditions: 4 nurses in total, including at least 1 senior nurse.
- Set the shift codes to assign to this group. If codes other than D, E, N are needed, click the Select button, choose the shift codes to add, and click Add.
- Select the options and enter the staffing count for each shift.
To ban an assignment, enter both minimum 0 and maximum 0, and check Required. A minimum of 0 alone means no minimum staffing is needed; it does not ban assignments.
- Autofill: After entering one row, press Enter and the rows below are auto-filled with the same value.
- Remove a day: Click the ✖ button on the left to remove days that don't need a setting (e.g., assistants don't work Saturdays → remove Sat).
- Click Save to register the pattern. Click it again to edit it, or use the trash button to delete it.
- After configuring all staffing patterns, click Next.
If your ward has separate Mid-level Groups 1, 2, and 3, or needs a minimum headcount per group, see FAQ1 - 세부 그룹별 부서패턴 설정하기 (Korean).
If available shift codes differ by day, see FAQ6 - 근무 역량·요일별 근무코드 설정하기 (Korean).
Overly restrictive required patterns may cause schedule generation to fail.
Use identical minimum and maximum values only when an exact headcount is necessary. Otherwise, set an acceptable range. If multiple patterns cover the same work capability, day, and shift code, all conditions apply together, so check that they do not conflict.
Fixed-day workers (e.g., a unit manager's weekday D3 shift or NEDIS weekday M shift) do not need to be added to staffing patterns. If they are included in the staff roster and wanted list, they will be assigned fixed shifts.
③ Forbidden Patterns
- Among the default forbidden patterns, uncheck any not used in your ward.
- Any forbidden pattern not on the list can be created directly with + Add Item. In the Select shift code to add dropdown, pick a code and click Add to stack the codes in the order you want to forbid them, then click Save to register the pattern. (e.g., add `E2` → `M` → the "M on the day after E2" sequence is forbidden.)
- Forbidden patterns registered here can also be added or edited later under Ward Shift Info > Forbidden Patterns. (See 7. Edit Ward Shift Information.)
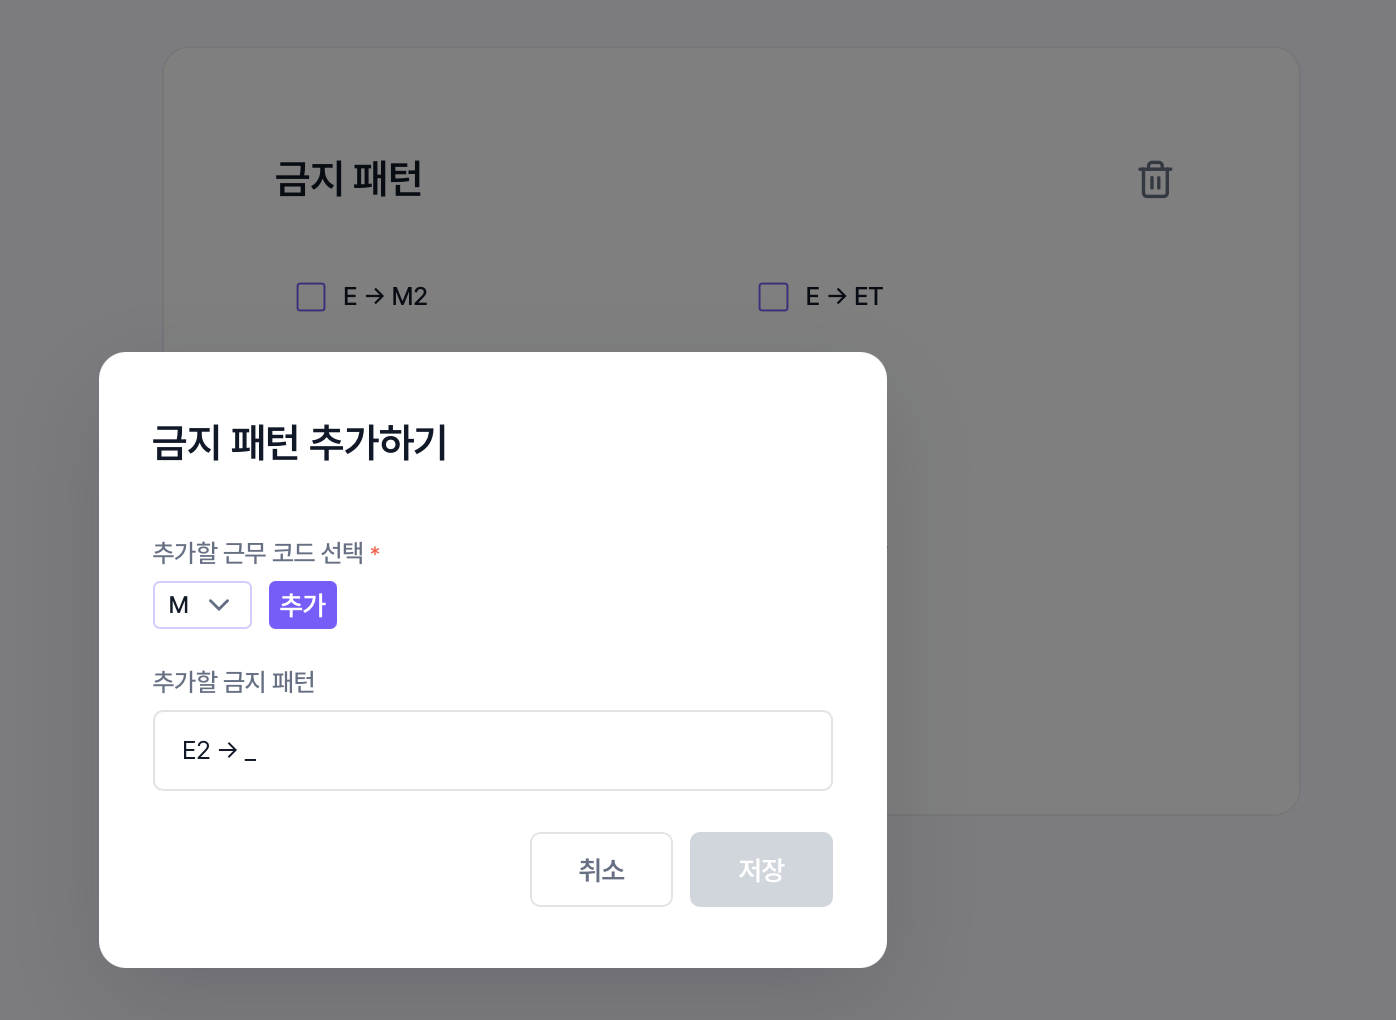
Adding too many forbidden patterns can make a valid schedule impossible and cause schedule generation to fail. Register only the combinations your ward actually forbids. (See FAQ4 - 스케줄 생성 실패 시 대처하기 (Korean).)
2-3. [Required] Data Upload
- File Upload: Drag and drop or upload an Excel file (`.xls`, `.xlsx`, `.csv`). Check the format first with Download Example.
- Direct Entry: You can also enter data directly in the popup table without a file.
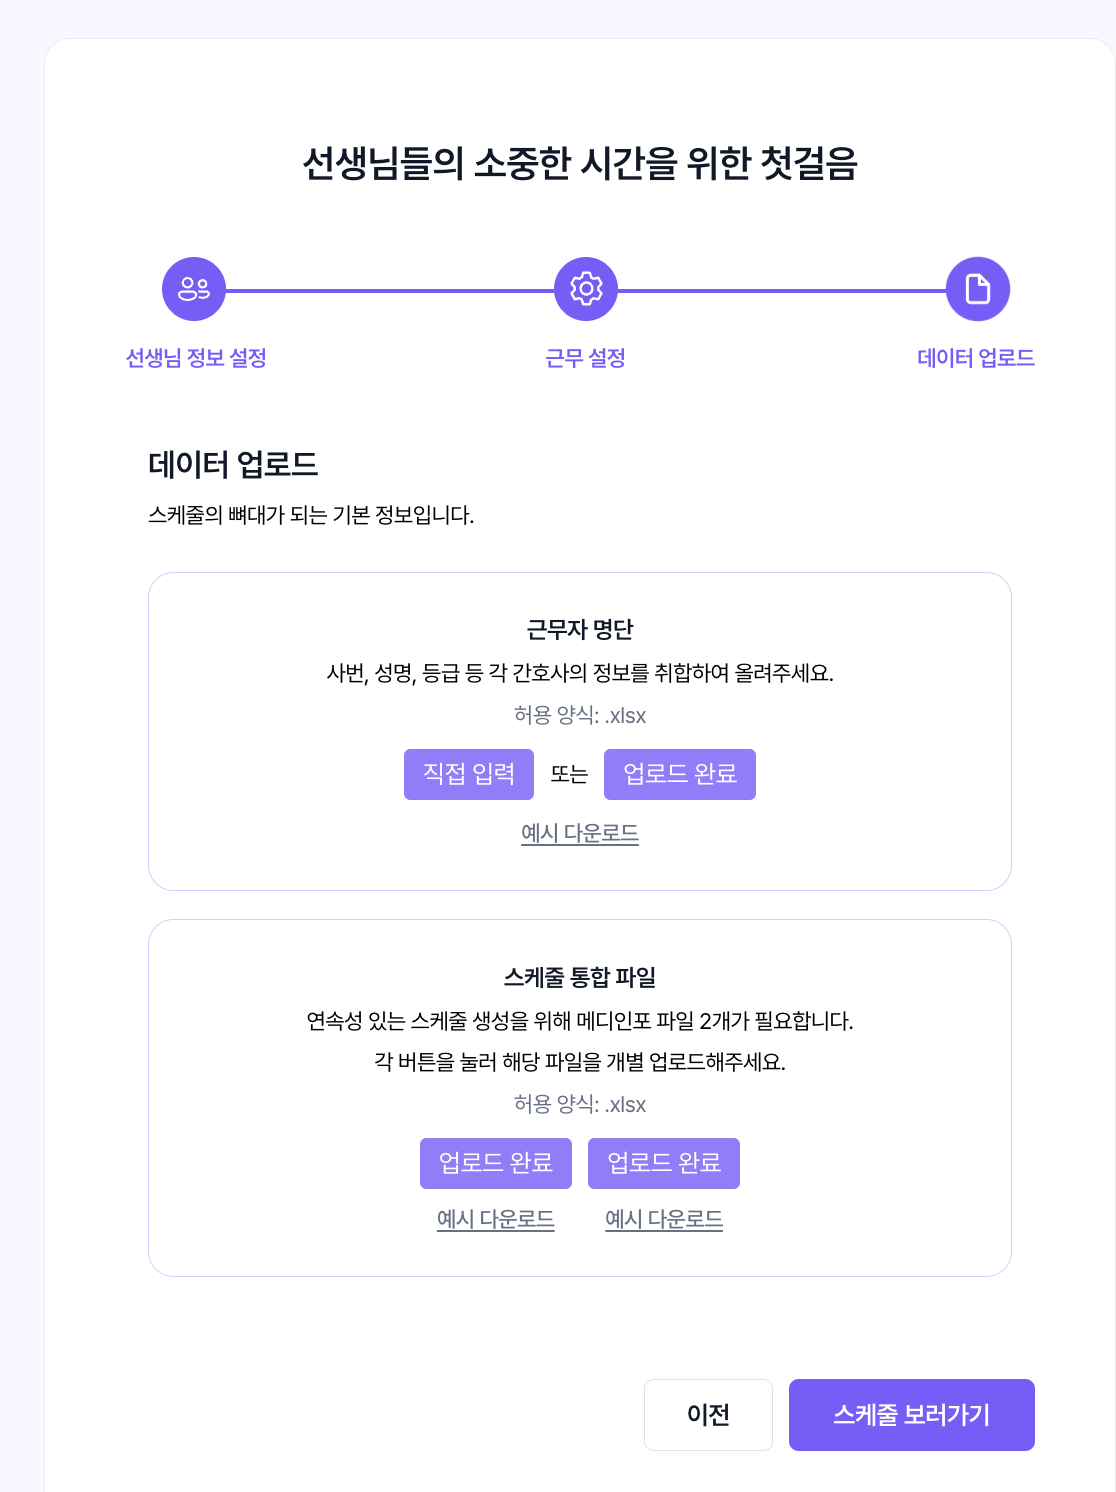
Once each file uploads without issues, its status changes to [Upload Complete].
Before uploading, make sure the staff lists in the previous month's schedule, the staff roster, and the wanted file match exactly.
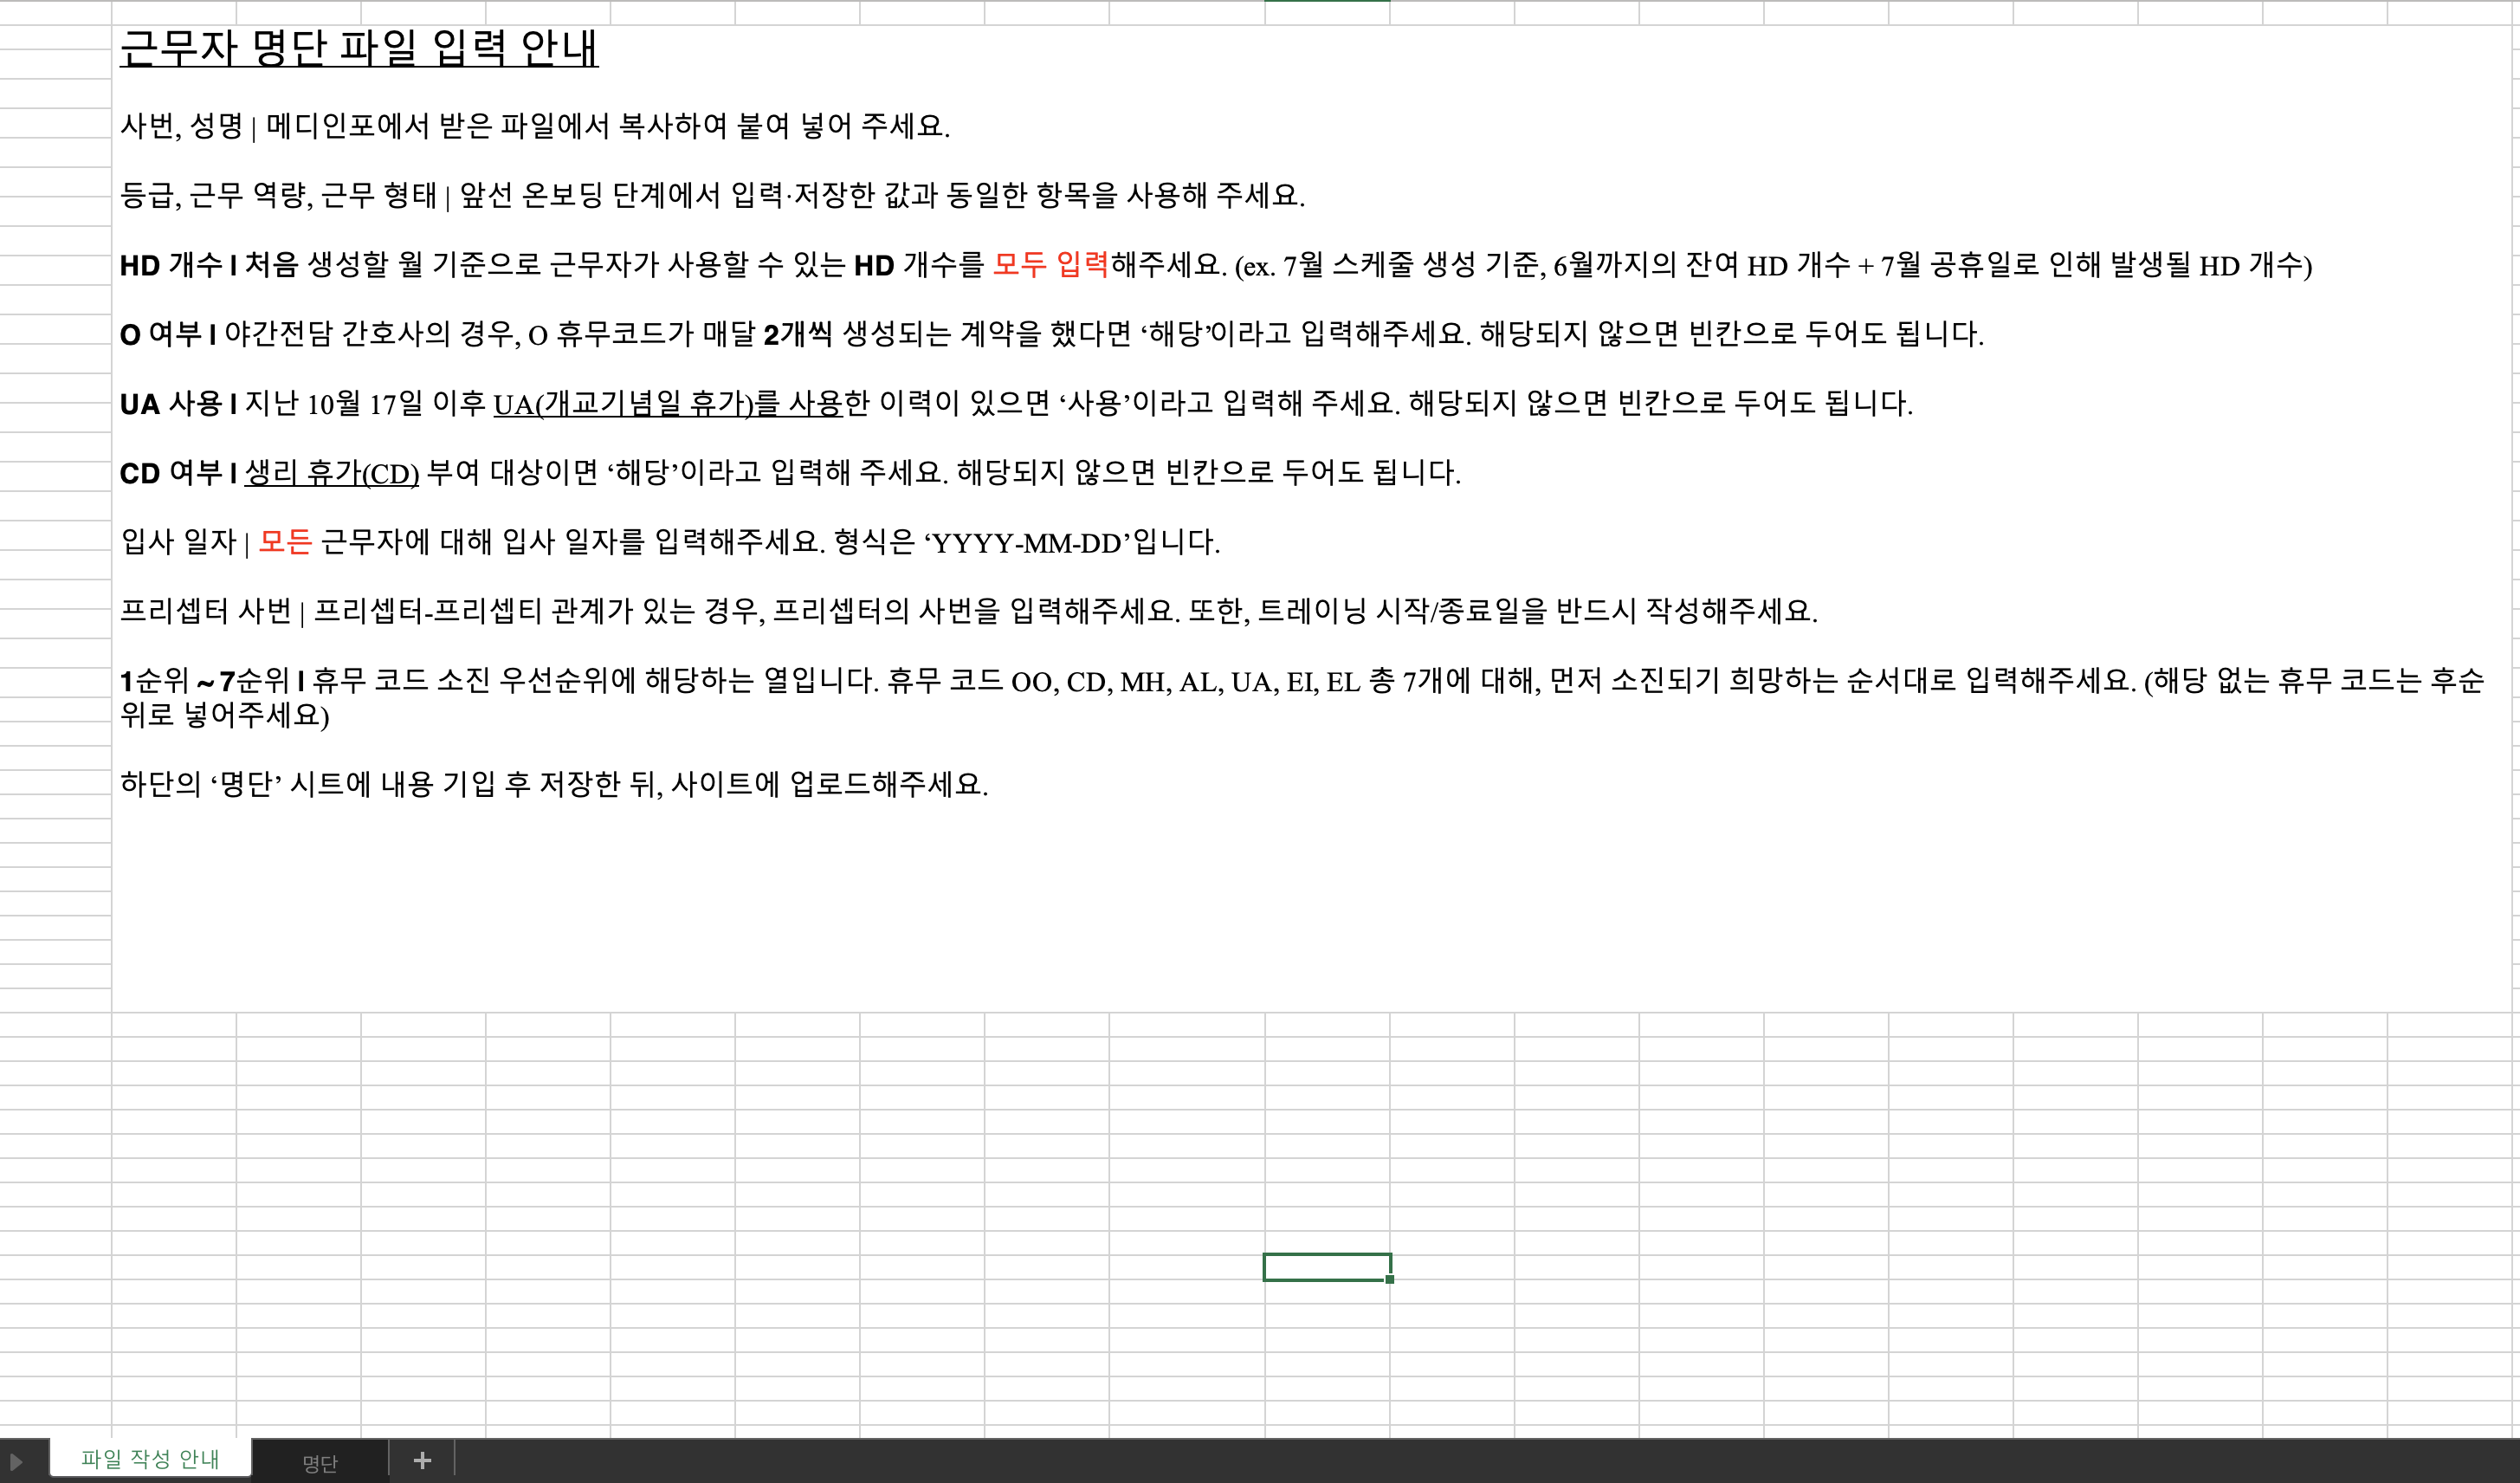
Staff Roster Upload Guide
- Download the example file, follow the first sheet "File Instructions", fill in the 'Roster' sheet → save → upload to the site.
Previous Month Schedule Upload Guide
Upload the previous month's schedule file downloaded from MediInfo as is.
- Upload the file for the month immediately preceding the target month.
- e.g., If the month you want to generate is July 2026, the previous month's schedule must be the June 2026 file.
- The shift summary and leave balance columns next to the previous month's schedule on the MediInfo screen must be included.
- Do not copy only the schedule from MediInfo; copy and paste the entire screen as is.
- If there is no remaining balance, enter 0 instead of leaving it blank.
- Negative values can be entered as shown.
- All shift codes and off-shift codes used in the schedule must be registered under Shift Codes / Off-Shift Codes in Onboarding Step 1.
Wanted File Upload Guide
Upload the shift preference (wanted) file submitted by nurses.
Entry guide
- Staff IDs and names must match the staff roster.
- The month of the wanted file must match the target month you are generating.
When entering off-shift codes in the wanted file, check FAQ3 - 원티드 휴무코드 반영 기준 (Korean).
Final Pre-Upload Checklist
- Is the file `.xlsx` and under 10MB?
- Do the rank · work capability · shift type values in the staff roster match the names set in onboarding exactly, including spaces and case?
- Are dates in `YYYY-MM-DD` format, with no duplicate staff IDs?
- Is the HD balance entered as a number? (0 if none)
- Do the names / staff IDs in the previous month's schedule and wanted file match the staff roster file?
- Is the previous month's schedule the file for the month immediately preceding the target month?
- Are all shift codes used registered in onboarding?
Did an error occur during file upload? For solutions, refer to the subpage FAQ2 - 입력자료 업로드 오류 해결하기 (Korean).
3. Reviewing the Schedule
After uploading files, click View Schedule to generate a draft automatically. Review the schedule and regenerate or edit it as needed.
Hospital policies applied automatically
- Whether an `OF` is required in the first week of a new period is determined from the previous schedule.
- For wards that use `OO`, it is applied on a 6 N-shift basis (changed from the previous 7).
If generation fails and an error screen appears, see FAQ4 - 스케줄 생성 실패 시 대처하기 and contact the Customer Center.
If too many off-shifts are assigned, see FAQ5 - 휴무가 너무 많이 배정될 때.
Schedule Table
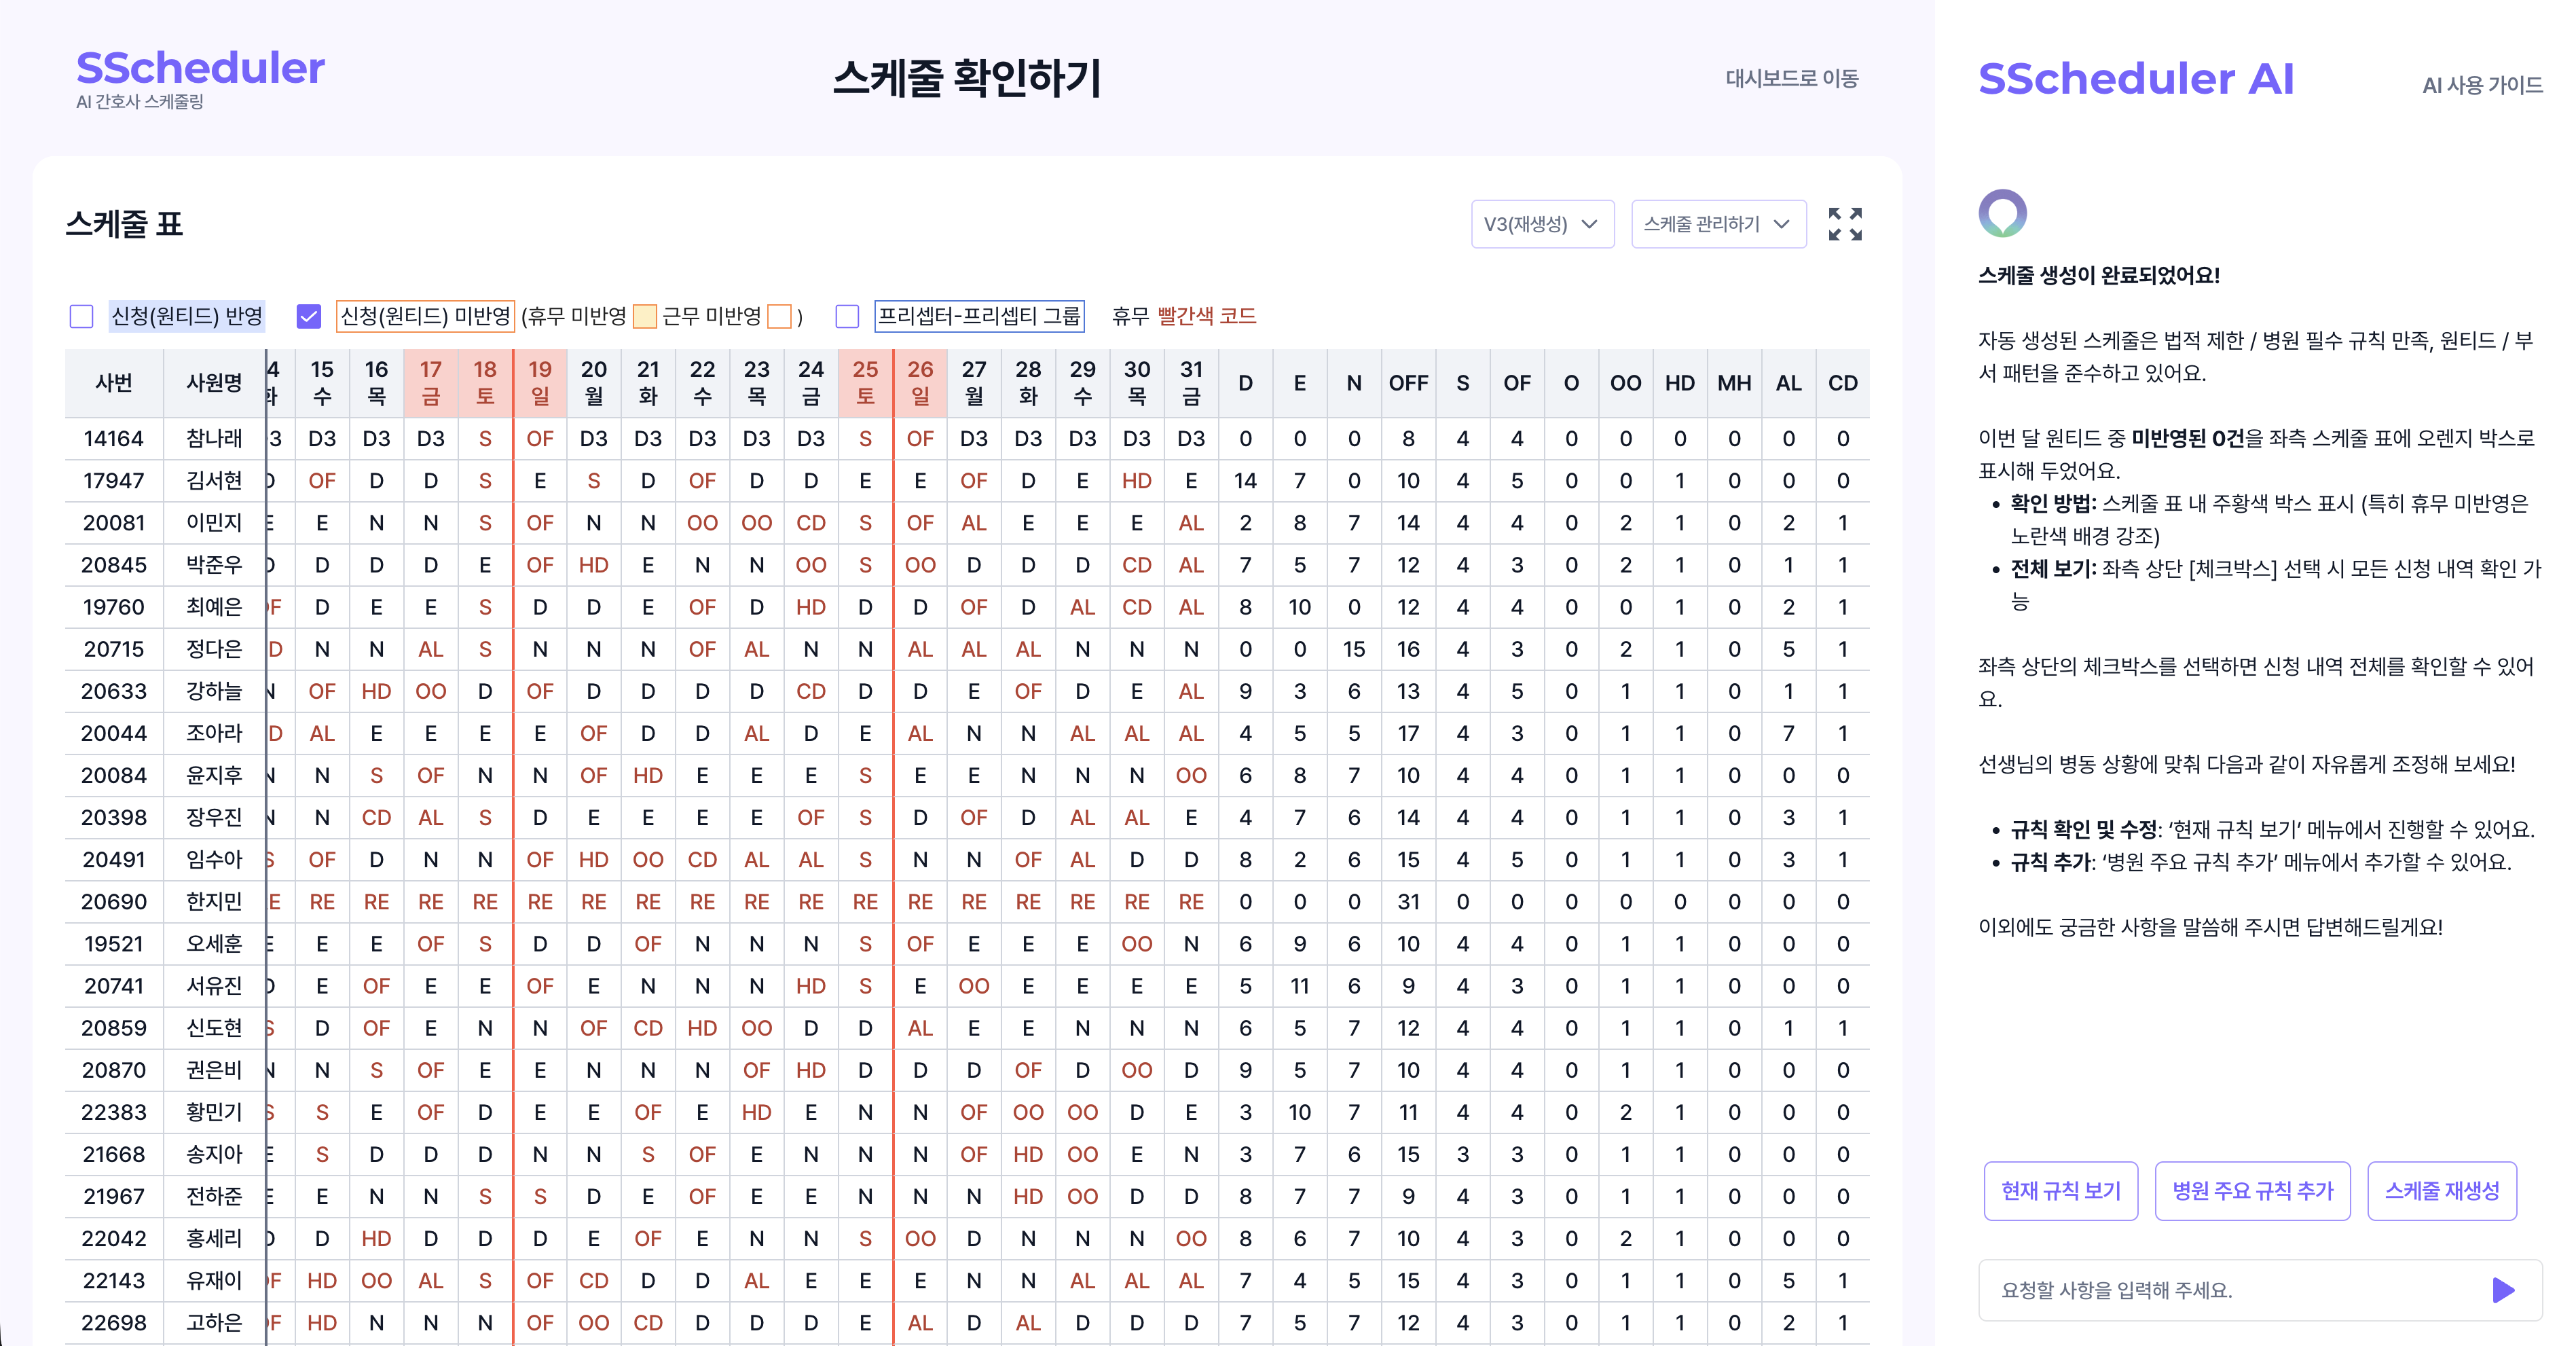
- Scroll to the far right to see each nurse's D / E / N / OFF (total of all off-shift codes) and totals per off-shift code.
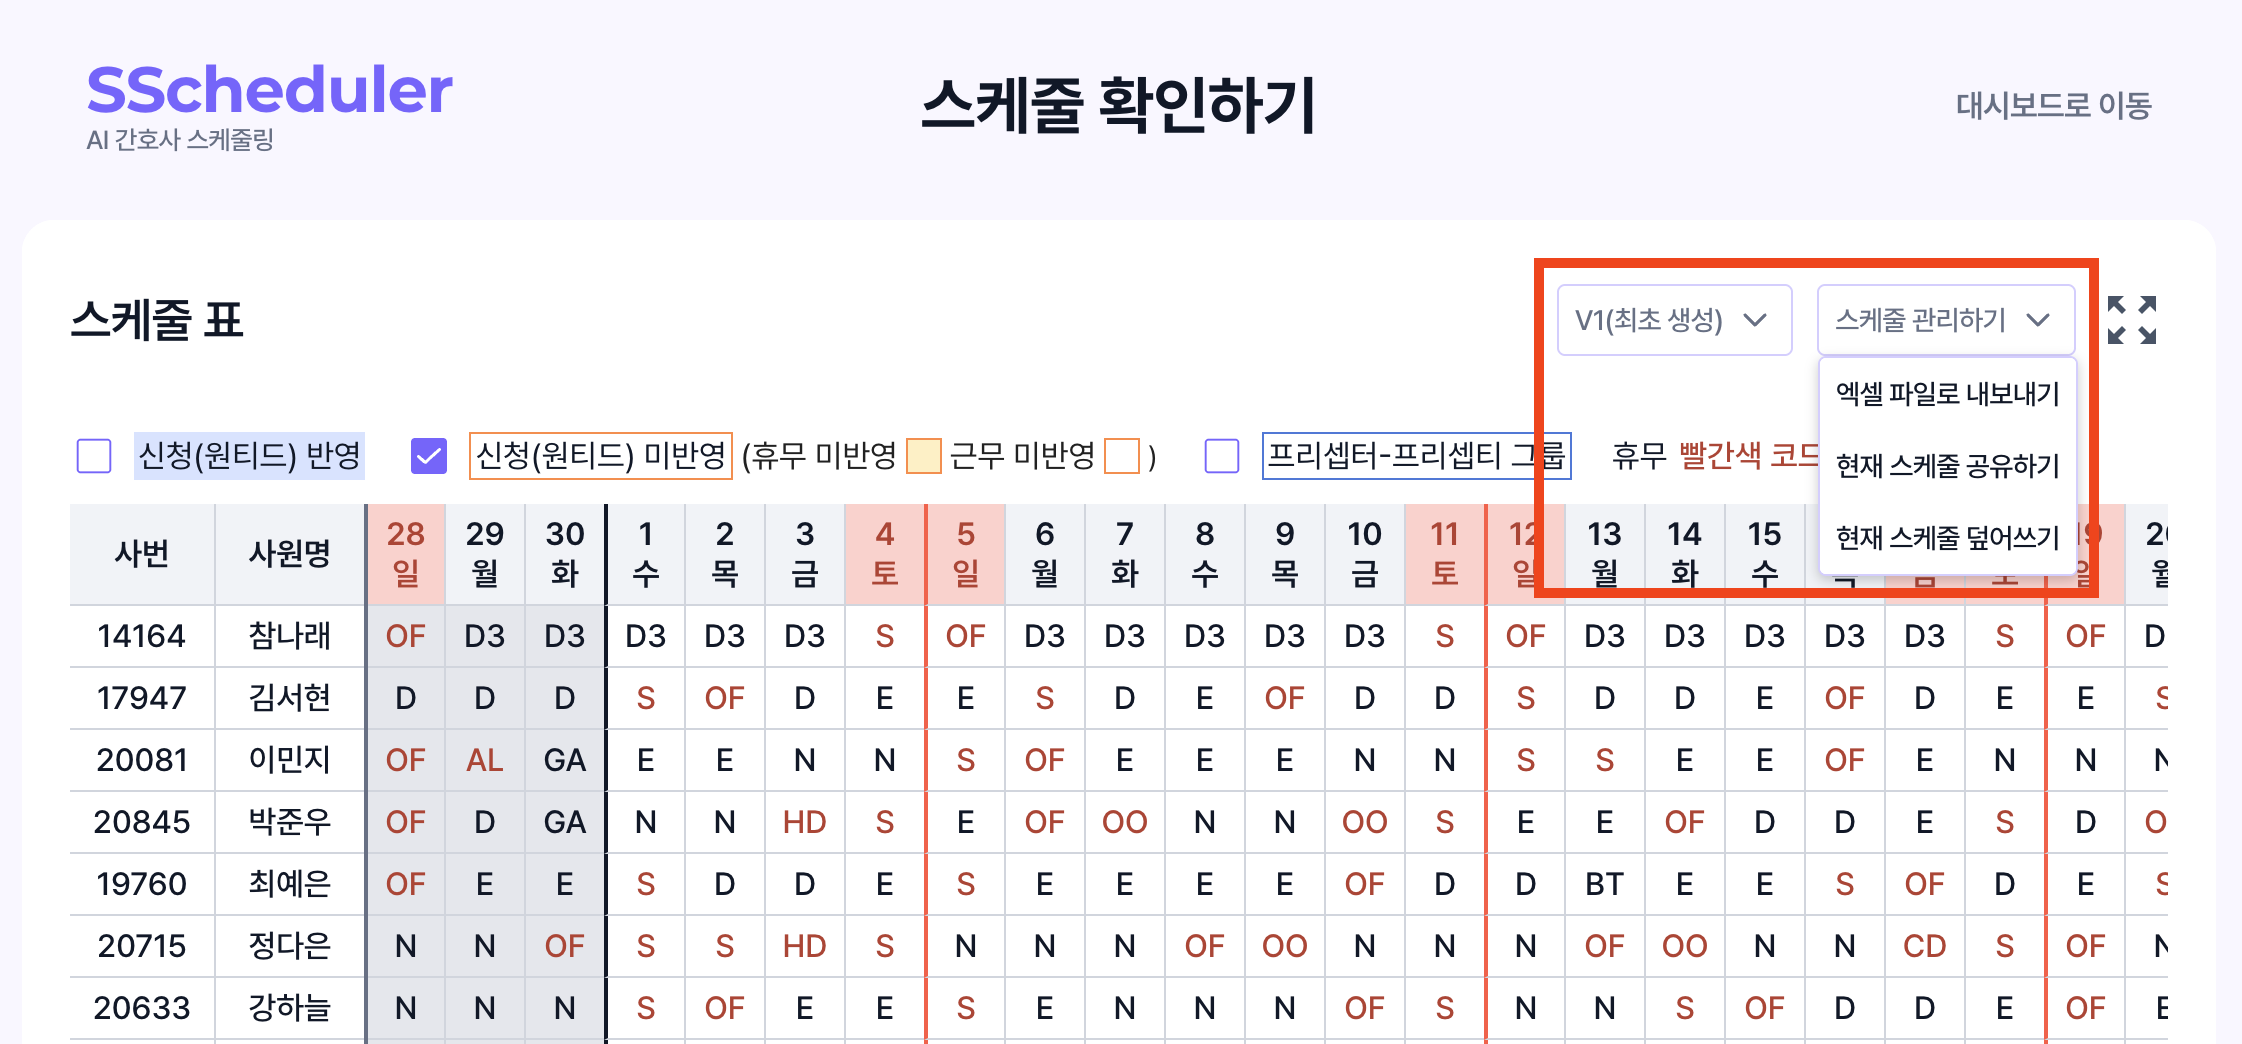
- Use Manage Schedule at the top right to export to Excel, share, or overwrite the schedule. See 5. Finalizing and Sharing the Schedule for details.
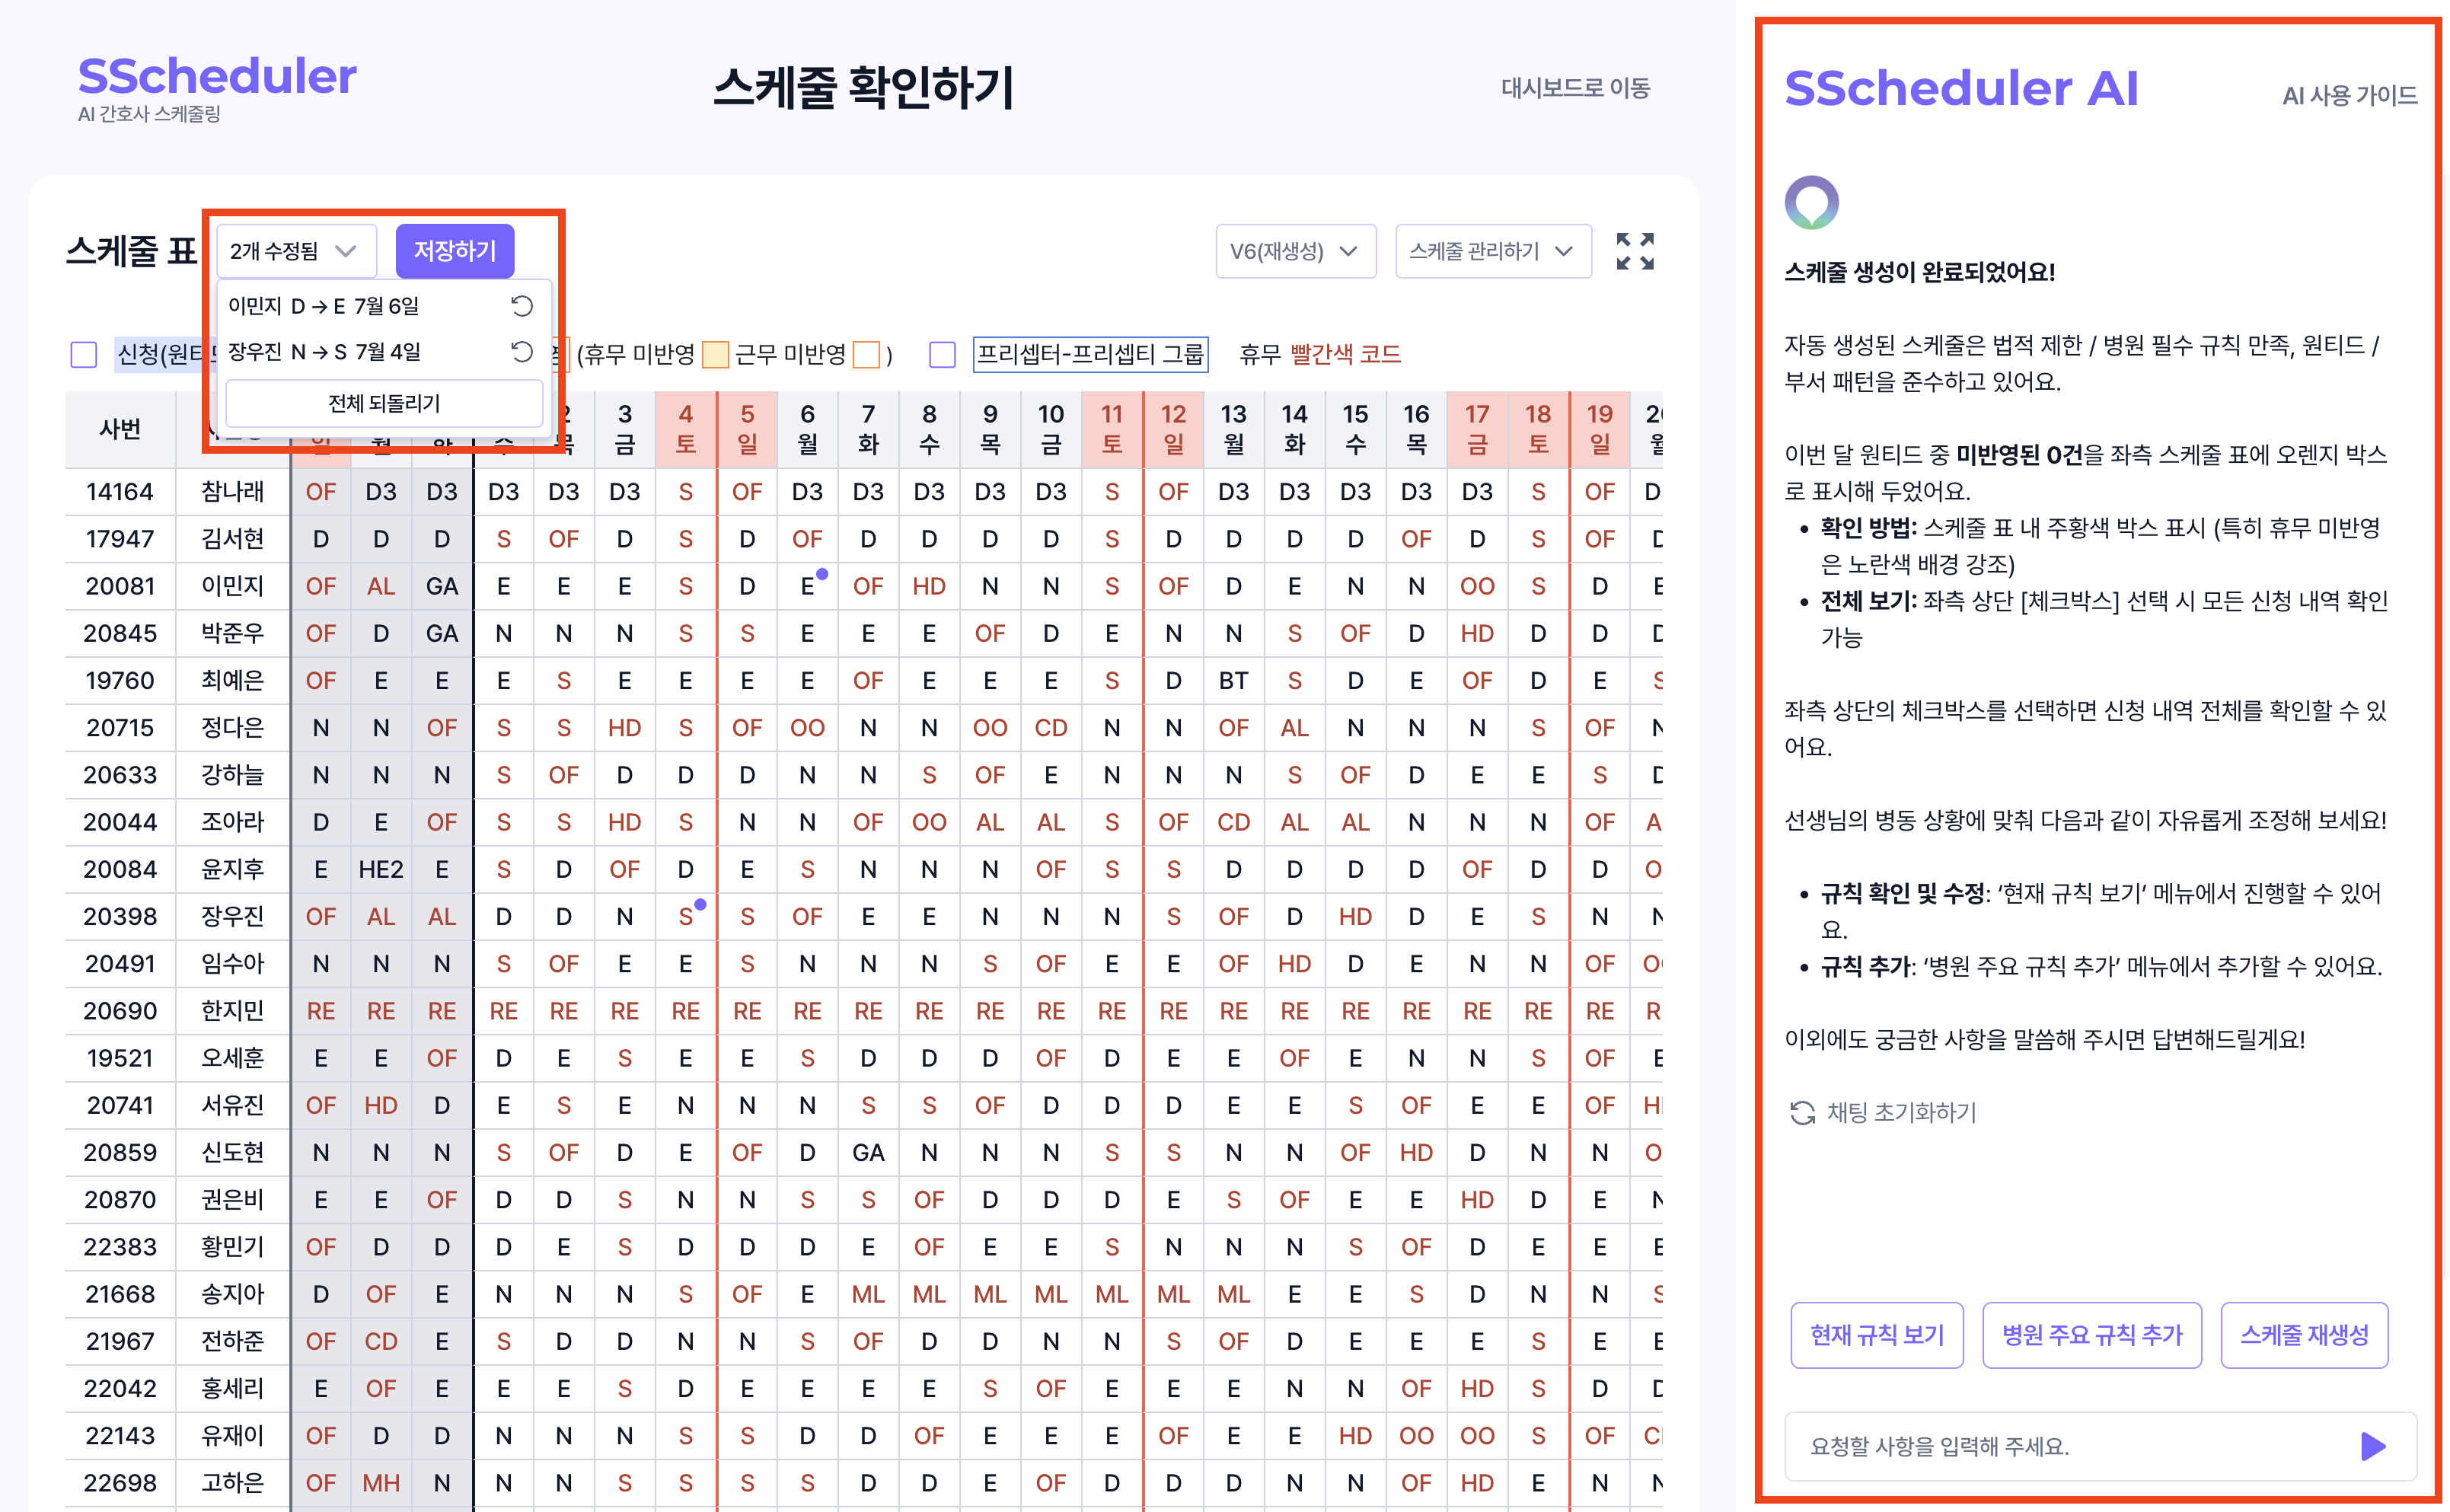
- Use the top filters to view wanted request fulfillment, preceptor–preceptee groups, and more.
Editing the Schedule
- Manual Edit: Click a cell to change its shift or off-shift code. The edit count is displayed at the top, and changes can be undone. Saving with required-rule violations or unfulfilled wanted requests displays the Required Rule Unmet Notice. Unfulfilled wanted requests are highlighted with an orange border (2px outline) and a yellow background.
- AI-Assisted Edit: To add or change rules or modify the schedule, see 4. Using the SScheduler AI Copilot.
- Overwrite Current Schedule (Excel Upload): Upload a finalized `.xlsx` file to replace the schedule all at once. It is automatically shared with nurses immediately. See 5. Finalizing and Sharing the Schedule.
Staffing Pattern Table
Check staffing pattern fulfillment below the schedule table.
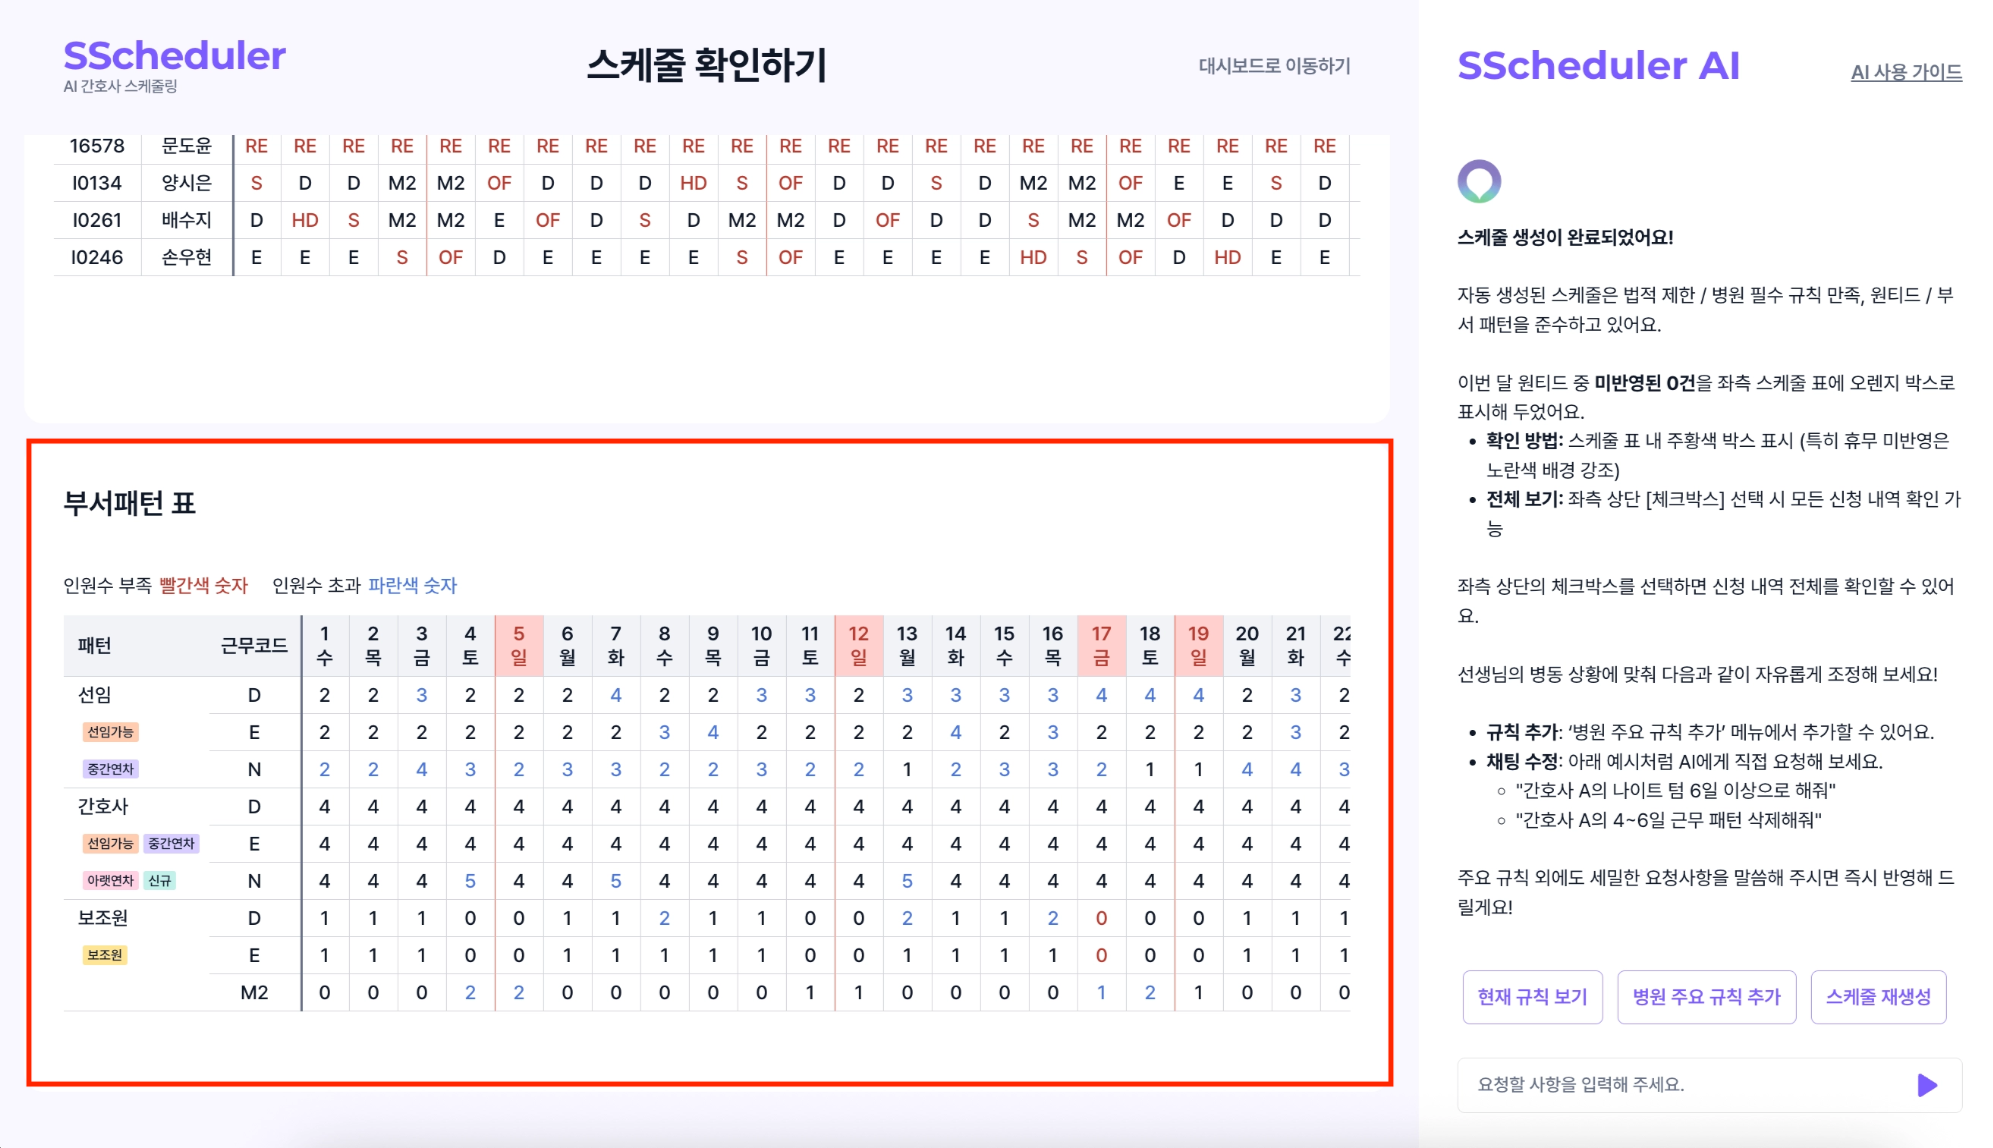
- Red numbers: Understaffed; blue numbers: Overstaffed.
- Hover over a cell to see the nurses assigned to that shift.
Saving as an Excel File
Click Save, then distribute the schedule using Manage Schedule > Share Current Schedule or Export to Excel.
The exported Excel file includes a Roster Order sheet in addition to the regular schedule sheet. It shows the schedule in the order registered in the staff roster.
4. Using the SScheduler AI Copilot
After reviewing the schedule, use the AI chat panel on the right to make simple changes to the current schedule or add rules and regenerate it.
AI Tips
- Adding rules
- Use Add Key Hospital Rules to register common rules quickly.
- Rules saved with Yes, keep applying carry over to next month's schedule. Delete rules you no longer need.
- More rules may increase generation time. Keep only the rules you need.
- AI rules cannot apply to off-shifts filled in automatically after generation, such as MH and HD. Requests such as "Give everyone exactly 1 MH" will not be applied. For off-shift code-count issues, see FAQ5 - 휴무가 너무 많이 배정될 때.
- Schedule analysis
- If results differ from expectations, check View Current Rules first.
Simple Schedule Changes
Use this to change only part of the current schedule.
- Change a shift: "Change Nurse Hana Lee's D on June 4 to N."
- Delete a pattern: "Remove Nurse A's shift pattern on days 4–6."
Changes appear in the schedule table immediately. If satisfied, click Save above the schedule table on the left.
Adding Rules
For rules that should apply across the schedule, add the rules first, then regenerate.
- Select rules from the list: Select all desired rules → Done Selecting → choose who the rules apply to → choose whether to apply them every month → add more rules, reconfigure, or ask follow-up questions → Regenerate Schedule.
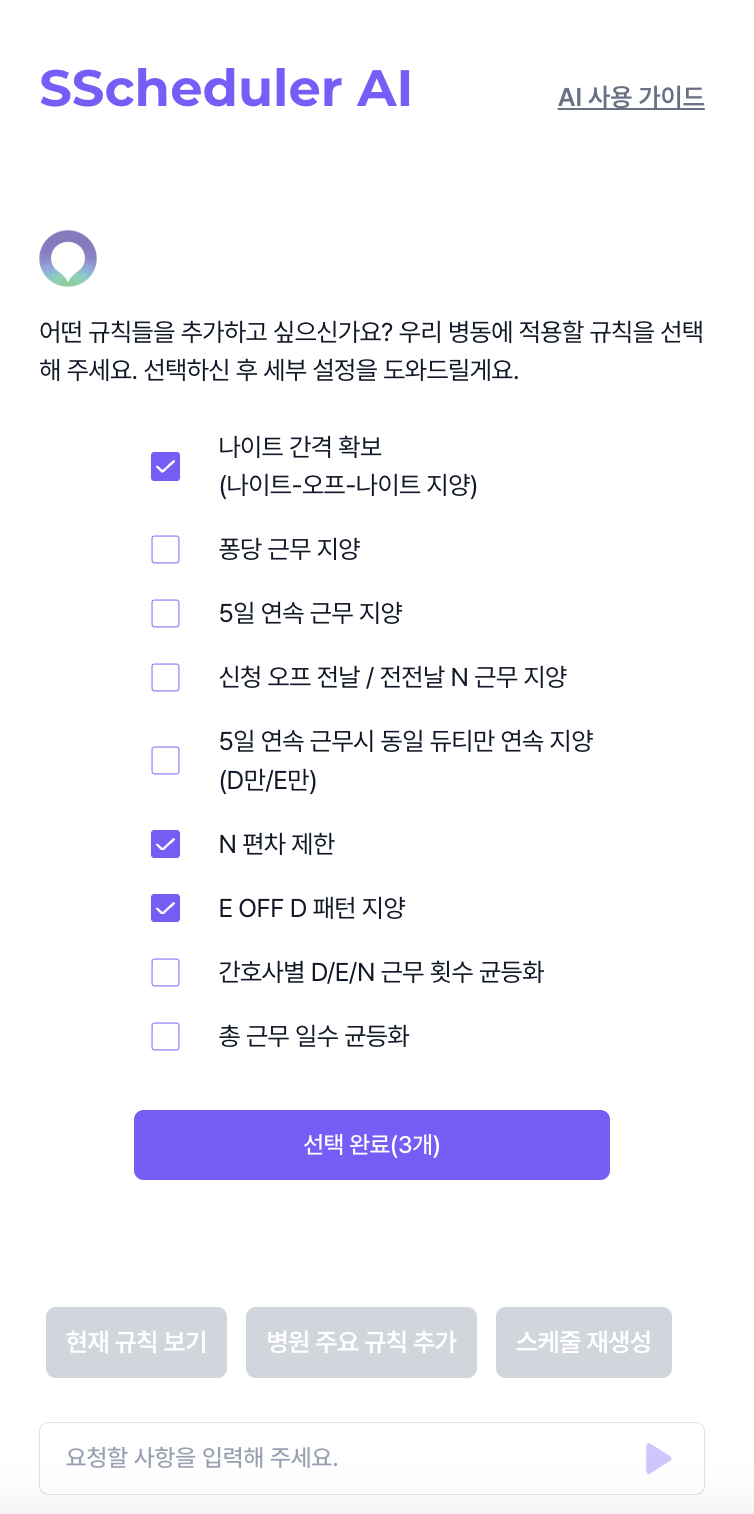
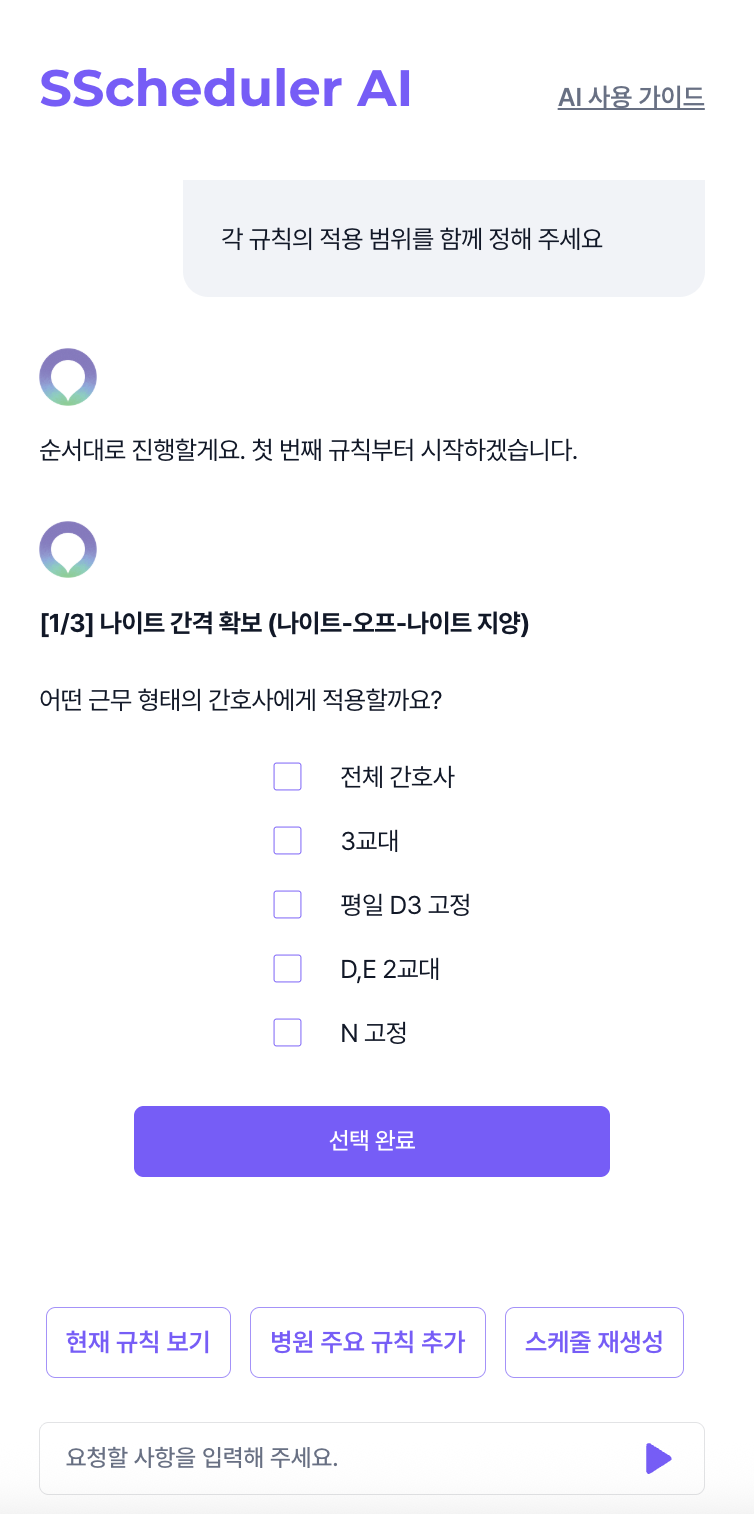
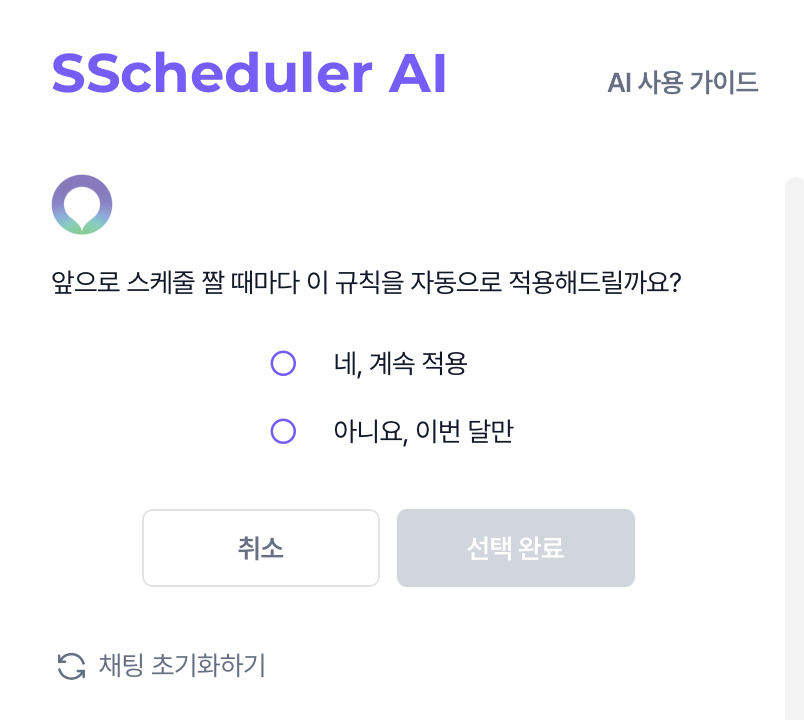
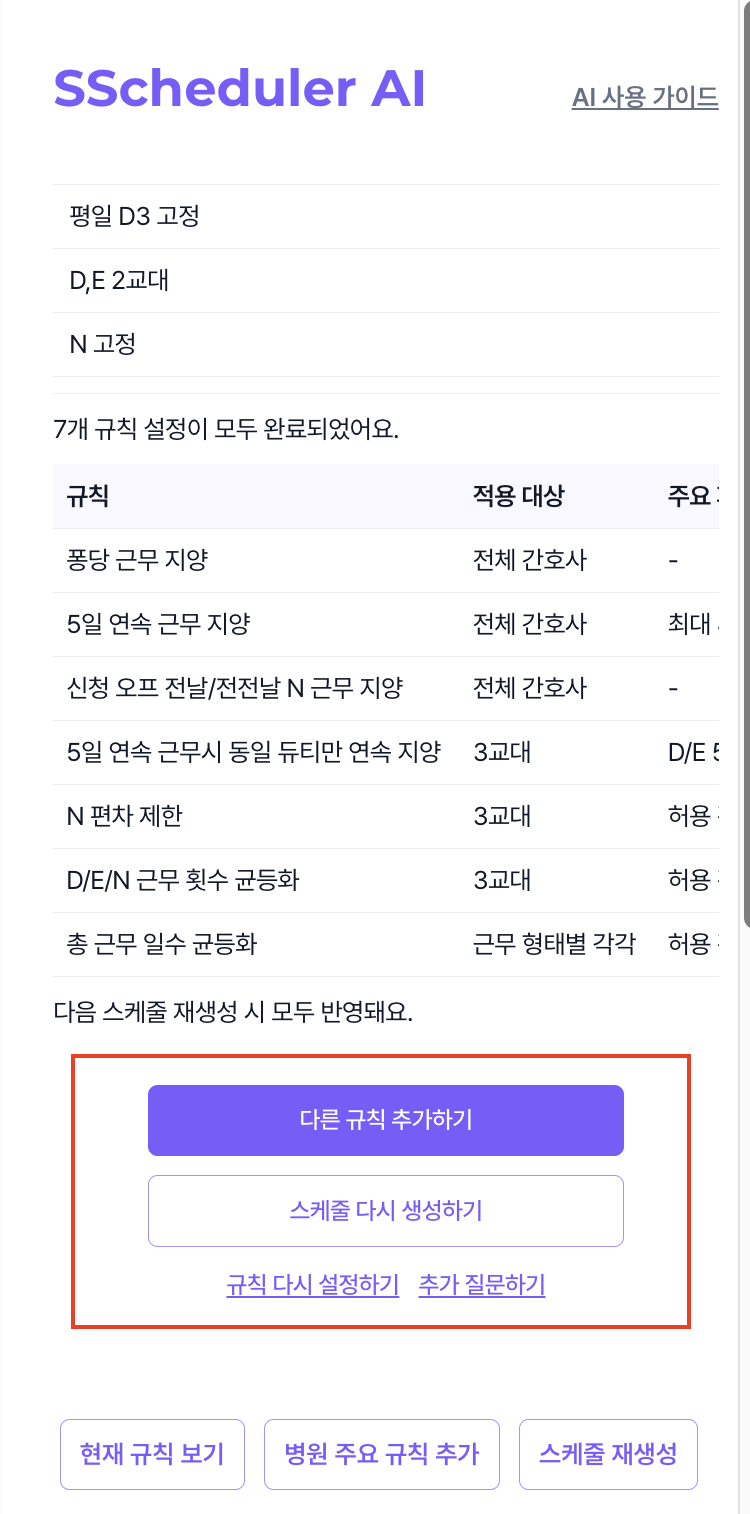
- Request rules not on the list via AI chat, within the supported scope.
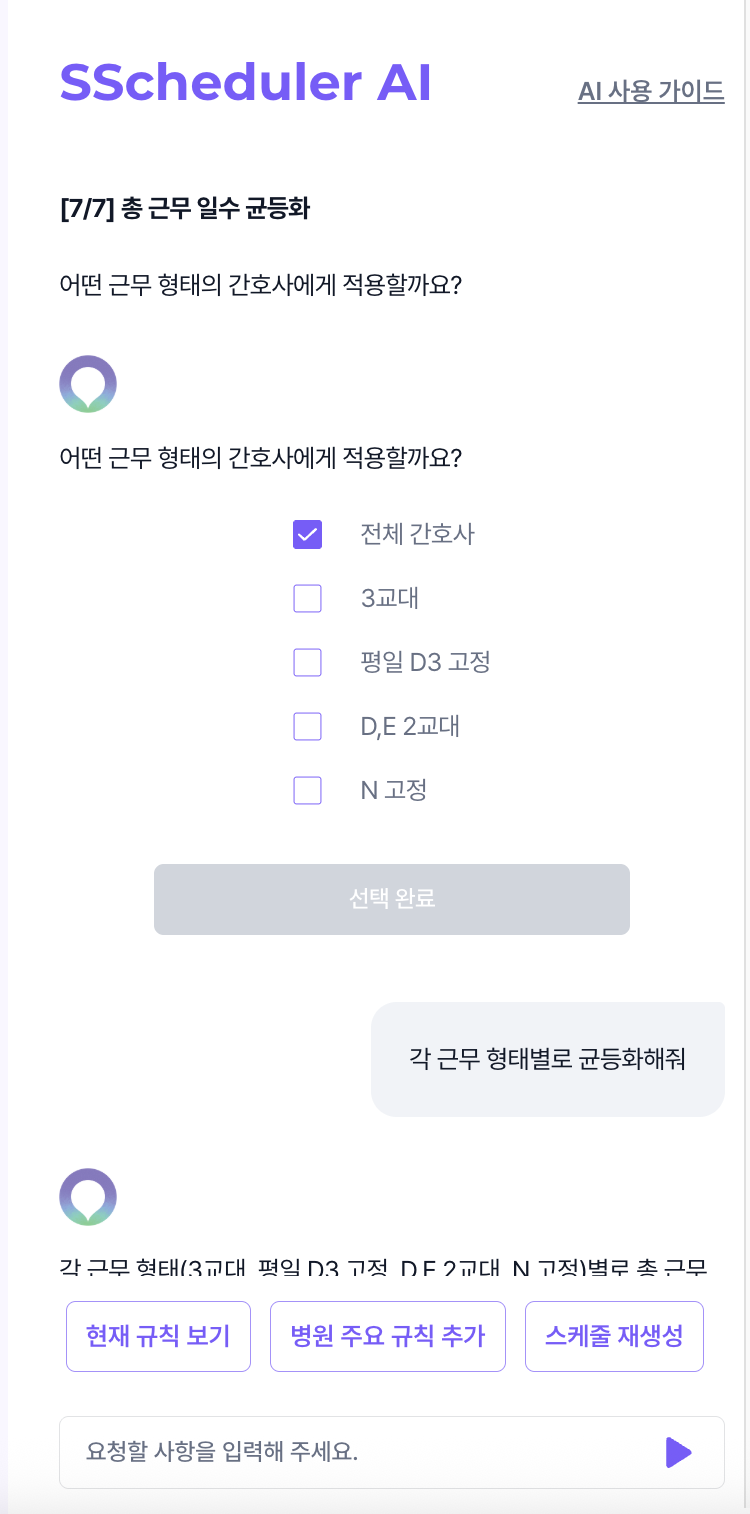
- "Do not assign Nurse A and Nurse B to the same duty on the same day."
- "Set the maximum number of N shifts to 7 for all 3-shift nurses."
Regenerating the Schedule
Once all rules are ready, click Regenerate Schedule at the bottom of the chat.
Choose between two modes:
- Fast Generation (5 min): Generates quickly, but some rules may not be satisfied.
- Precision Generation (30 min): Takes longer and aims to satisfy all rules as much as possible.
Viewing Current Rules
Click View Current Rules to see automatically applied required rules and key hospital rules added through AI chat.
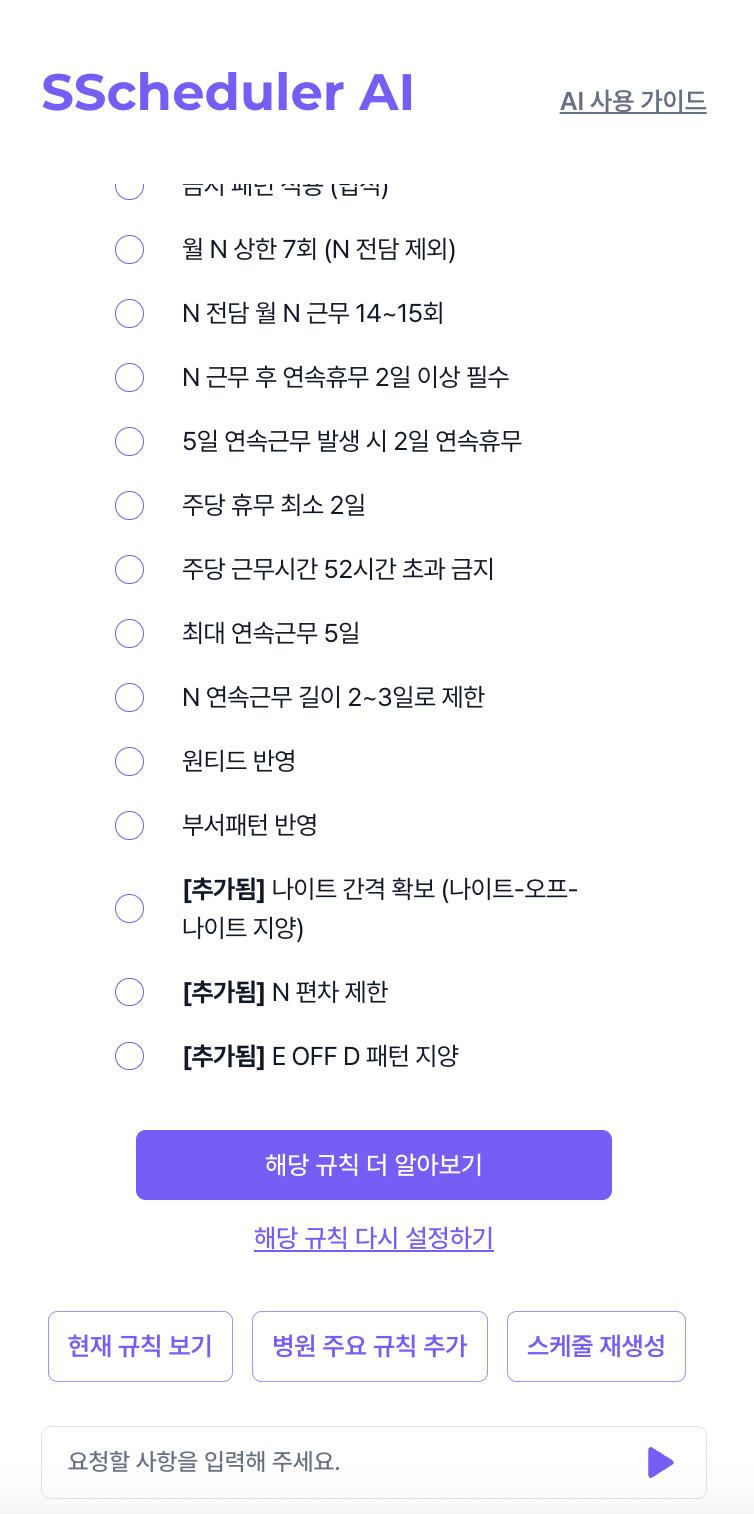
- Changed / Added: Labels identify rules changed or added through Add Key Hospital Rules.
- Learn more about this rule: Check whether the selected rule was applied correctly.
- Reconfigure this rule: Change the rule's target or priority.
AI Chat Examples
You can use AI chat for more than adding rules. If you have further questions about an answer, continue the conversation.
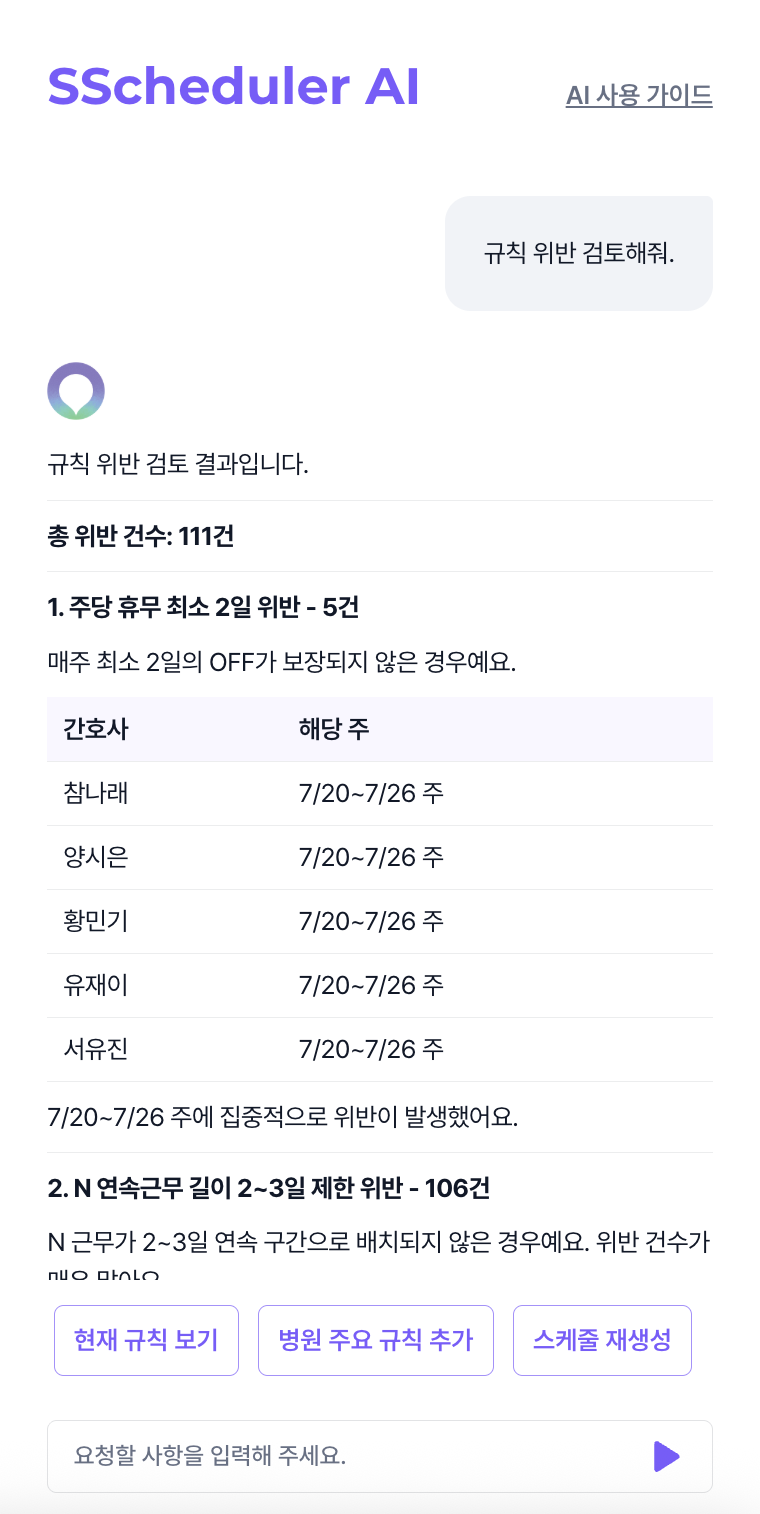
- Review rule violations
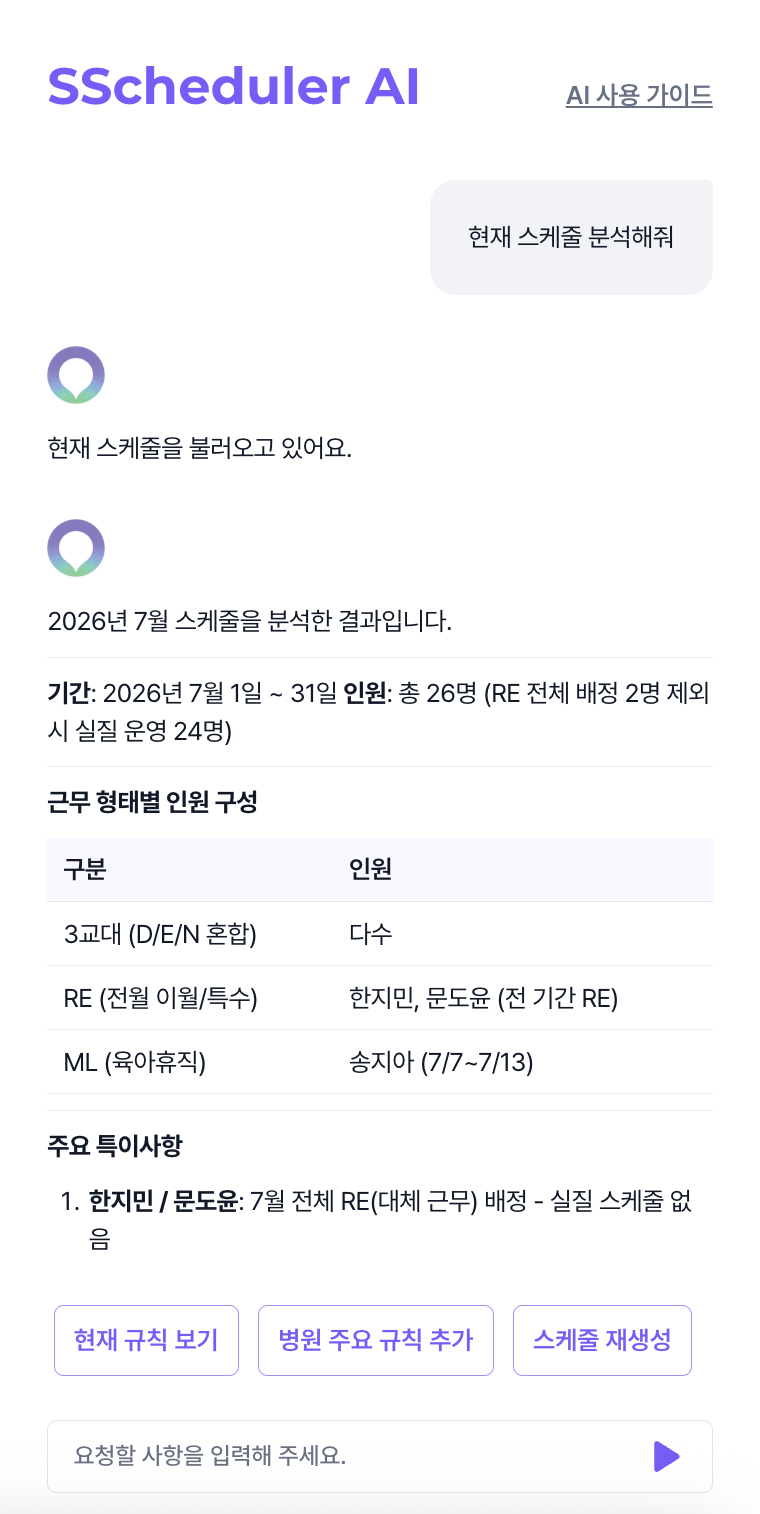
- Analyze the current schedule
Handling Modification Requests
Check nurses' schedule modification requests through the notification 🔔 icon at the top right.
- NEW: Requests not yet handled; Rejected: Declined requests.
- Individual handling: Click a request to read the full message.
- Enter a response for the AI to consider during automatic processing. Check Include this response in AI auto-processing to let the AI use it.
- Select Reject or Confirm.
- Batch handling: Click AI Auto-Process to apply requests automatically where possible.
5. Finalizing and Sharing the Schedule
Once the schedule review is complete, distribute the schedule to the nurses or overwrite it with an external Excel file.
Share Schedule
Click the [Manage Schedule] > [Share Current Schedule] button at the top right of the schedule table, and a schedule notification is sent to the mobile apps of all nurses in the ward. After composing an announcement and sharing, the success message will display the distributed version (`Successfully distributed Schedule (Vn)`).
Schedule Version Management
SScheduler automatically organizes and records versions whenever a schedule is generated or changed. You can check all versions from the version dropdown at the top left of the schedule table.
Version label format: `Vn (creation type)`
- `V1 (Initial Creation)`: Schedule initially generated by the algorithm after onboarding or monthly preparation
- `Vn (Regeneration)`: Schedule recreated via the AI Copilot schedule regeneration feature
- `Vn (Direct Edit)`: Schedule saved after directly editing cells in the schedule table
- `Vn (Overwrite)`: Schedule overwritten via Excel file upload
- At the bottom of each version item, status labels such as `Saved on MM/DD` and `Shared on MM/DD (or Last shared)` are displayed.
Principles for Viewing and Editing Previous Versions
- Selecting a previous version from the version dropdown allows you to view the schedule table and rules (read-only) for that version.
- Even if you edit cells of a previous version and save, the past version snapshot remains unchanged and preserved, and a new version is always safely created as the latest version.
- Changes become a saved version only after you click Save. Until then, "You have unsaved changes" is displayed.
Sharing and Re-sharing Specific Versions
In addition to the latest version, you can select a desired past version and re-share it with nurses via [Manage Schedule] > [Share Current Schedule] if needed.
- Nurses' mobile apps immediately reflect the active version most recently shared (re-shared) by the manager, rather than the highest version number.
- Even if a past version is shared, the workspace working state is safely maintained at the latest version.
Overwriting Current Schedule (Excel Upload)
If you have a schedule file (`.xlsx`) directly edited and finalized by the head nurse in an external Excel program, you can upload it to the system to replace the current schedule all at once.
- Click the [Manage Schedule] button at the top right of the schedule table and select [Overwrite Current Schedule].
- Drag or select the finalized schedule Excel file (`.xlsx`) to upload it in the popup window.
- Clicking the [Overwrite] button immediately applies the schedule as a new version and automatically distributes (shares) it to the ward nurses' mobile apps.
Precautions Before Overwriting
- Process unsaved changes beforehand: If there are unsaved edited cells in the schedule table, you must complete [Save] or [Revert] before executing the overwrite.
- File validation: The target month (period), nurse roster (employee ID / name), shift and off-shift codes, remaining M/H, etc., in the uploaded file must match the information registered in the system.
- Previous month share required: The previous period's schedule must already be shared for next month's schedule overwrite and sharing to proceed normally.
Notice — The following is for accounts that have already generated their first schedule.
Before creating next month's schedule, proceed in this order: 6. Staff Roster Management → 7. Edit Ward Shift Information (if needed) → 8. Monthly Schedule Preparation.
6. Staff Roster Management
Manage nurse information from the left menu Staff Roster.
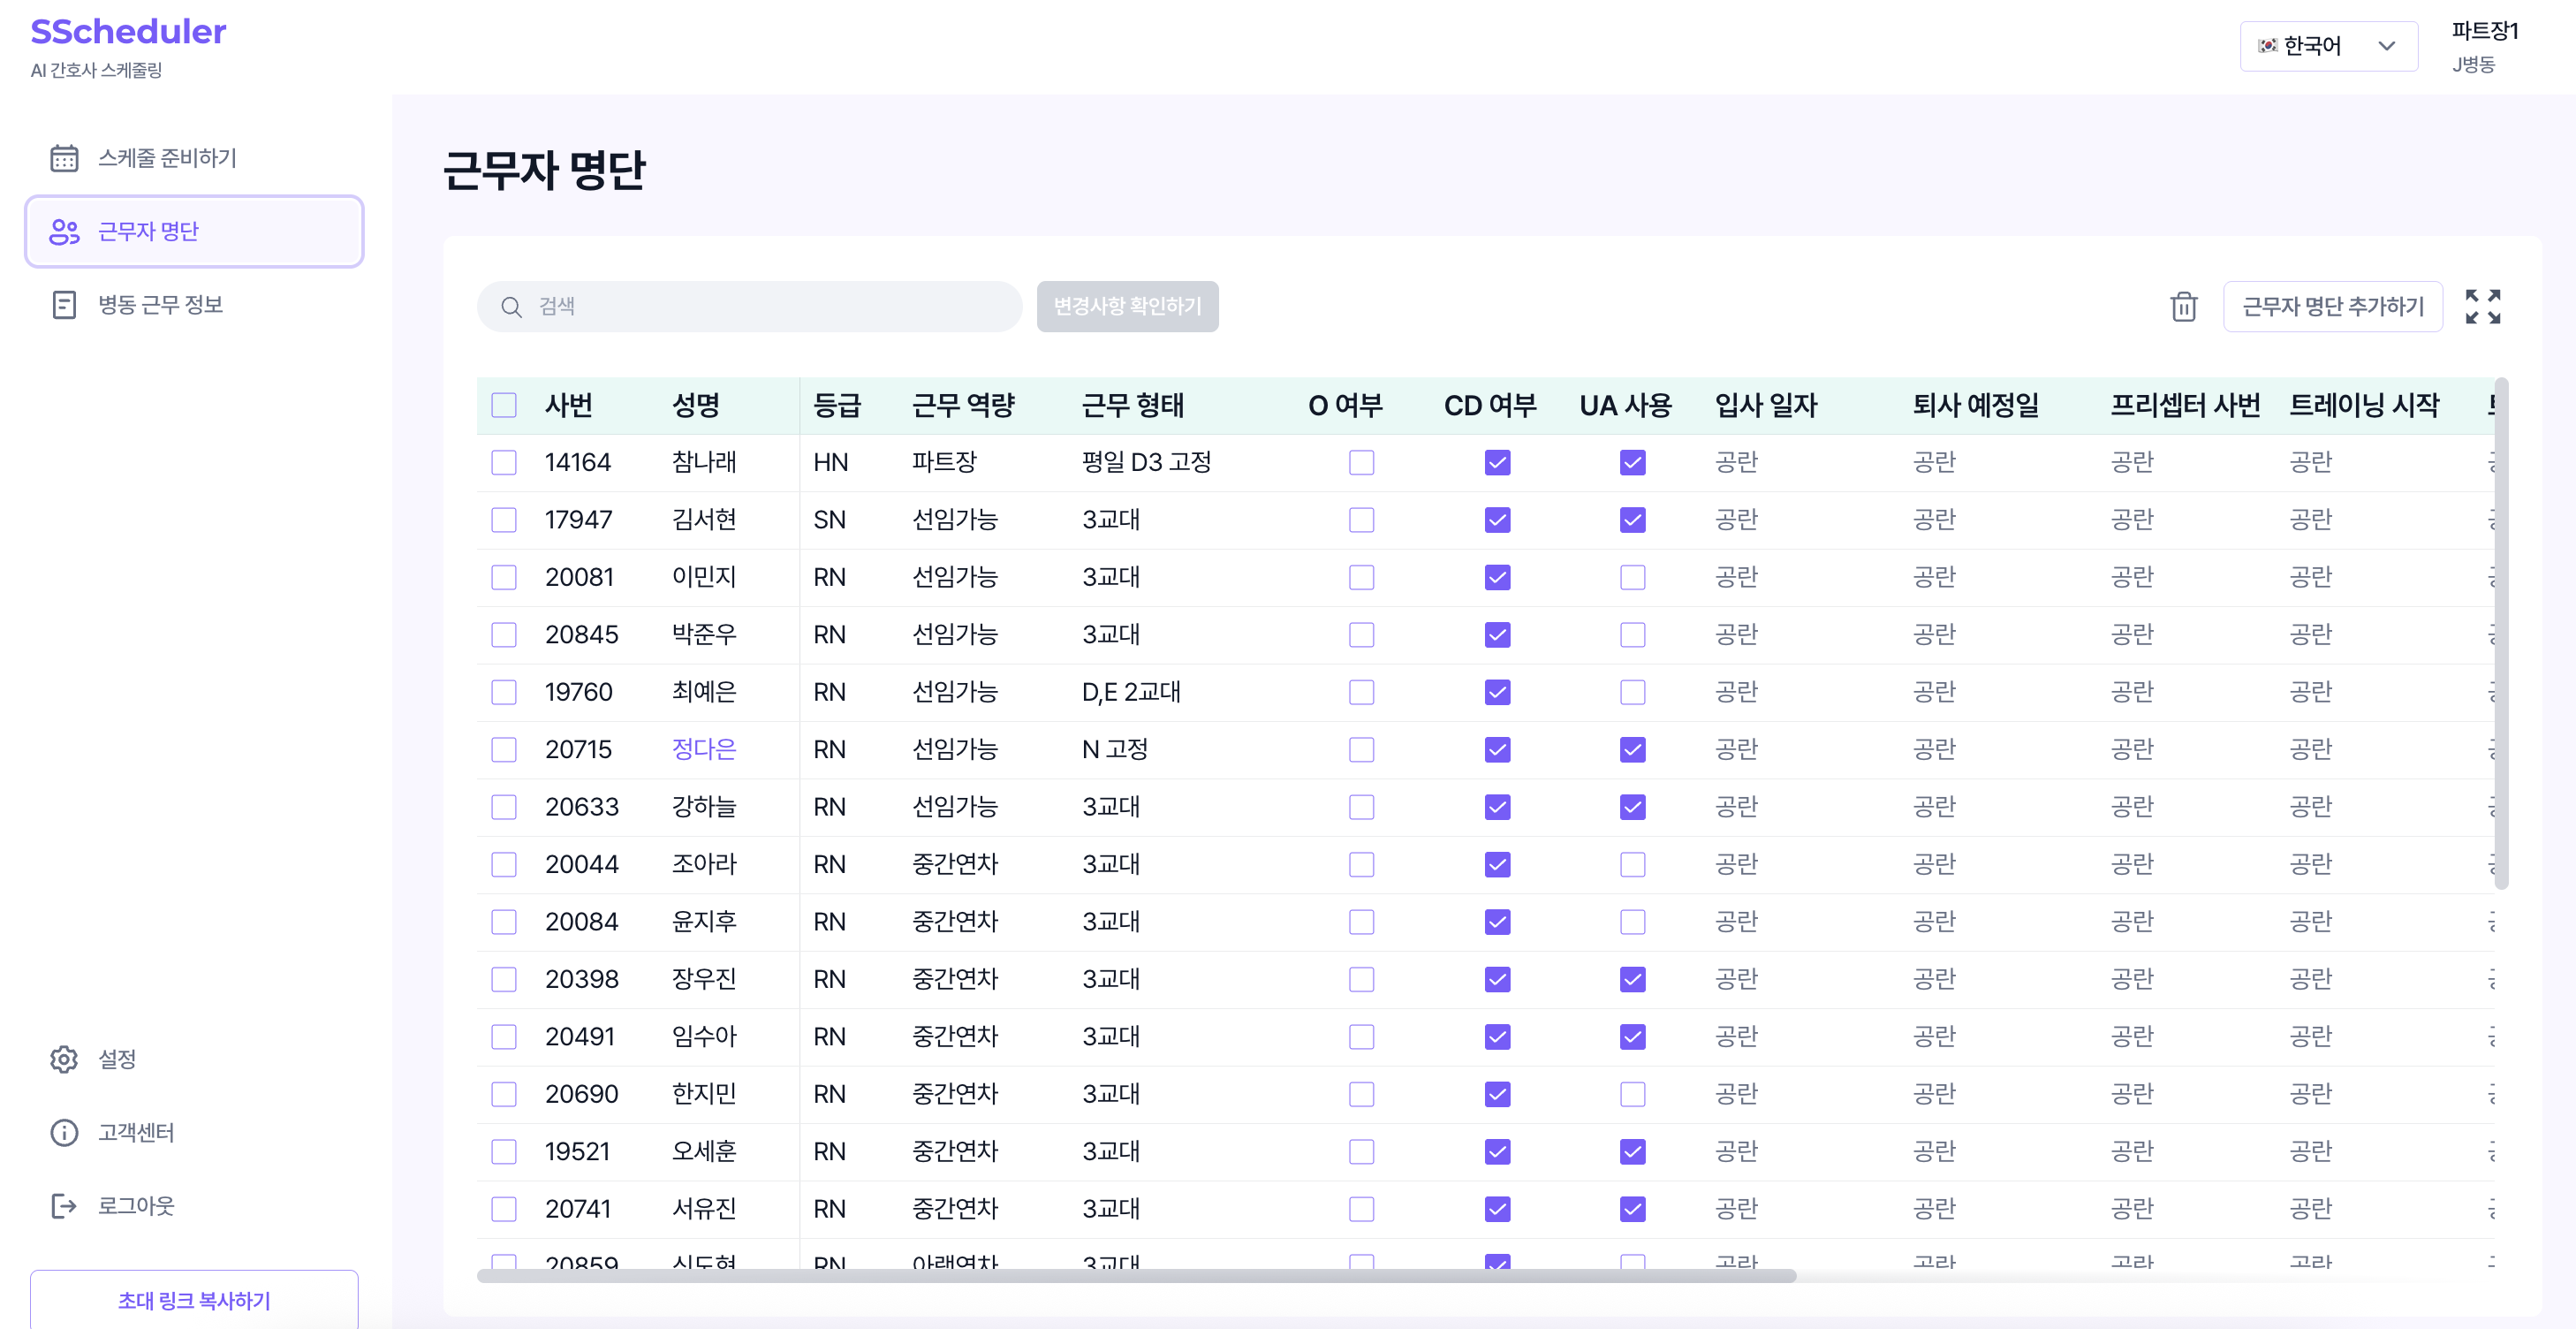
The following tasks can be done in Staff Roster Management.
- Add new staff who were not previously on the roster
- Departure of existing staff
- Change information such as shift type for existing staff
Monthly Pre-Generation Checklist
- Did you add new staff? Did you enter their hire date?
- Did you update work capability · shift type changes for existing staff? (e.g., 3-shift worker → fixed N worker, etc.)
- Did you exclude staff who have left?
- Did you update each staff member's off-shift code usage priority?
Adding Staff / Changing Information
Method 1. Add directly to the roster
- Click the Add Staff button at the top right of the table → register one person at a time in the direct entry screen.
- Required: Staff ID · Name · Rank · Work capability · Shift Type · O status · CD status
- Optional: Hire date, Planned departure date, Preceptor staff ID, Training period (start / end date)
For pregnant nurses, check CD status. Afterwards, entering CU in that nurse's wanted file will be reflected as CU in the schedule.
Method 2. Upload a roster file
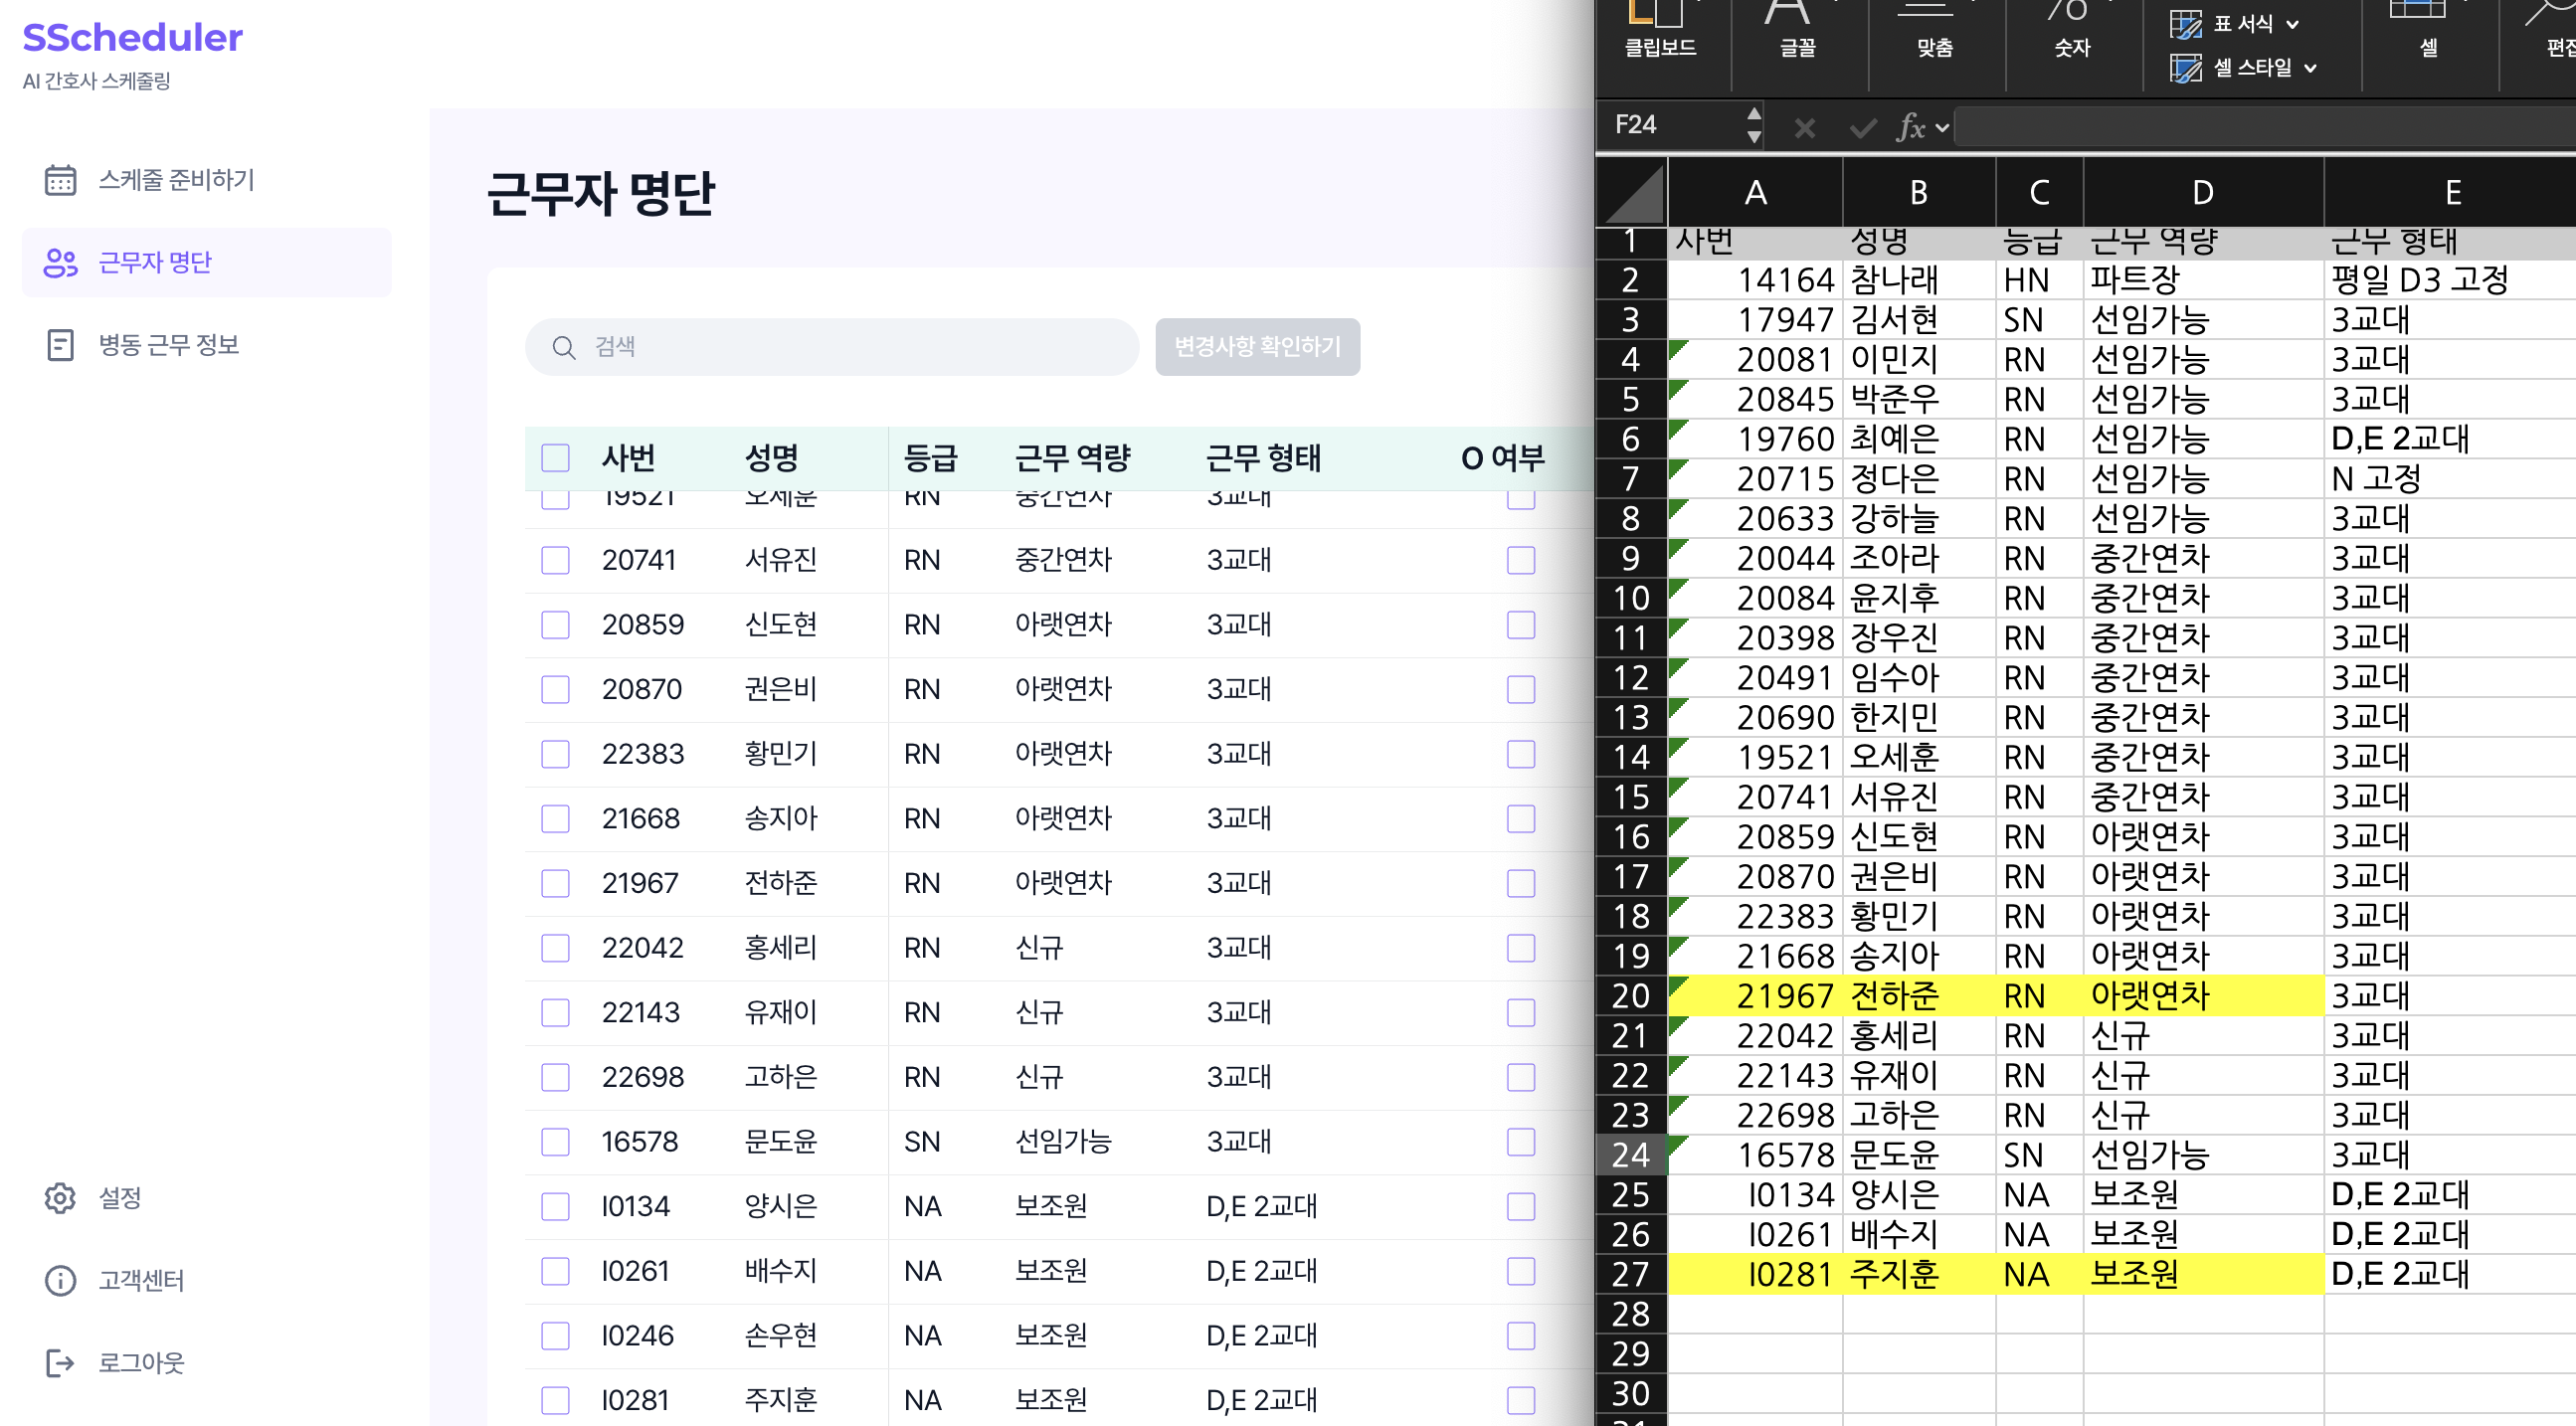
- Click Add Staff → upload the Excel file in the file upload screen.
- Uploading a file not only adds new staff, but also automatically applies rank · work capability · shift type changes for existing staff.
- If an upload error occurs, refer to the Download Example template to match the format.
Does the staff member you're adding need a new rank, work capability, or shift type? First add that item in 7. Edit Ward Shift Information, then register the roster.
Removing Staff
Method 1. Delete directly
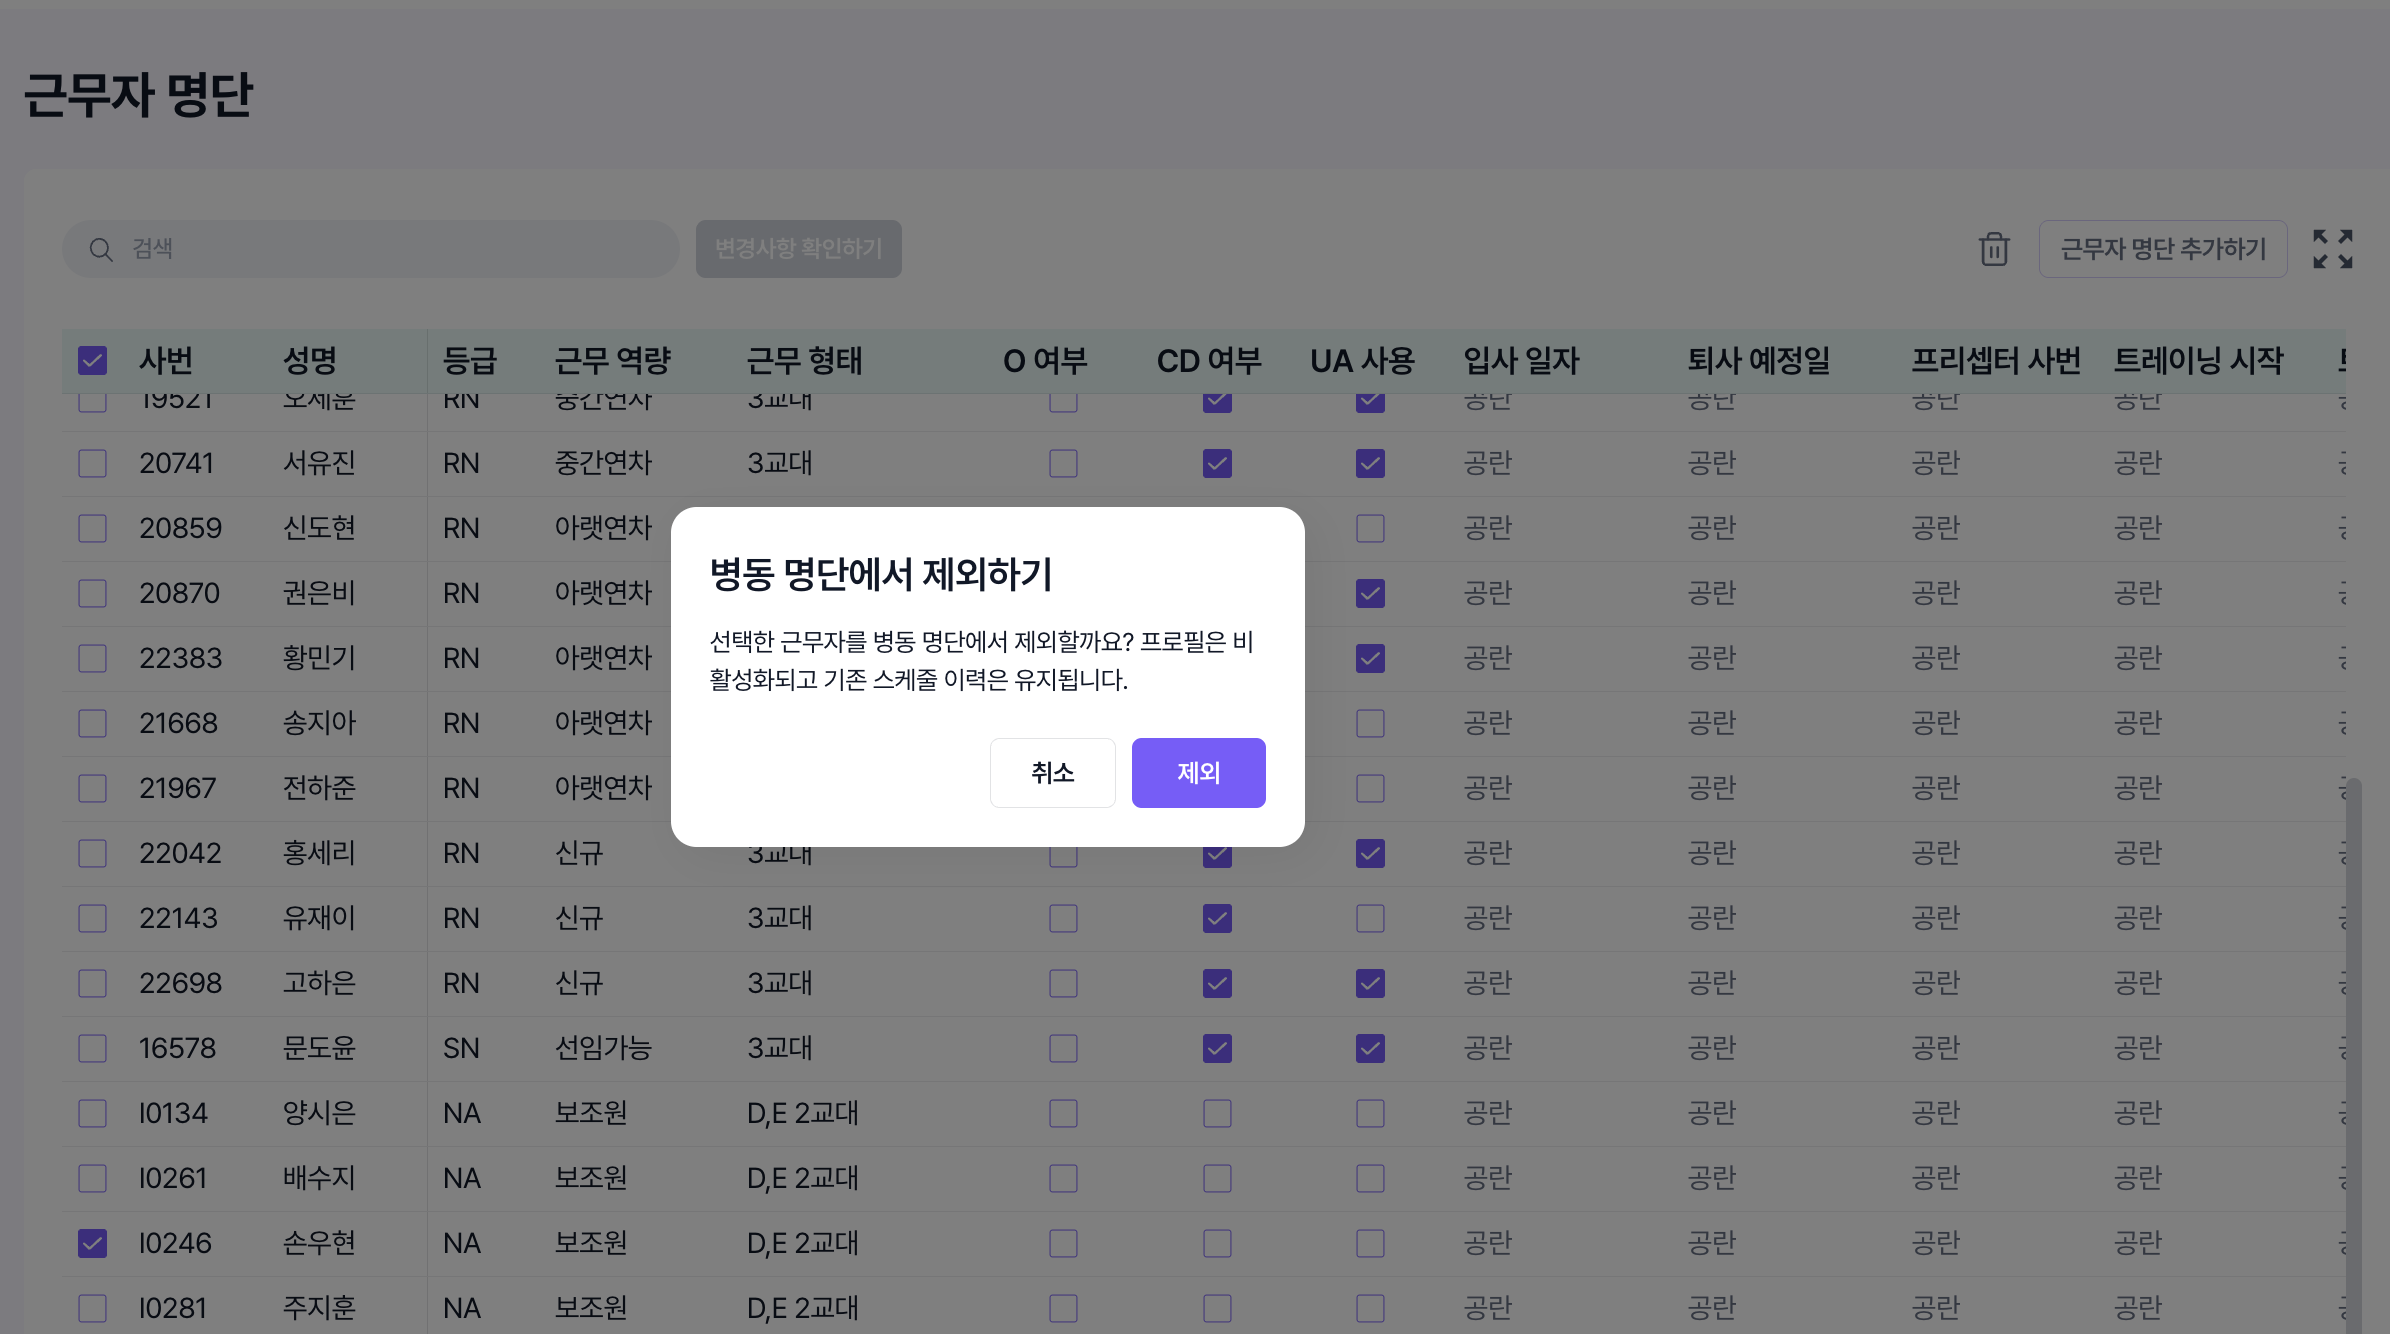
- Check the staff to delete and click the 🗑️ trash button at the top of the table to remove them from the ward roster.
Method 2. Enter a planned departure date
- Enter a date in the Planned Departure Date field of the staff Excel file and upload it. The staff member is automatically deactivated on that date and the manager is notified.
Editing the Roster
When editing staff information, also specify the effective start date (e.g., 2026-06). The change applies from that month onward.
Use the Review Changes button to preview the list of pending changes by rank · work capability · shift type · O status · CD status.
7. Edit Ward Shift Information
From the left menu Ward Shift Info, you can edit the items configured during onboarding: Rank / Work Capability / Off-Shift Codes / Shift Codes / Shift Type / Staffing Patterns / Forbidden Patterns.
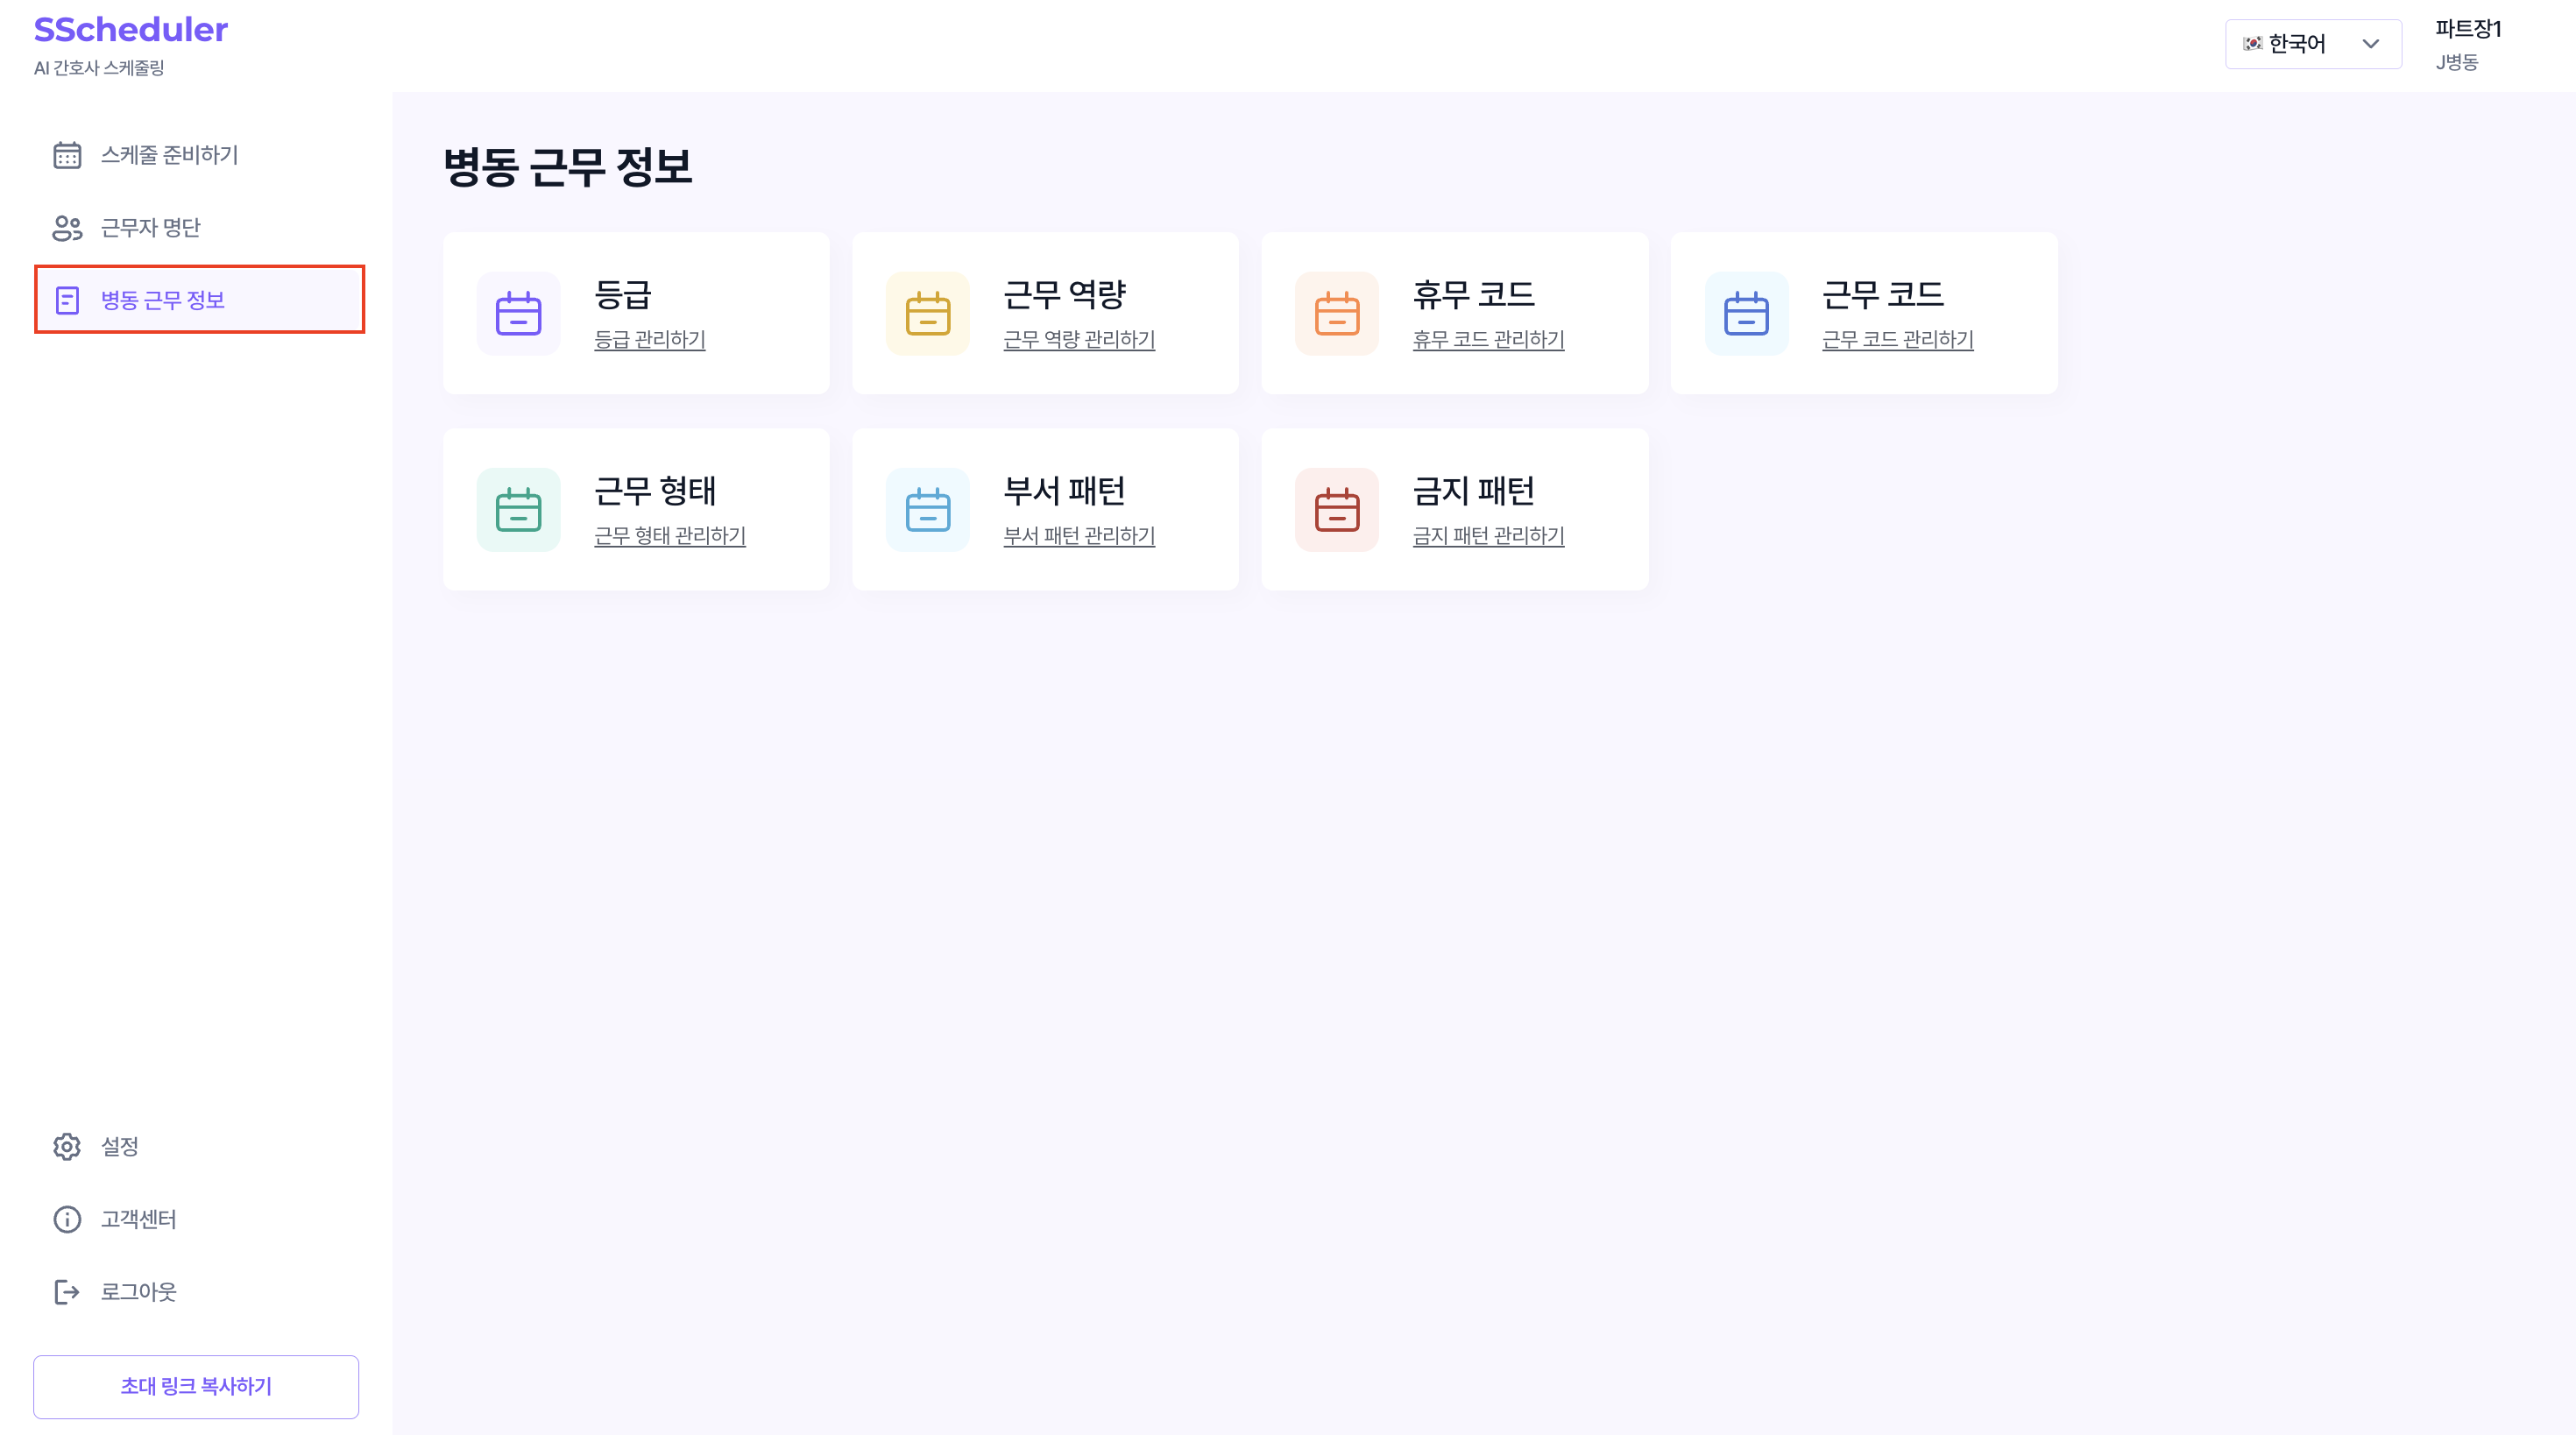
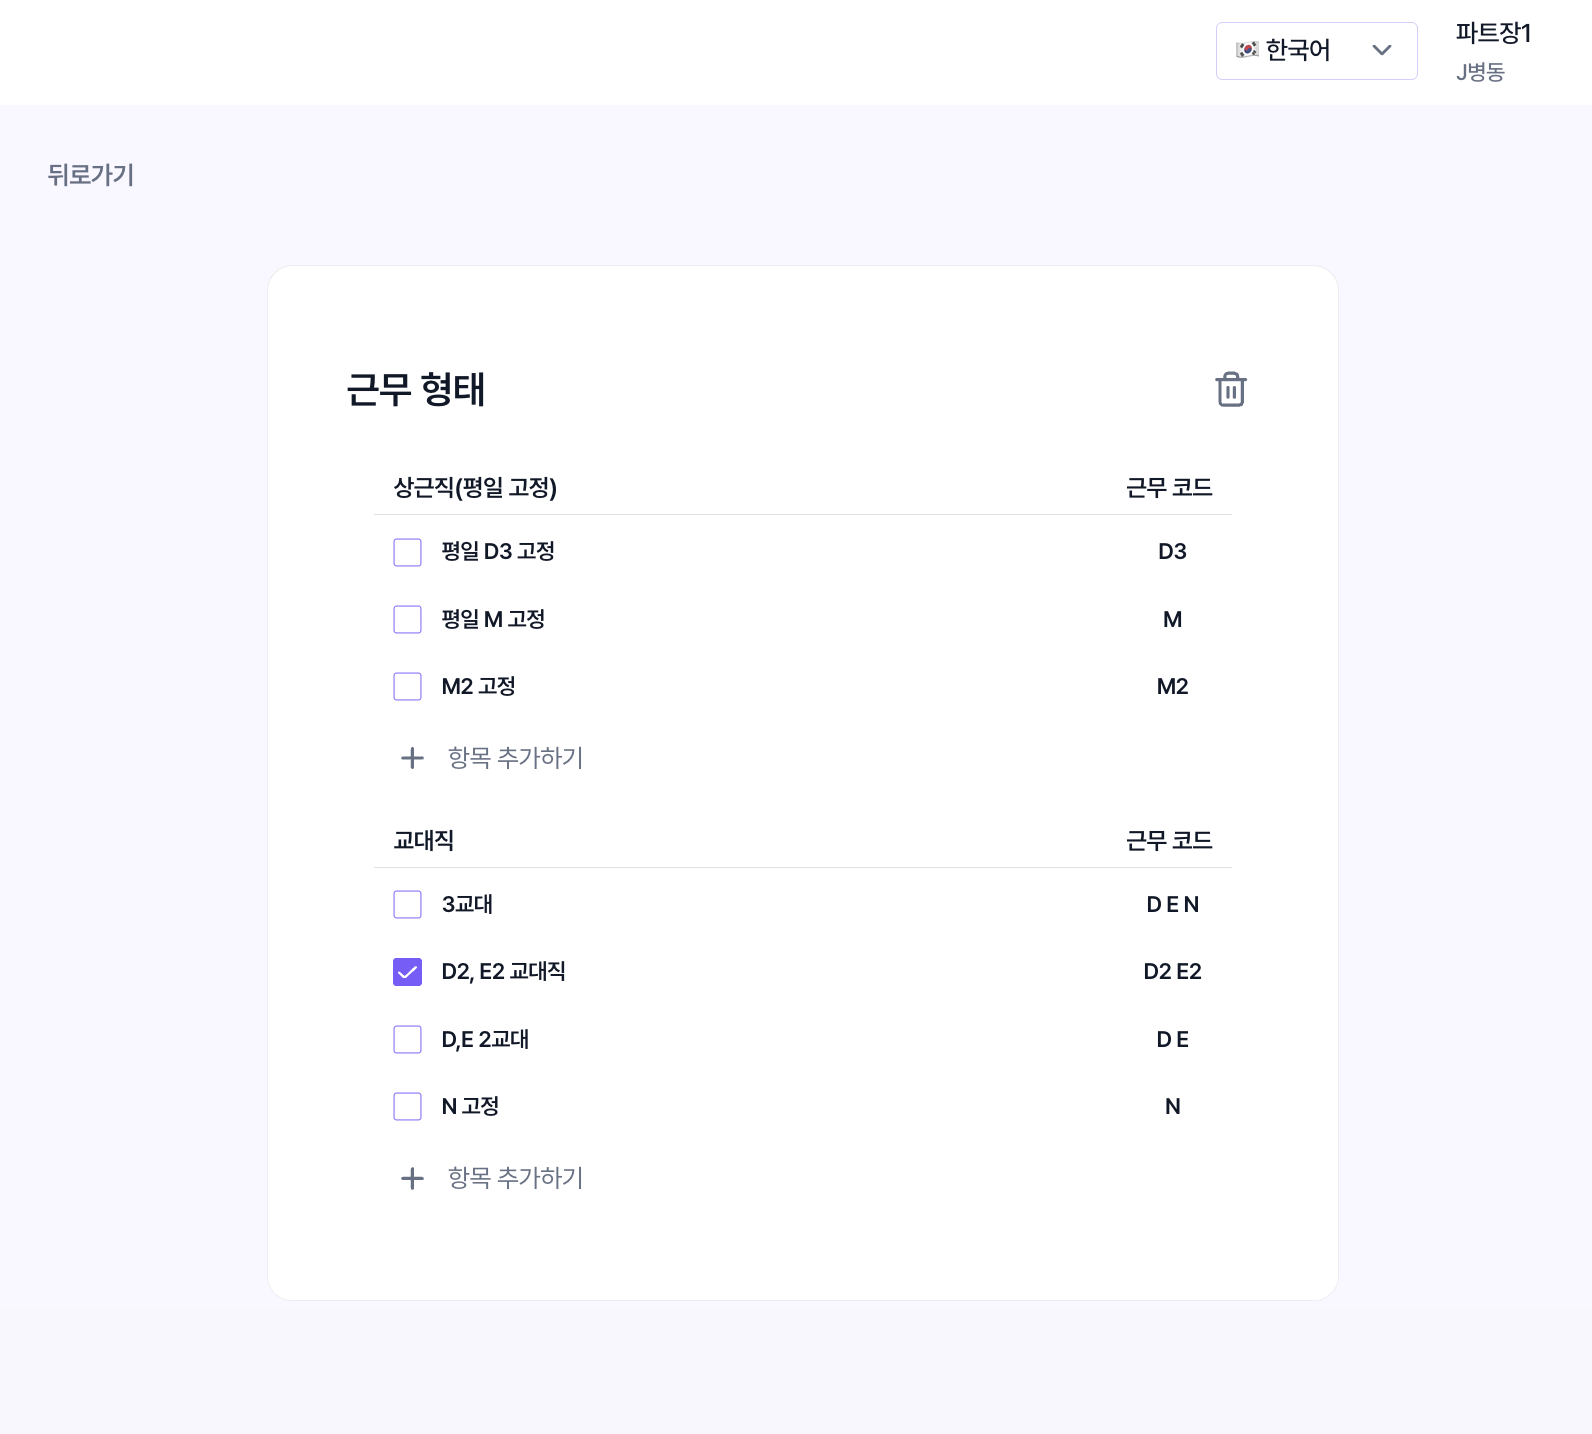
- To delete items no longer in use, check them and click the trash button.
- If a new item is needed, select + Add Item.
- Forbidden patterns can be created directly by selecting your ward's registered shift codes in the order you want to forbid them.
Settings are interconnected, so order matters!
- To add a staffing pattern based on a new work capability: Update work capability → Update Staffing Pattern
- To include shift codes that didn't exist before (e.g., E2, NG) in a shift type: Update Shift Codes → Update Shift Type
Deleted items cannot be recovered. If you delete something by mistake, you must set it up again via Add Item.
8. Monthly Schedule Preparation
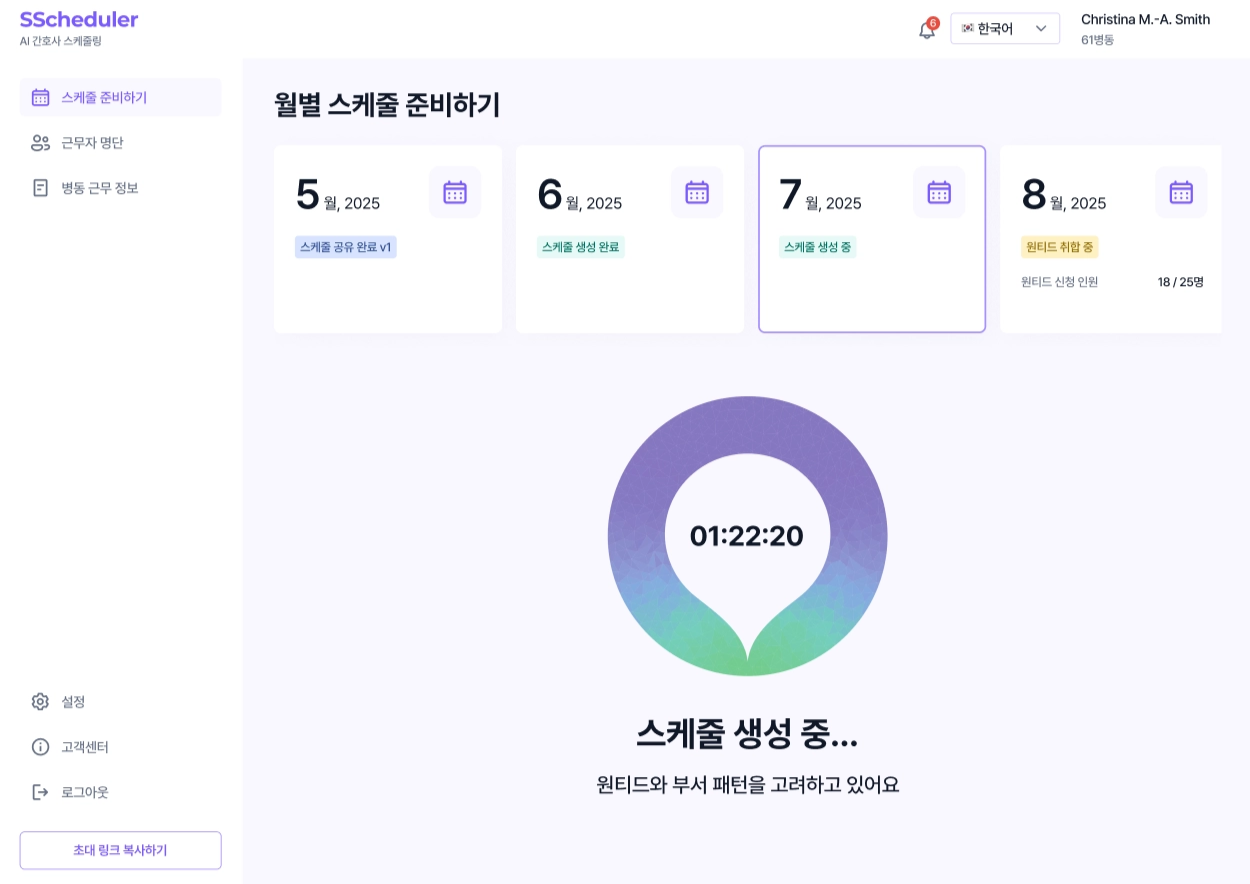
This is the main page shown after login, where you can view and manage each month's schedule status as cards.
Monthly Status
Preparing the Wanted File
Select a month whose wanted requests have not yet been collected, then click the Upload Wanted File button at the bottom center of the screen to upload the nurses' shift preference file.
Reviewing Off-Shift Information
After collecting wanted requests and before generating each month's schedule, use Review Off-Shift Info to check and adjust each nurse's remaining off-shift balance in advance.
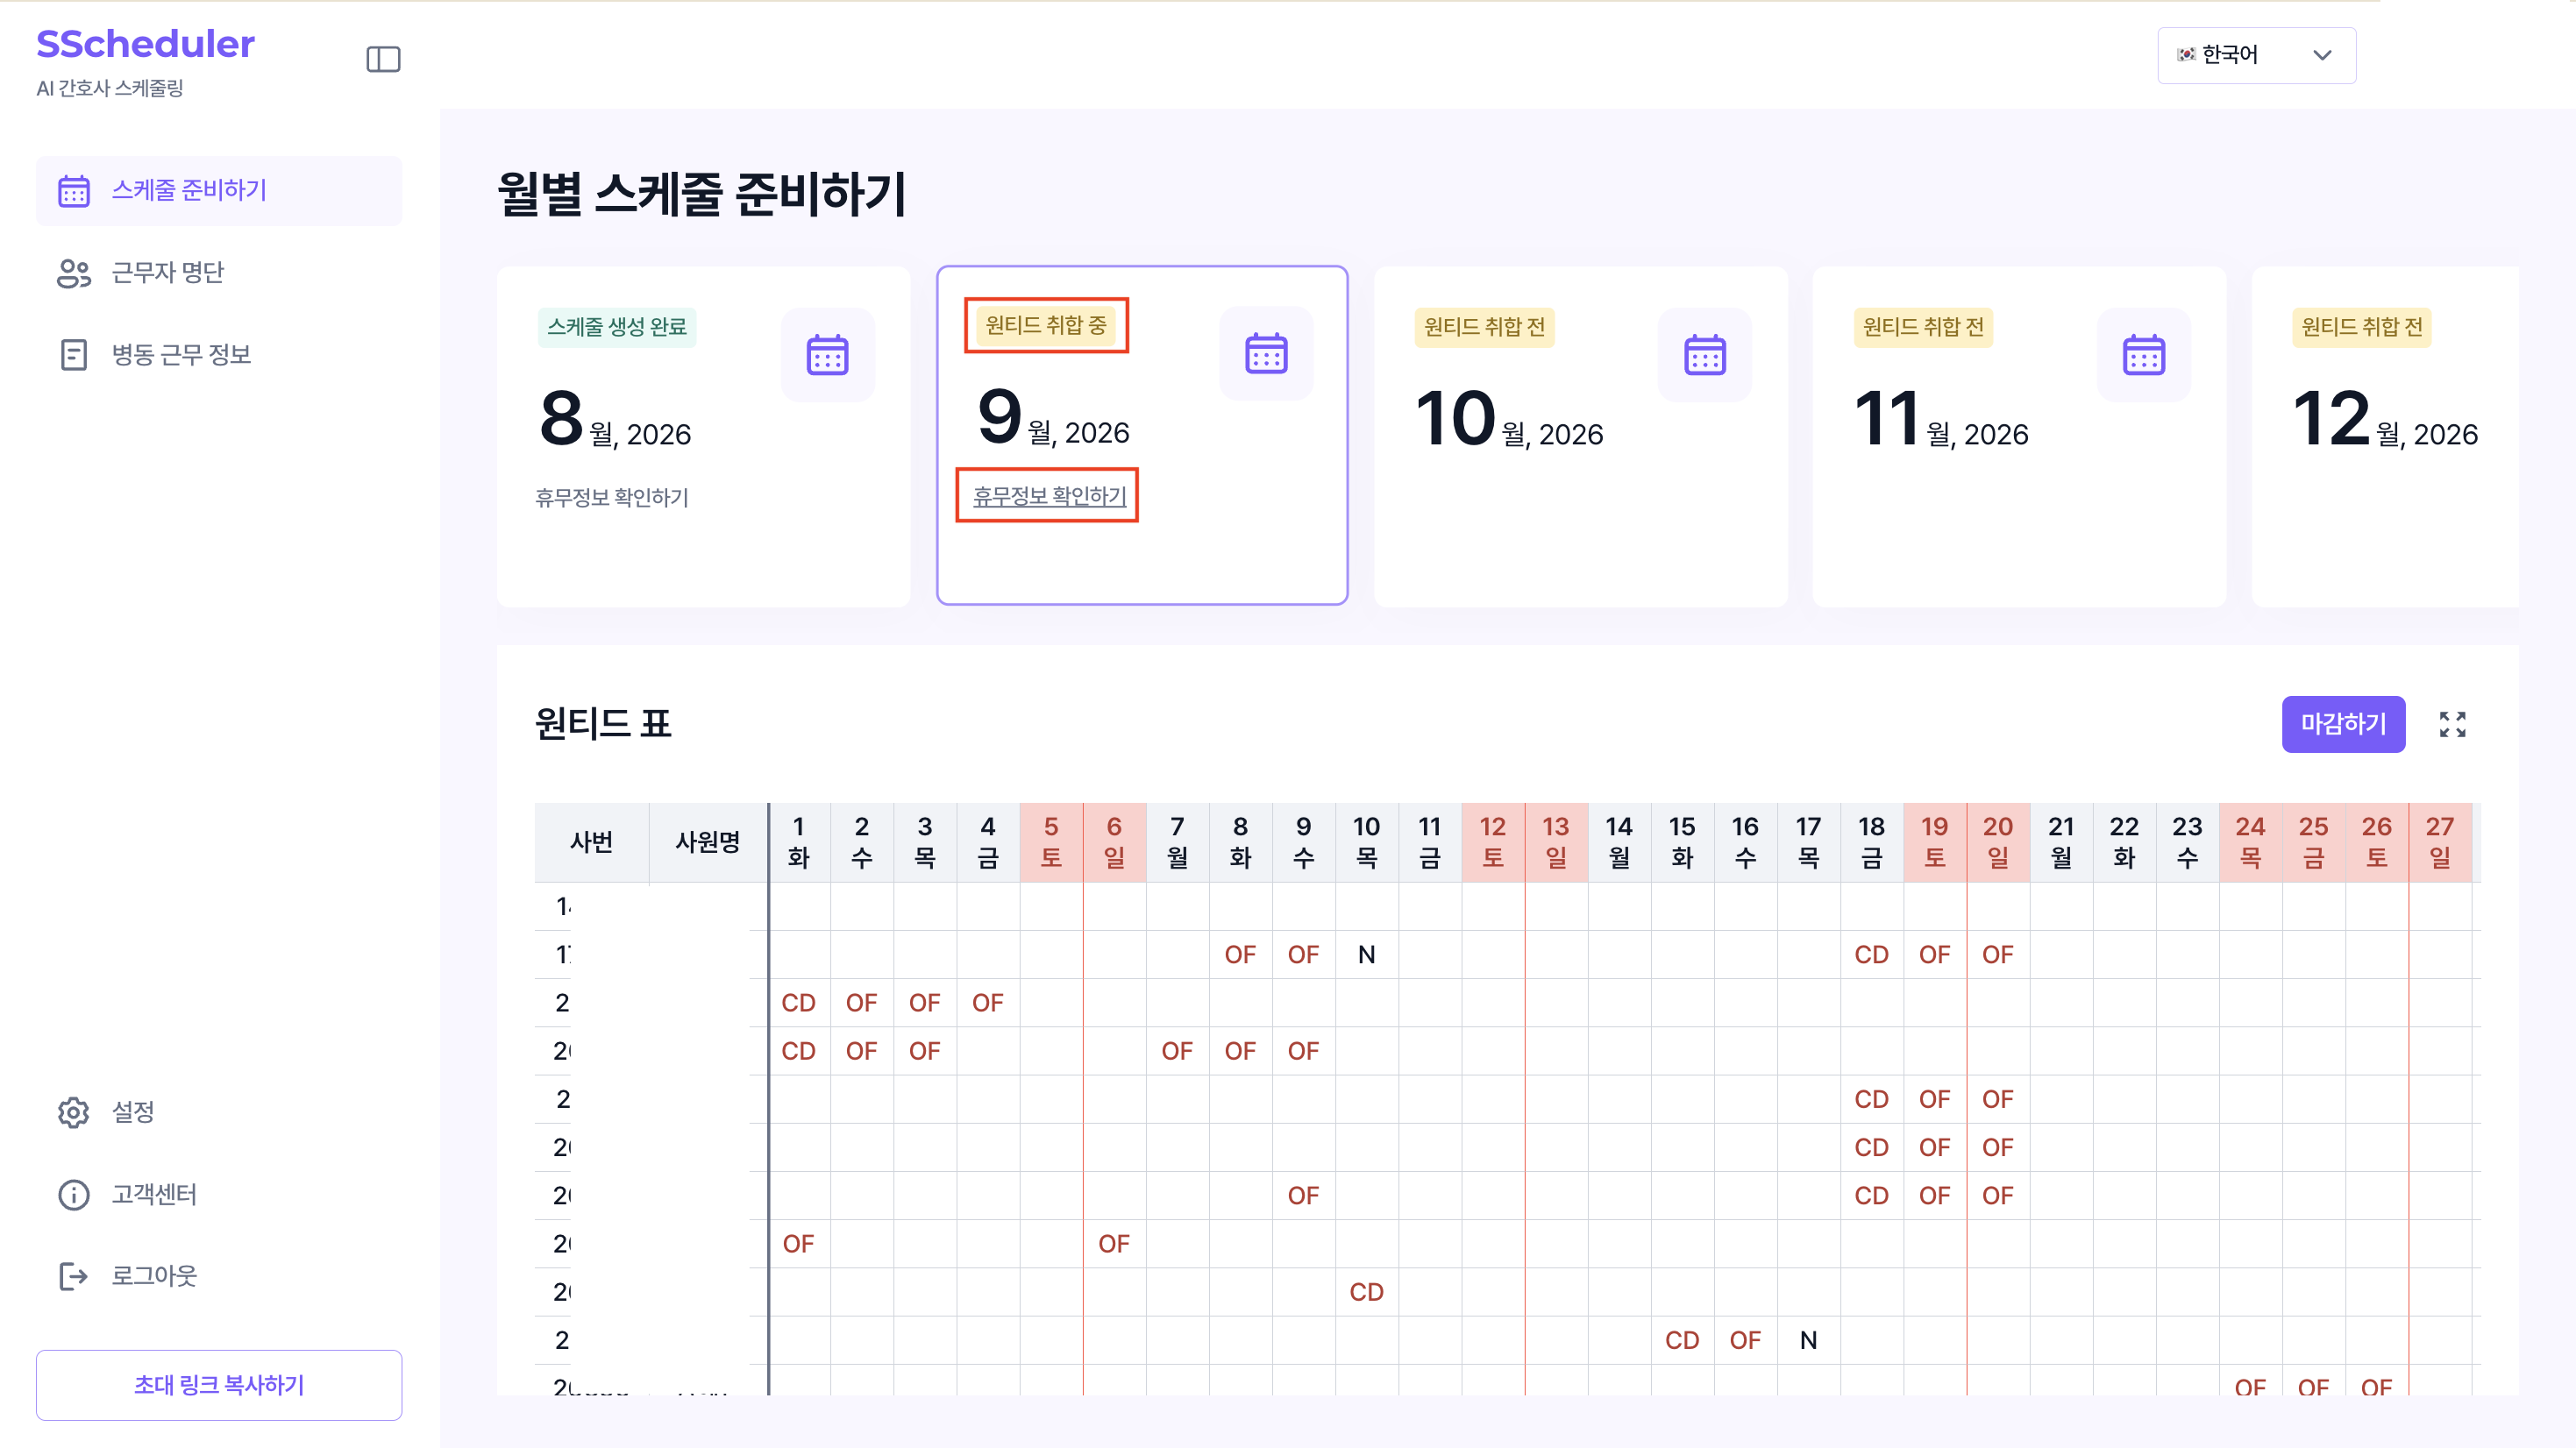
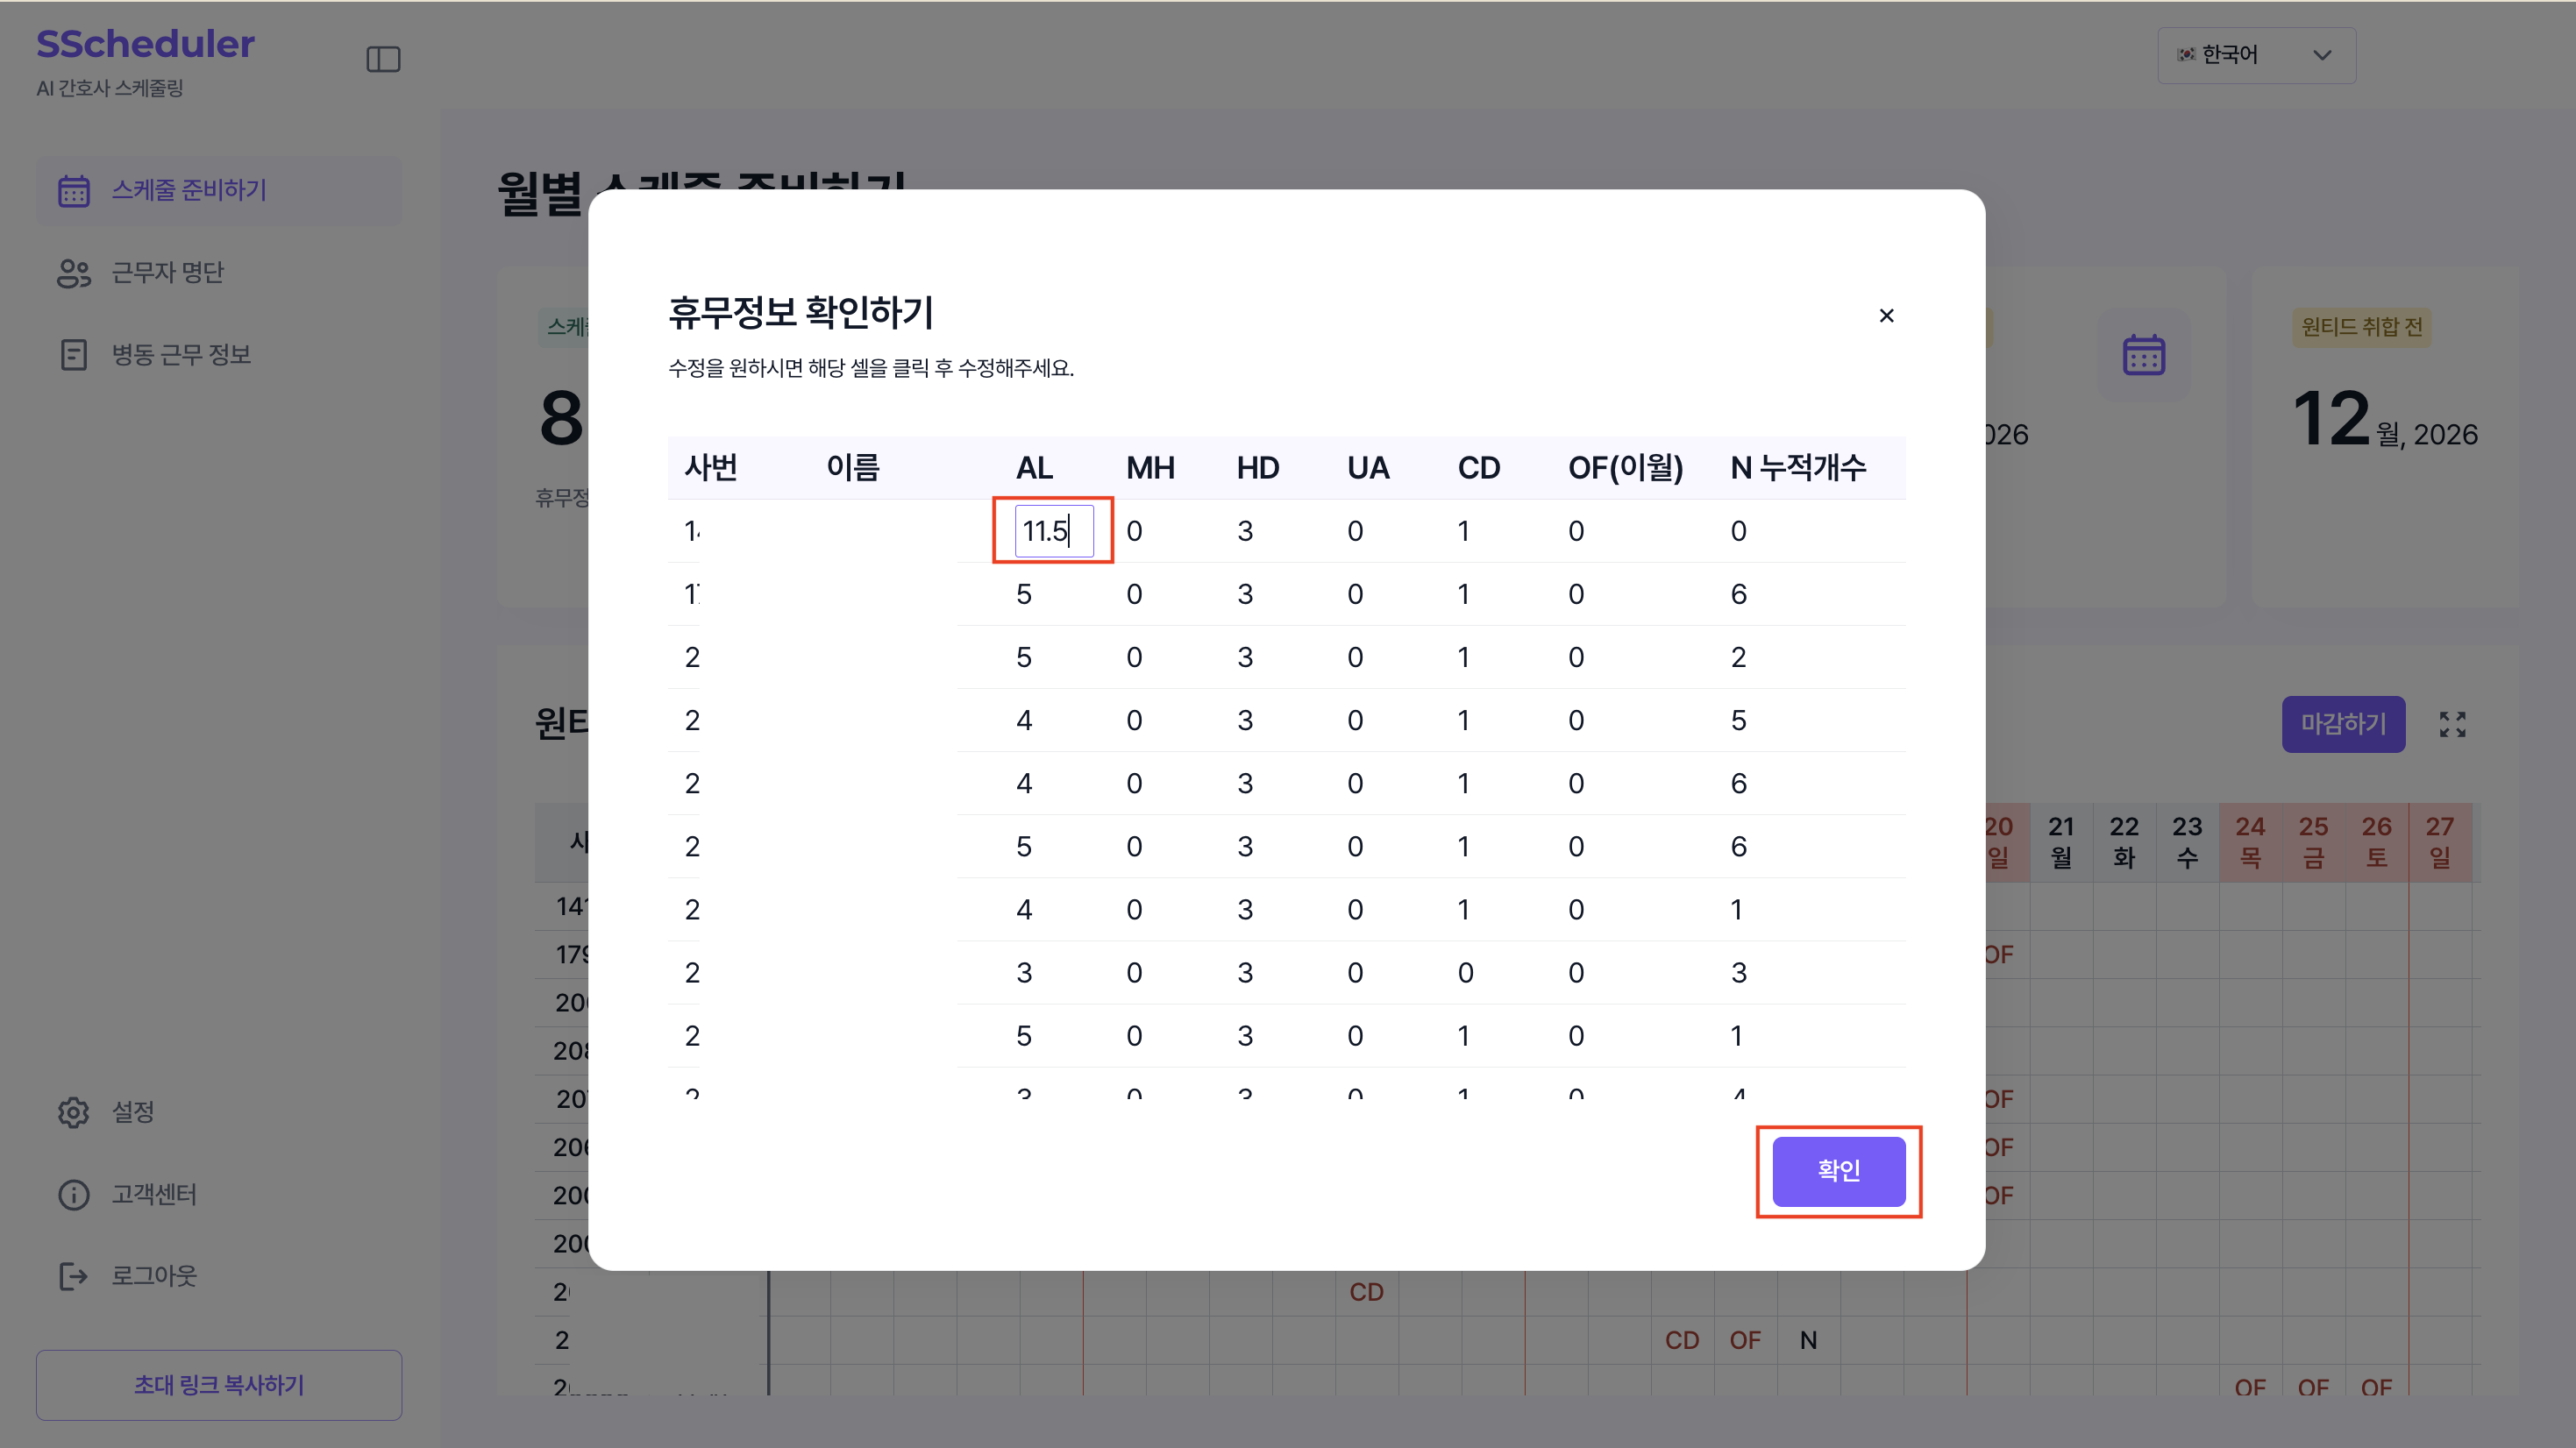
- Click Review Off-Shift Info at the bottom of the month card.
- Review each nurse's off-shift information and click cells to make changes.
- Click Confirm when finished.
Remaining off-shift balances are available after wanted requests have been collected. Balances are calculated from past usage and accrual conditions, so review them before generating each month's schedule.
Generating Next Month's Schedule
If you also upload next month's wanted file, you can generate next month's schedule right after reviewing this month's.
- Select next month's card and proceed with Upload Wanted File.
- Go through the final confirmation and closing steps.
- Once closing is complete, next month's schedule is generated automatically.
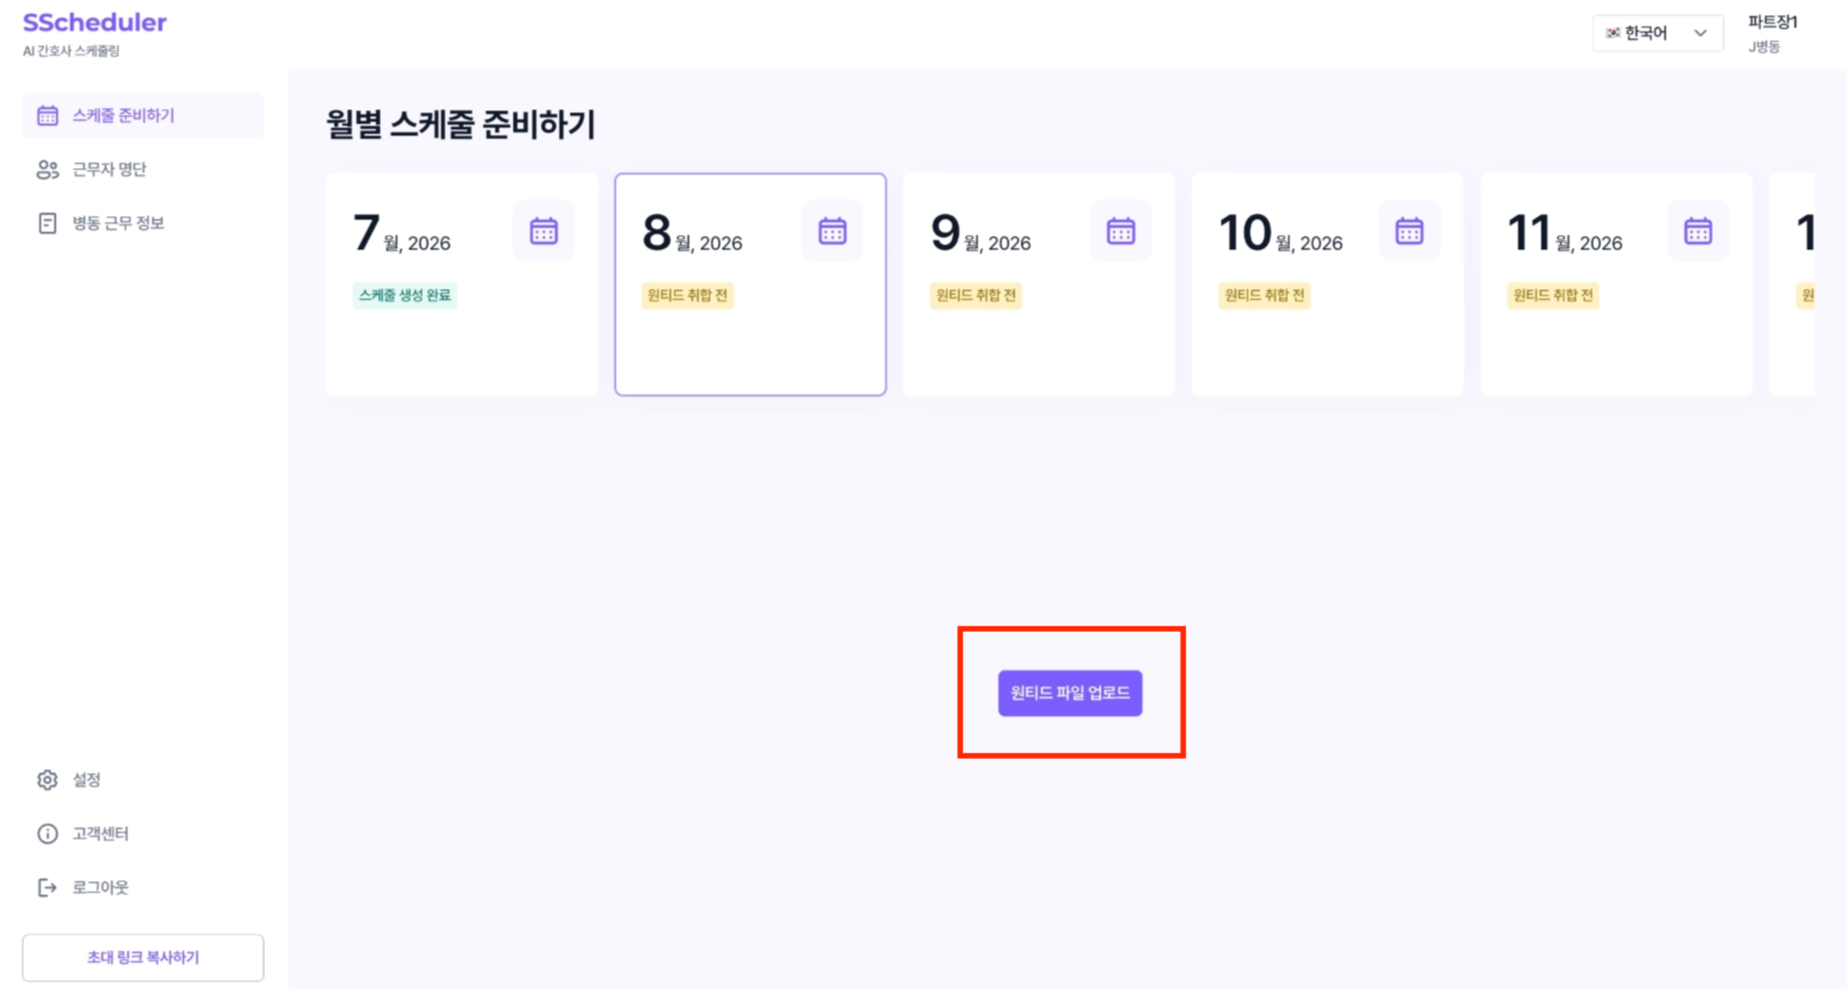
9. Settings and Others
Settings
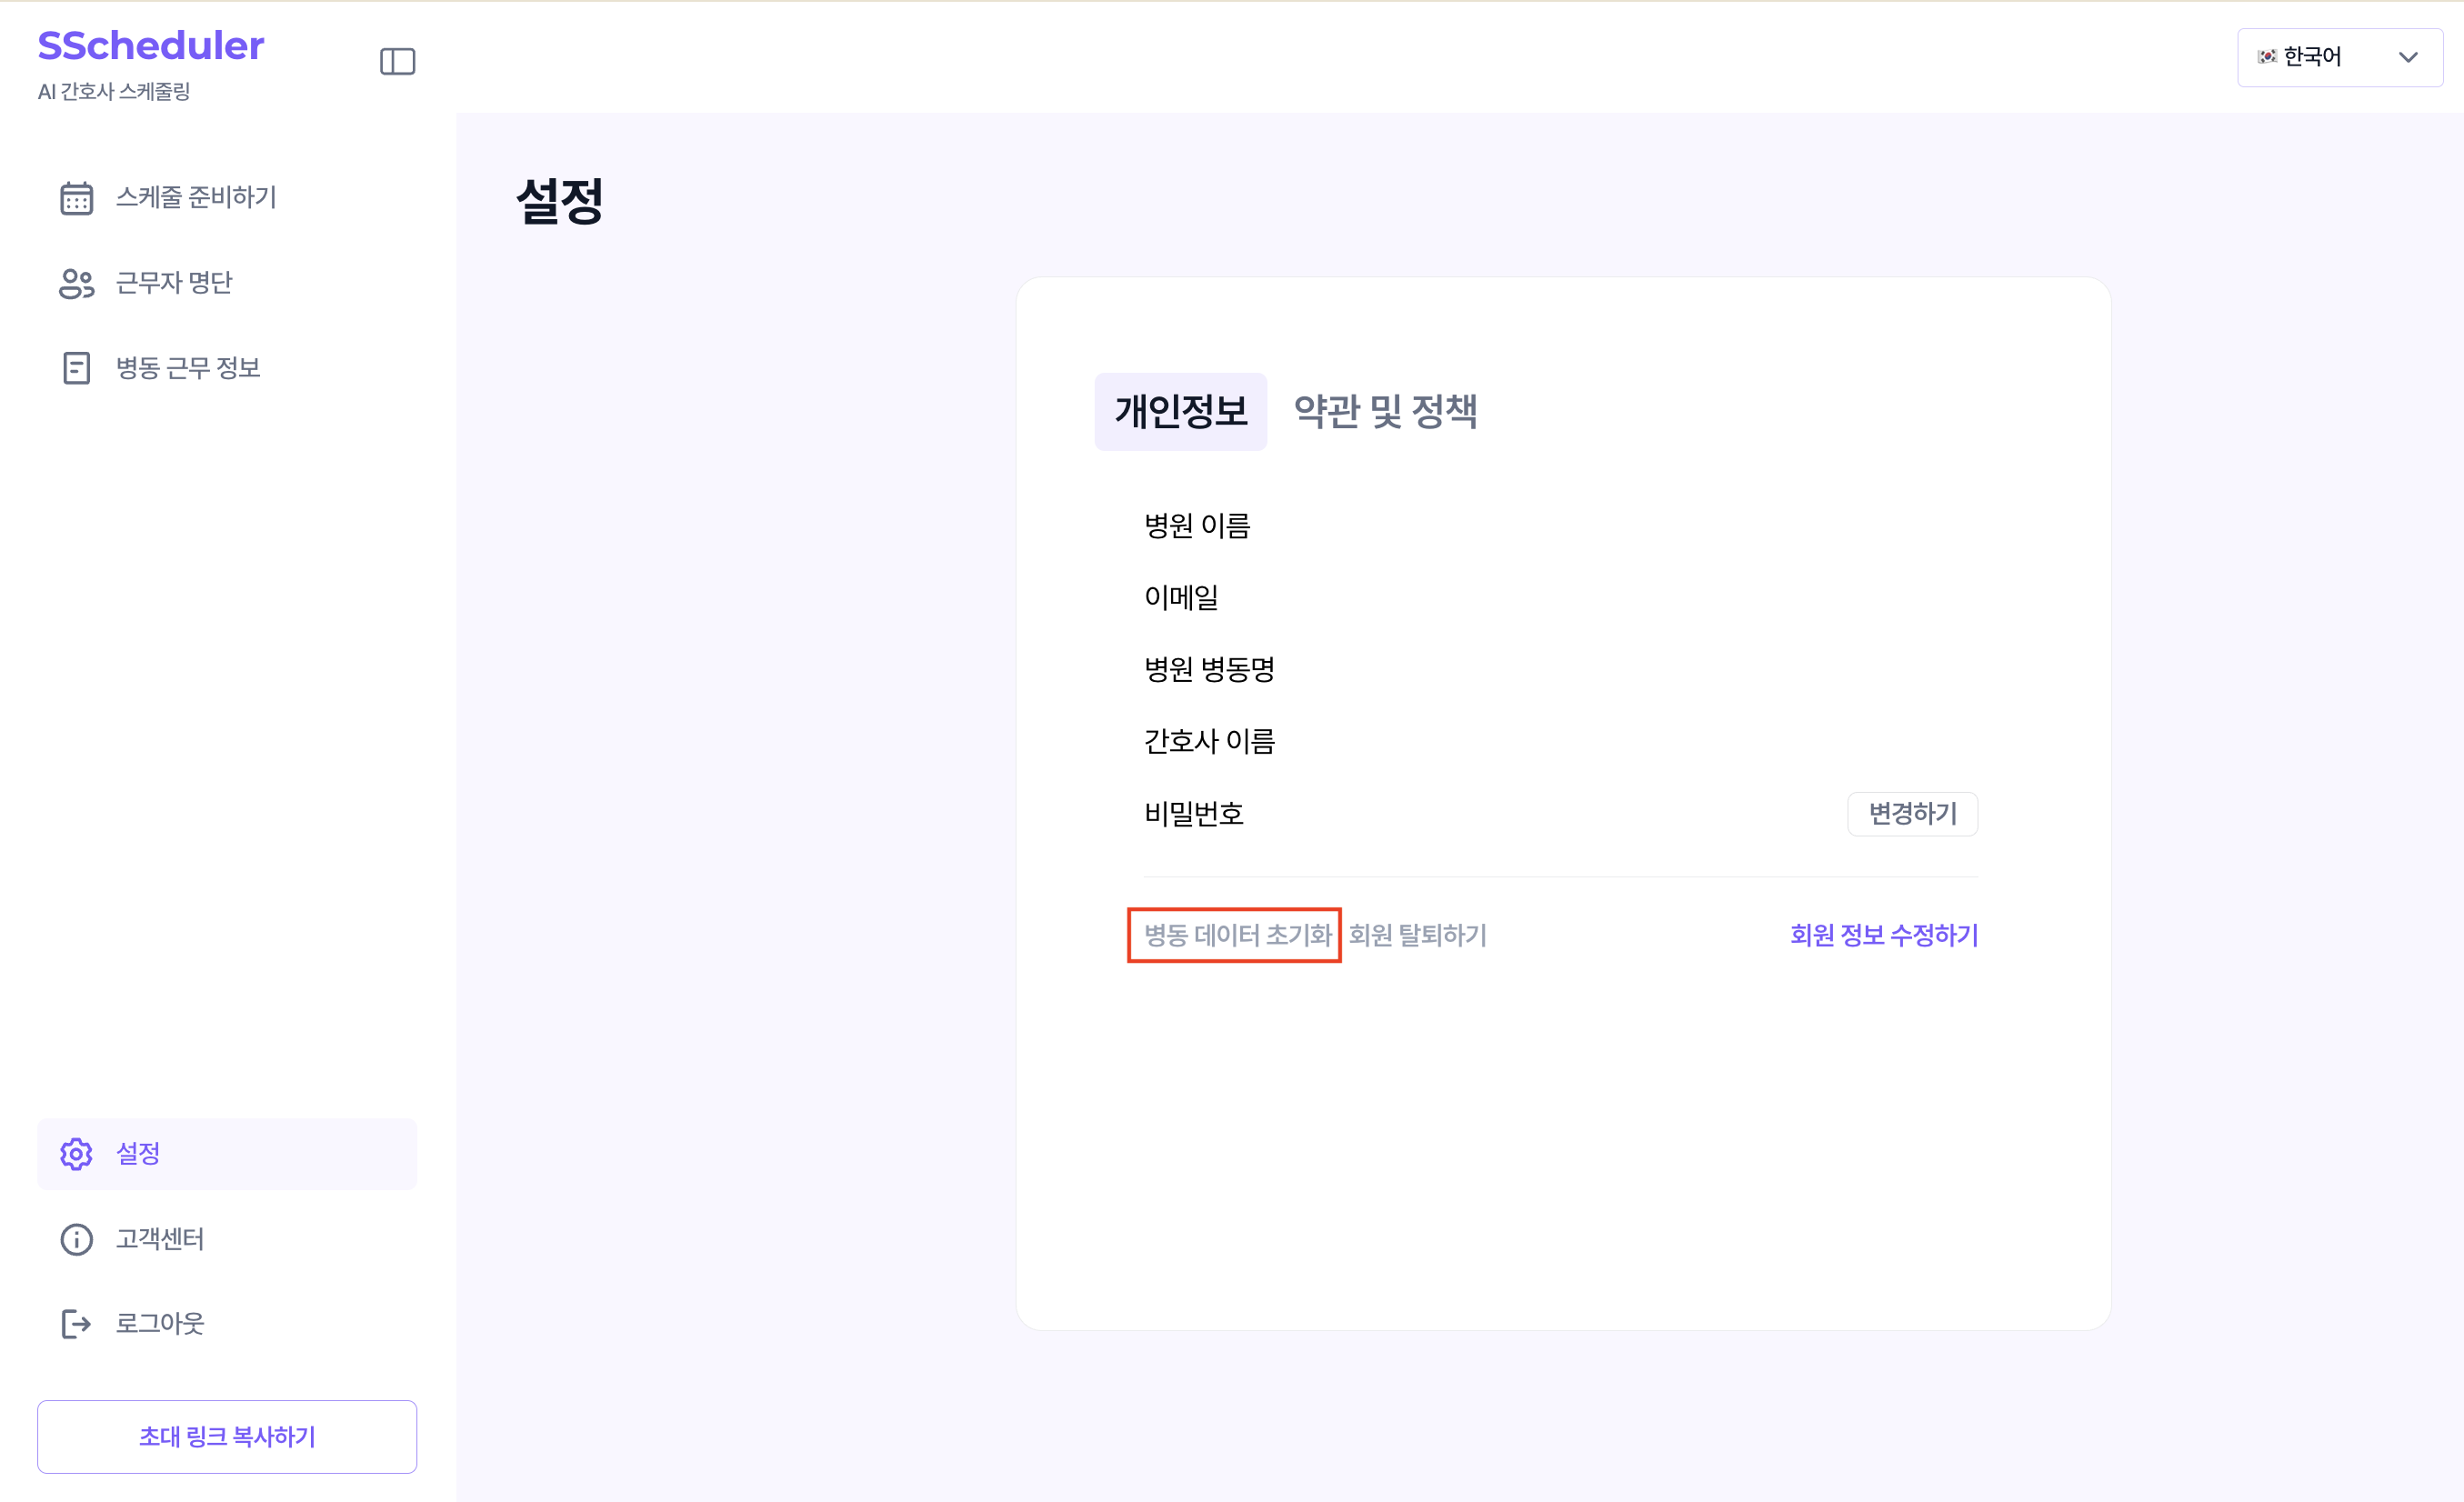
In Settings at the bottom left, you can change your password or delete your account, and change your name via [Edit Profile].
Reset Ward Data
Use this when you want to set up the ward from scratch.
- If the Keep onboarding data option is on, only the files uploaded in the last onboarding step (Data Upload) are reset; settings such as rank · work capability · staffing patterns are preserved and you return to the onboarding page.
- If the option is off, all ward settings and data are deleted and you must redo onboarding from the beginning.
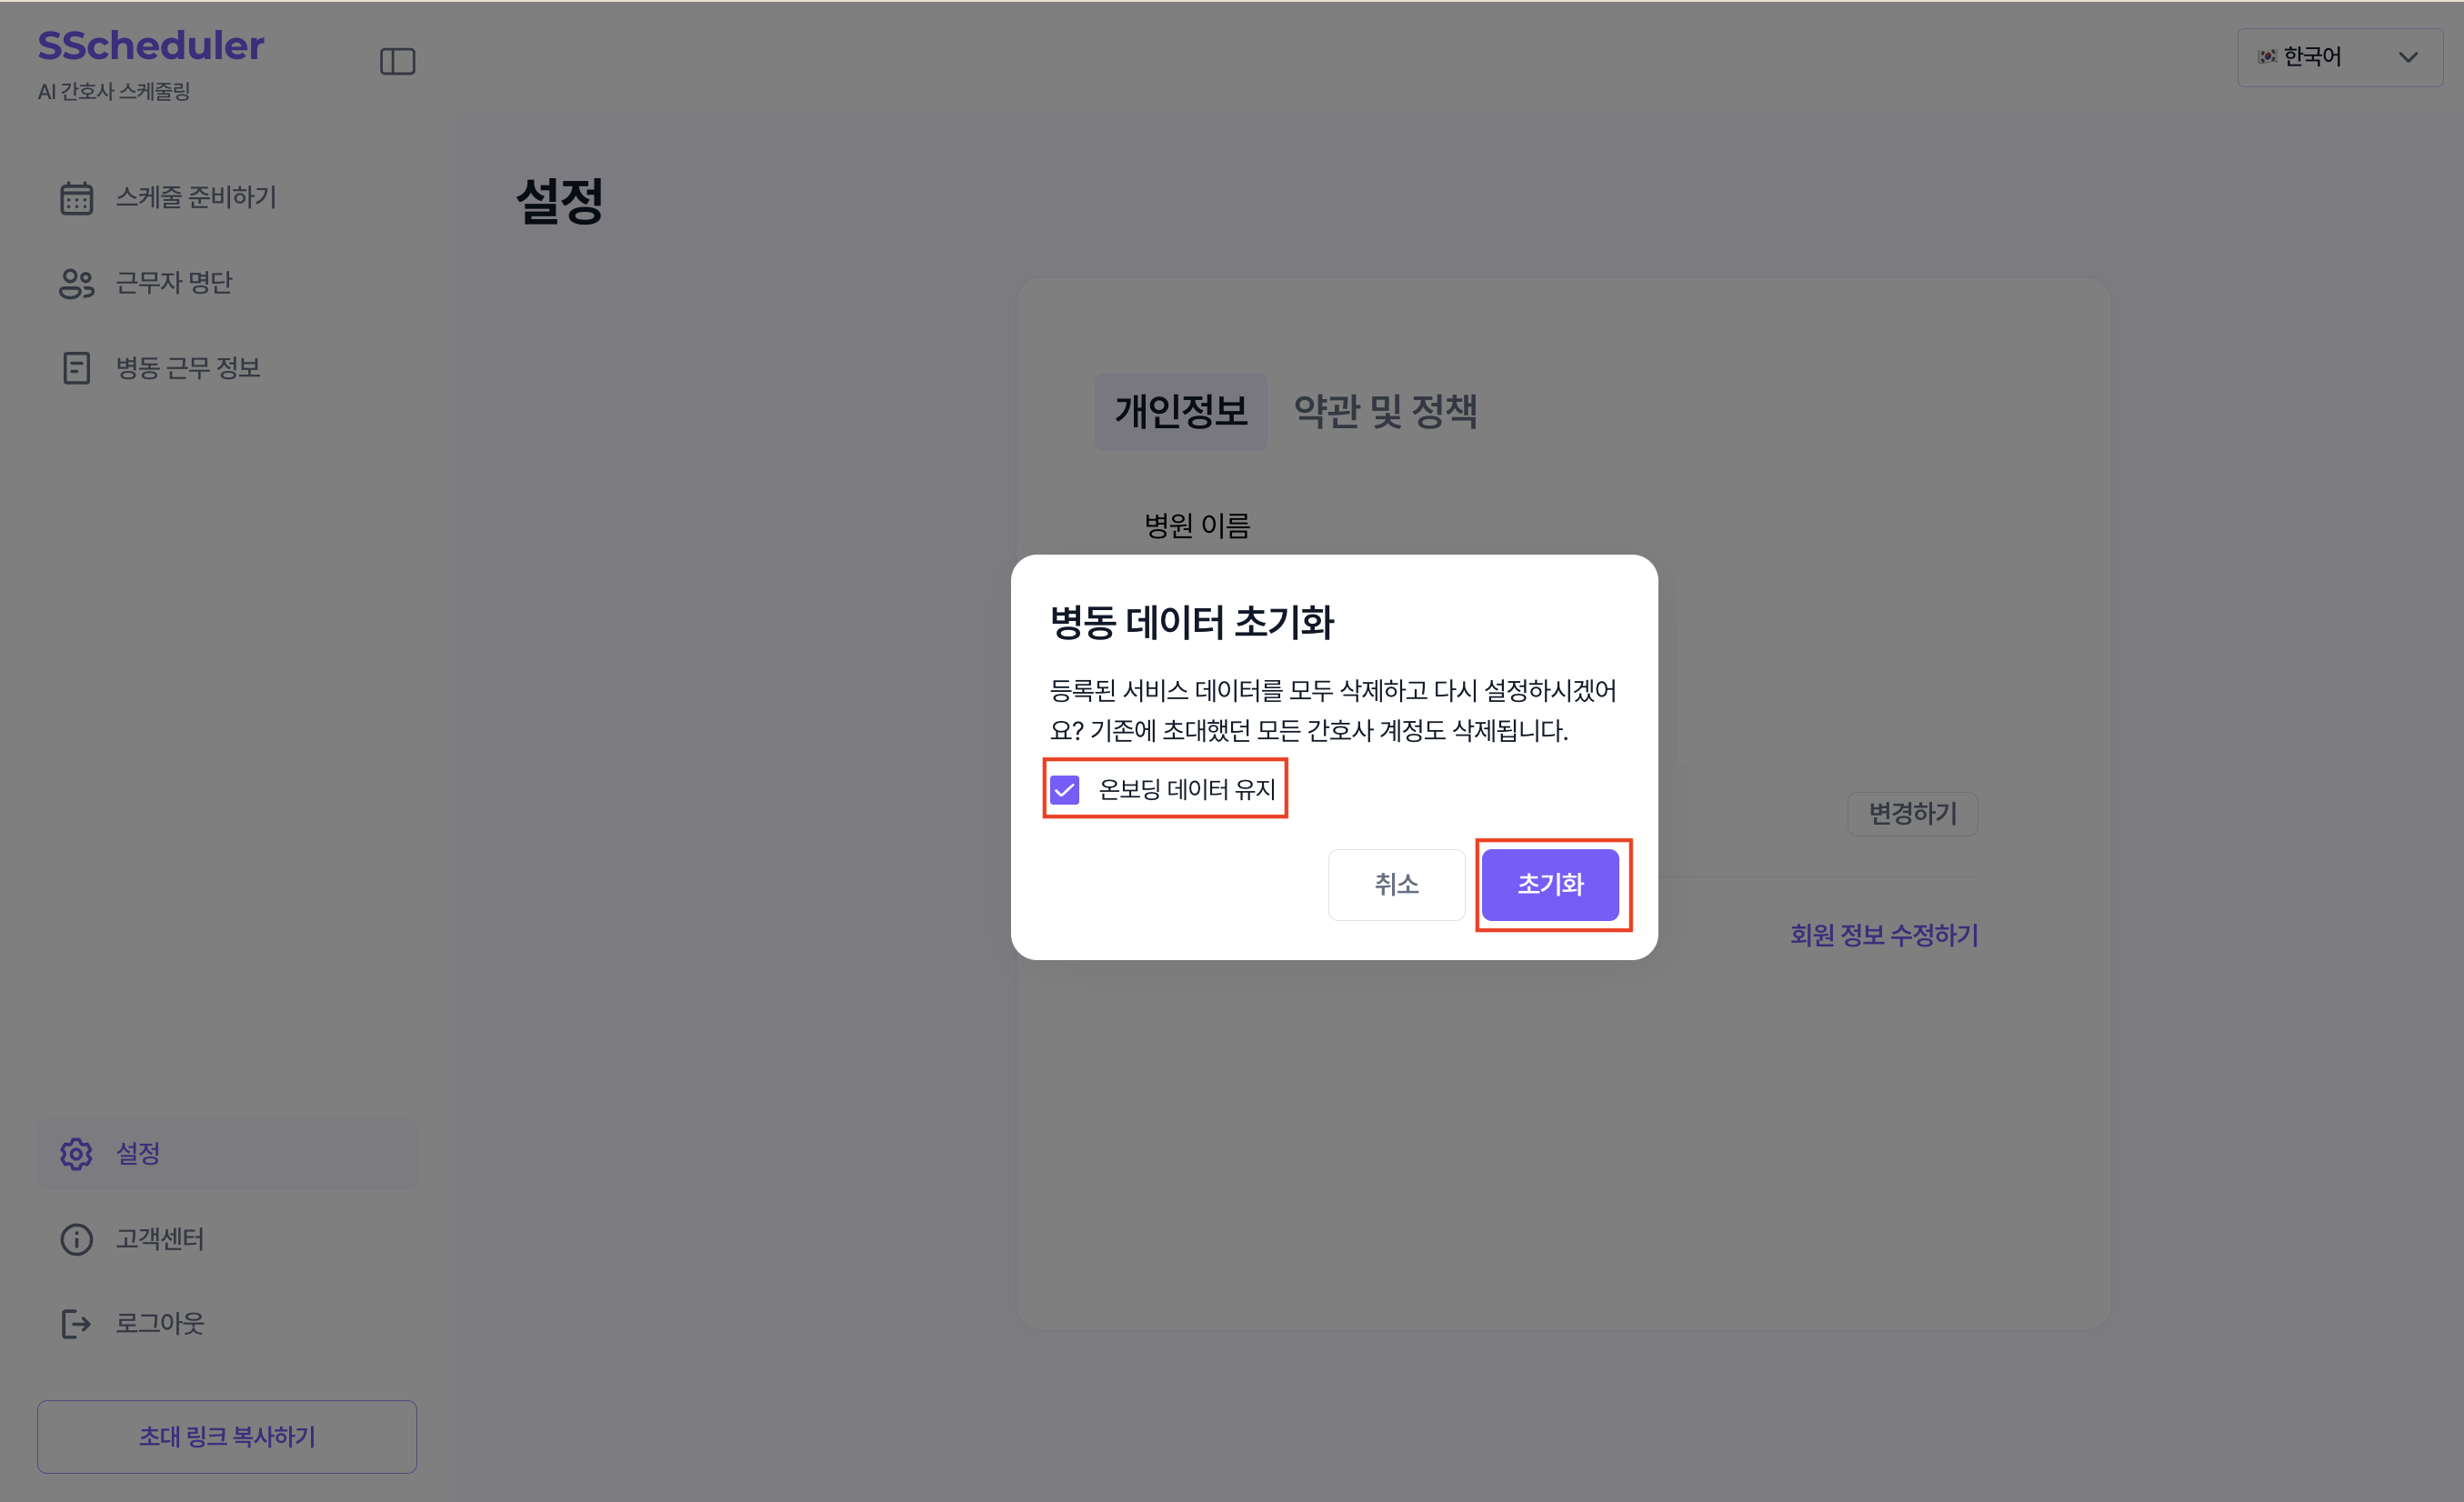
A reset cannot be undone. You will have to set everything up again from scratch, so proceed with caution.
Customer Center
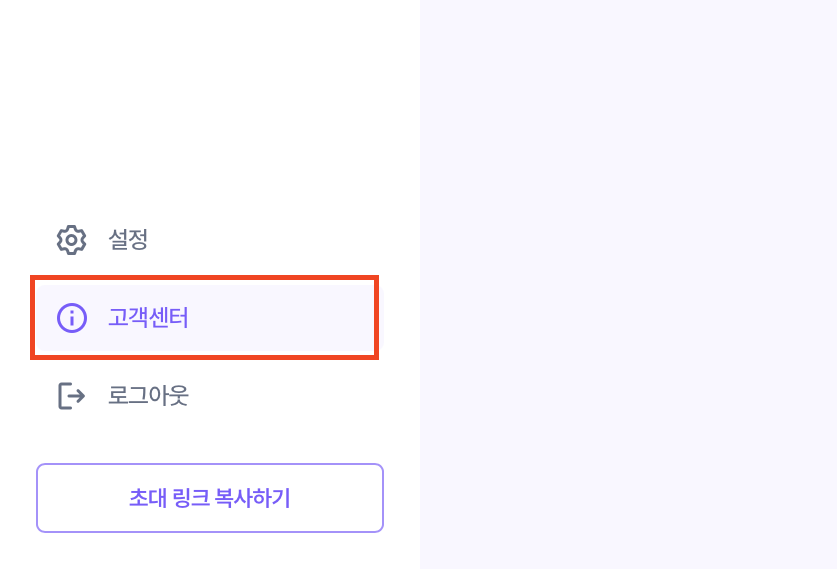
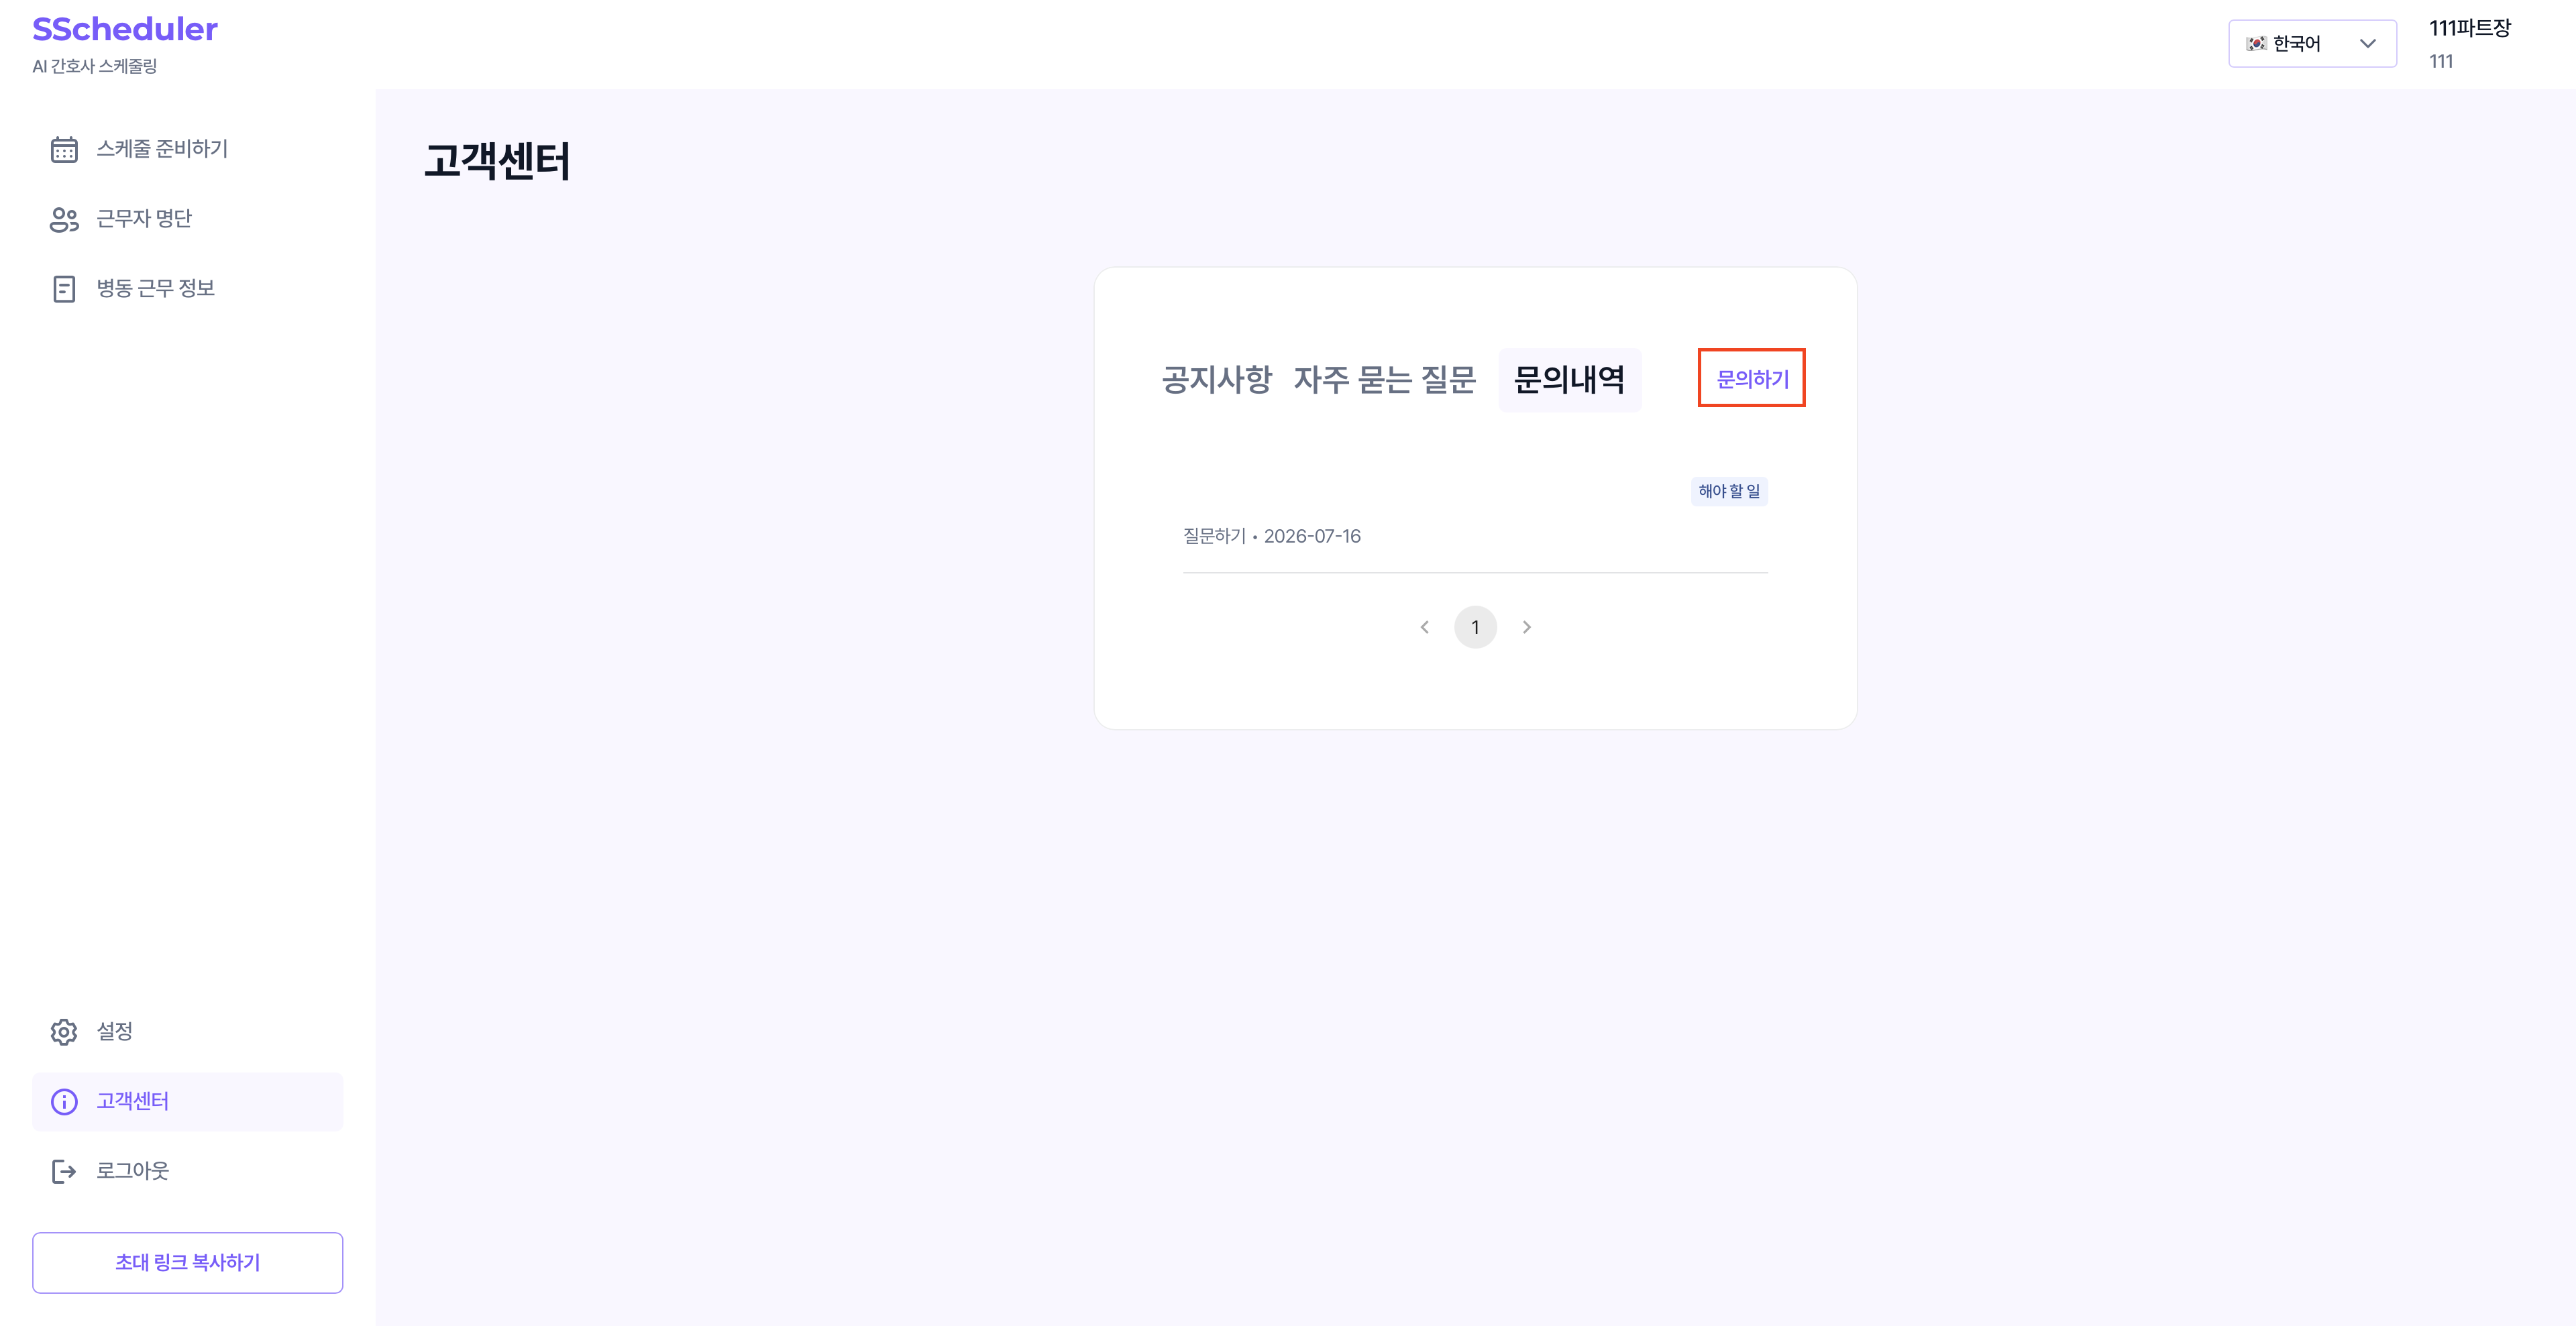
In Customer Center at the bottom left, you can view notices, frequently asked questions (FAQ), and your inquiry history. You can also submit inquiries directly with the Contact Us button.
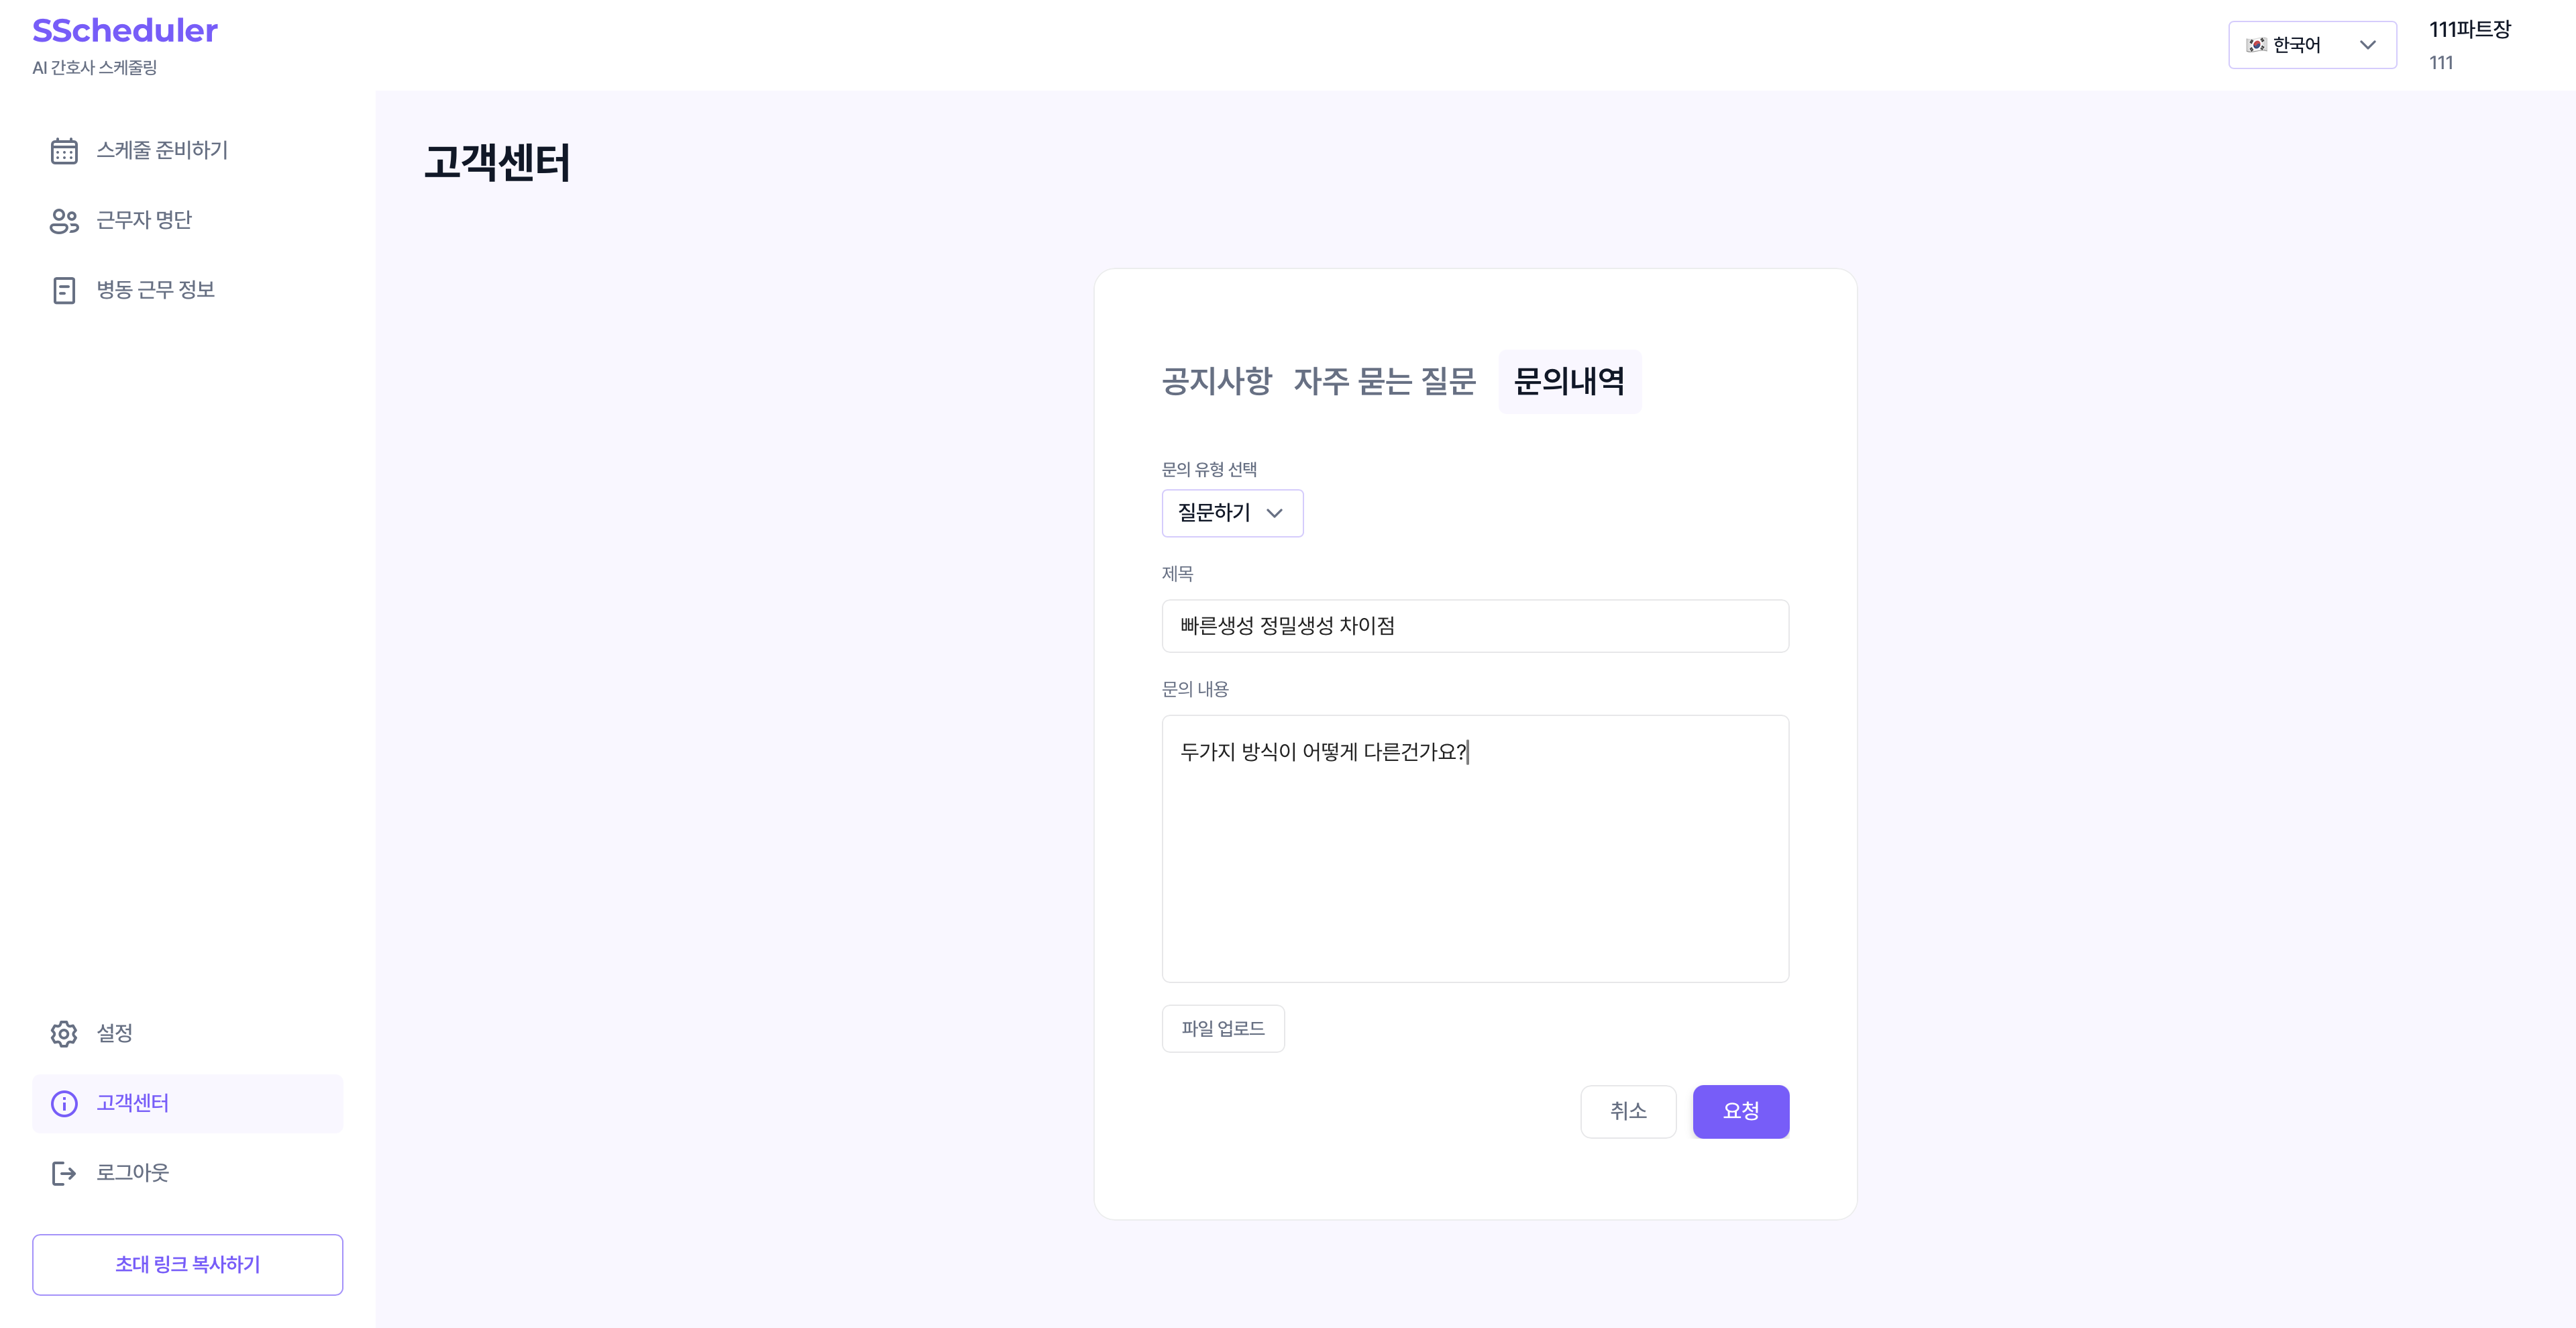
Please be sure to include the following in your inquiry
- Onboarding settings: How you configured work capability, shift types, staffing patterns, etc. (attach screenshots of the settings screens)
- The solution output: Where the problem occurred in the generated schedule (attach screenshots of the schedule table · staffing pattern table, etc.)
- A specific description: What action you took and what result you got
Invite Link
Use Copy Invite Link at the bottom left to invite other users.